Are you searching for a show-stopping dessert that’s as fun to make as it is to eat? Look no further! These adorable Bunny Ear Rice Krispie Treat Pops are the ultimate springtime confection, guaranteed to bring smiles to everyone’s faces. Combining the classic, chewy goodness of a homemade Rice Krispie treat with a festive Easter twist, this recipe is a perfect activity for the whole family. Moreover, these no-bake wonders are incredibly simple to prepare, making them an ideal choice for school parties, Easter brunch, or simply as a sweet surprise. Get ready to create a batch of the cutest, most delicious Bunny Ear Rice Krispie Treat Pops you’ve ever seen.
Why You’ll Adore These Bunny Ear Rice Krispie Treat Pops
There are countless reasons to fall in love with this charming recipe. First and foremost, its simplicity is a major advantage. You don’t need to be an expert baker to achieve fantastic results. Furthermore, the entire process is a wonderful way to get children involved in the kitchen, allowing them to help with mixing, shaping, and especially decorating.
Perfectly Easy and No-Bake
One of the best aspects of this recipe is that it requires absolutely no oven time. Consequently, it’s a great option for warmer spring days when you don’t want to heat up the house. The entire treat comes together on the stovetop and then simply needs time to set. As a result, you can whip up a batch of these Bunny Ear Rice Krispie Treat Pops with minimal effort and cleanup, leaving more time for festive fun.
A Fun, Kid-Friendly Activity
Making these treats is an experience in itself. From melting the marshmallows to dipping the pops in creamy white candy melts, every step is an opportunity for fun. Kids will especially love the decorating phase, where they can help attach the bunny ears and add little faces. For this reason, it’s a fantastic way to create lasting memories and a delicious dessert at the same time.
Completely Festive and Customizable
While designed to look like Easter bunnies, these treats offer plenty of room for creativity. For example, you can change the color of the candy melts to match a party theme or use different sprinkles for a unique touch. You could even add a dash of food coloring to the marshmallow mixture itself. Therefore, these Bunny Ear Rice Krispie Treat Pops can be adapted for any spring celebration.
Print
Bunny Ear Rice Krispie Treat Pops
Adorable Bunny Ear Rice Krispie Treat Pops are the ultimate springtime confection, combining the classic, chewy goodness of a homemade Rice Krispie treat with a festive Easter twist. A fun, no-bake recipe perfect for the whole family.
- Total Time: 60 minutes
- Yield: 12 pops 1x
Ingredients
6 cups of crispy rice cereal
1 (16-ounce) bag of mini marshmallows
4 tablespoons of salted butter
1 (12-ounce) bag of white candy melts
1/2 cup of pink candy melts
Lollipop sticks or sturdy paper straws
Optional: Black icing writer or mini chocolate chips for eyes
Instructions
1. Line a 9×13-inch pan with parchment paper.
2. Melt butter in a large pot over low heat, then stir in marshmallows until completely smooth and remove from heat.
3. Fold the crispy rice cereal into the marshmallow mixture until evenly coated.
4. Gently press the mixture into the prepared pan in an even layer without packing it down.
5. Create bunny ear shapes on parchment paper using melted white and pink candy melts, then let them set.
6. Once the treat base is firm, use a 3-inch round cookie cutter to cut out shapes and insert a lollipop stick into each one.
7. Melt the remaining white candy melts and dip each pop to coat it completely.
8. Before the coating sets, press two bunny ears into the top of each pop and place on parchment paper.
9. Use a black icing writer to add eyes and a nose, if desired.
Notes
For the best chewy texture, use fresh marshmallows and avoid pressing the cereal mixture too tightly into the pan. Store in an airtight container at room temperature for up to three days.
- Prep Time: 20 minutes
- Cook Time: 10 minutes
- Category: Dessert
- Method: No-Bake
- Cuisine: American
Nutrition
- Serving Size: 1 pop
- Calories: 285
- Sugar: 25g
- Sodium: 110mg
- Fat: 10g
- Saturated Fat: 6g
- Unsaturated Fat: 4g
- Trans Fat: 0g
- Carbohydrates: 46g
- Fiber: 1g
- Protein: 2g
- Cholesterol: 10mg
Essential Ingredients and Tools
Before you begin, it’s a good idea to gather all your ingredients and tools. This simple preparation step ensures the process goes smoothly from start to finish. Fortunately, you likely have many of these items in your pantry already.
Ingredients List
The foundation of these Bunny Ear Rice Krispie Treat Pops is the classic three-ingredient recipe, with a few additions for the adorable decorations.
- 6 cups of crispy rice cereal
- 1 (16-ounce) bag of mini marshmallows
- 4 tablespoons of salted butter
- 1 (12-ounce) bag of white candy melts
- 1/2 cup of pink candy melts
- Lollipop sticks or sturdy paper straws
- Optional: Black icing writer or mini chocolate chips for eyes
For the best results, always use fresh marshmallows, as they melt more smoothly and create a softer, chewier treat. Additionally, while these pops are a delightful indulgence, it’s always wise to enjoy them as part of a balanced diet, a concept well-explained by experts at the Mayo Clinic.
Necessary Tools
You won’t need any fancy equipment for this recipe. Just a few kitchen staples will do the trick.
- A large pot or Dutch oven
- A 9×13-inch baking pan
– A silicone spatula
– Parchment paper
– A 3-inch round or oval cookie cutter
– Two microwave-safe bowls for melting candy
– A piping bag or a small plastic bag for the pink details
Step-by-Step Instructions
Now for the fun part! Follow these simple steps to create your own batch of delightful Bunny Ear Rice Krispie Treat Pops. The process is straightforward and yields impressive results every time.
1. Prepare the Base
First, line your 9×13-inch baking pan with parchment paper, leaving some overhang on the sides to act as handles. Next, in a large pot, melt the butter over low heat. Once the butter is melted, add the entire bag of mini marshmallows. Continue to stir constantly with a silicone spatula until the marshmallows are completely melted and smooth. After that, remove the pot from the heat immediately to prevent the mixture from becoming tough.
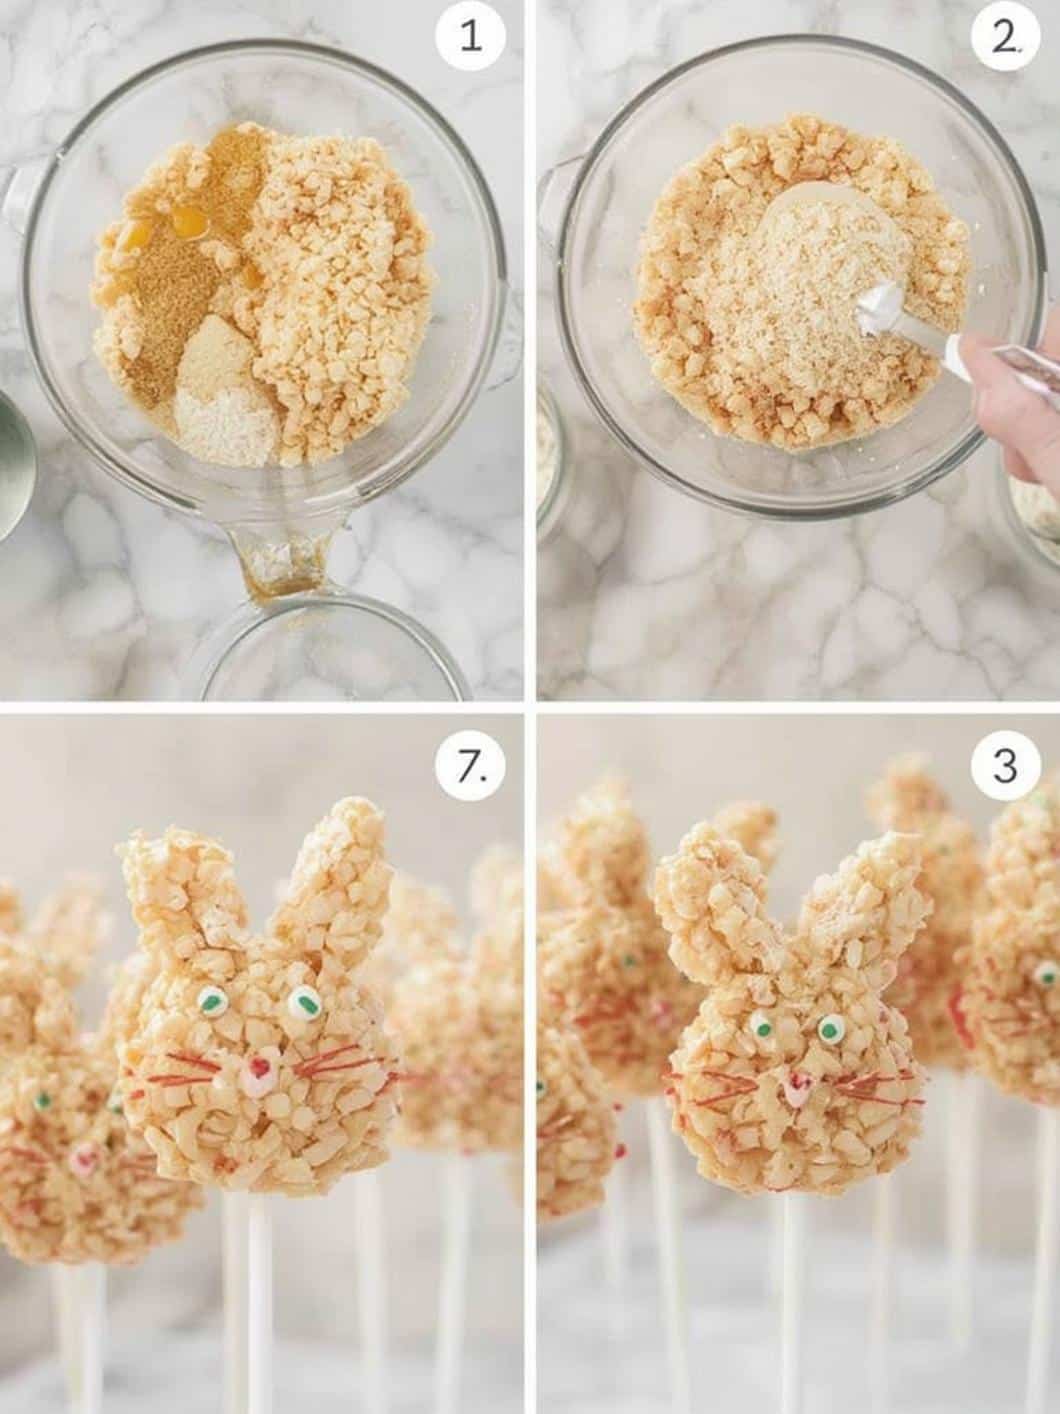
2. Mix and Press
Immediately pour the crispy rice cereal into the pot with the melted marshmallow mixture. Gently fold the cereal into the marshmallows until everything is evenly coated. Be careful not to crush the cereal. Then, transfer the mixture to your prepared baking pan. Using your spatula or another piece of parchment paper, gently press the mixture into an even layer. It is important not to pack it down too firmly, as this can result in hard treats.
3. Create the Bunny Ears and Pops
While the Rice Krispie treat base is setting, you can create the bunny ears. On a separate sheet of parchment paper, melt a portion of your white candy melts. Use a spoon or piping bag to create elongated ear shapes, about 2 inches long. Then, melt the pink candy melts and pipe a smaller pink line inside each white ear. Let these set completely, which can be expedited by placing them in the refrigerator for a few minutes. Subsequently, once the Rice Krispie treat slab has firmed up, use your round cookie cutter to cut out the shapes for the heads. Carefully insert a lollipop stick into the bottom of each circle, pushing it about halfway through.
4. Dip and Decorate
Next, melt the remaining white candy melts in a microwave-safe bowl according to the package directions. It is crucial to melt them in short intervals, stirring in between, to prevent overheating. For more information on safely handling food ingredients, you can refer to resources from Healthline. Dip each Rice Krispie pop into the melted white candy, ensuring it is fully coated. Tap off any excess and place it on a parchment-lined tray to set. Before the coating hardens completely, gently press two of your prepared bunny ears into the top of the pop. Finally, you can use a black icing writer to add eyes and a nose if desired.
Pro Tips for Perfect Pops
A few expert tips can elevate your Bunny Ear Rice Krispie Treat Pops from good to great. These small adjustments make a big difference in the final product.
Achieving the Perfect Chewy Texture
The secret to perfectly soft and chewy Rice Krispie treats is twofold. First, as mentioned, use fresh marshmallows. Stale marshmallows do not melt as well and can lead to a dense texture. Secondly, avoid over-mixing or pressing the cereal mixture too tightly into the pan. A gentle touch ensures your treats remain light and airy.
Working with Candy Melts
Candy melts can sometimes be tricky. If you find your melted candy is too thick for dipping, you can stir in a tiny amount of coconut oil or vegetable shortening (about 1/2 teaspoon at a time) until it reaches a smoother consistency. This will help you achieve a flawless, even coating on your Bunny Ear Rice Krispie Treat Pops.
Creative and Fun Variations
Don’t be afraid to get creative! You can tint the white candy melts with oil-based food coloring to create bunnies in a rainbow of pastel colors. Furthermore, adding colorful sprinkles to the pops before the coating sets is another easy way to add flair. If you enjoy making themed, no-bake treats, you might also love these Easter Egg Oreo Balls, which follow a similar fun and creative process.
Storing Your Bunny Ear Rice Krispie Treat Pops
Proper storage is key to keeping your creations fresh and delicious. Thankfully, these pops are easy to store. Once the candy coating is completely set, you can place your Bunny Ear Rice Krispie Treat Pops in a single layer in an airtight container. If you need to stack them, be sure to place a sheet of parchment paper between each layer to prevent them from sticking together. They will stay fresh at room temperature for up to three days. For other delightful treats that store well, consider making an Easter Swirl Pie for your celebration.
Conclusion

In conclusion, creating these Bunny Ear Rice Krispie Treat Pops is a wonderfully rewarding experience that results in an incredibly charming and tasty dessert. With just a few simple ingredients and straightforward steps, you can craft a treat that is perfect for any Easter or spring-themed gathering. This recipe proves that you don’t need complex techniques to produce something truly special. Ultimately, the joy of making and sharing these adorable bunny pops is a sweet treat in itself. So go ahead, gather your ingredients, and get ready to hop into some delicious fun with these delightful Bunny Ear Rice Krispie Treat Pops.
Frequently Asked Questions (FAQ)
Can I use store-bought Rice Krispie treats for this recipe?
Yes, you certainly can use store-bought treats to save time. However, they are often more compressed than homemade versions, which can make inserting the lollipop sticks a bit more challenging. For the best texture and easiest handling, we recommend making the base from scratch.
My candy melts are seizing up. What did I do wrong?
Seizing, or when candy melts become thick and grainy, is usually caused by contact with even a tiny drop of water or by overheating. Therefore, always ensure your bowls and utensils are completely dry. To prevent overheating, microwave the melts in short 30-second bursts, stirring well after each interval.
How far in advance can I make these Bunny Ear Rice Krispie Treat Pops?
These treats can be made up to two days in advance. Be sure to store them in an airtight container at room temperature to maintain their freshness and chewy texture. This makes them a great make-ahead option for busy party planning.