As Valentine’s Day approaches, the desire to create something sweet and special for loved ones often comes with the stress of complicated recipes. Fortunately, there is a perfect solution that is both incredibly delicious and stunningly simple to make. This no-bake **Valentine Day Oreo cookie bark** is the ultimate treat for anyone looking to share a little love without spending hours in the kitchen. In fact, it requires just a handful of ingredients and minimal effort, resulting in a beautiful, festive dessert. This recipe is consequently perfect for class parties, thoughtful gifts, or simply a festive snack to enjoy at home. In this guide, we will walk you through everything you need to know, from the essential ingredients to pro tips for customization.
Why You’ll Love This Easy Valentine Day Oreo Cookie Bark
There are countless reasons to fall in love with this simple yet elegant dessert. First and foremost, its simplicity is a major draw for both novice and experienced bakers alike. Moreover, its festive appearance makes it a standout treat for the holiday of love.
No-Bake and Beginner-Friendly
One of the most significant advantages of this recipe is that it requires absolutely no baking. As a result, you don’t need to worry about preheating an oven or monitoring baking times. The entire process involves melting, mixing, and chilling, which makes it an ideal project for kids to help with. Furthermore, the steps are so straightforward that anyone can achieve a beautiful and delicious result on their first try. This makes it a go-to recipe for last-minute dessert needs.
Customizable and Fun
While the basic recipe is fantastic on its own, this **Valentine Day Oreo cookie bark** serves as a perfect canvas for your creativity. For example, you can easily adapt it by using different types of chocolate, various Oreo flavors, or a wide array of festive toppings. In addition, you can add swirls of colored candy melts or incorporate other mix-ins like M&Ms or chopped nuts. This adaptability means you can create a unique batch every single time, tailored to your specific tastes.
Perfect for Gifting
Handmade gifts often carry the most meaning, and this Oreo bark is no exception. Once the bark is set and broken into pieces, it looks like a professional confection. Subsequently, you can package it in clear cellophane bags tied with a festive red or pink ribbon. It also fits perfectly into decorative tins or boxes. For this reason, it makes a wonderful, heartfelt gift for teachers, friends, family, and that special someone in your life.
Print
Valentine Day Oreo Cookie Bark: The 5 Ultimate Steps for the Easiest Sweet Treat
This Valentine Day Oreo Cookie Bark is a quick, no-bake dessert that combines white chocolate, crunchy Oreos, and festive sprinkles into a fun, shareable treat—perfect for gifts or parties.
- Total Time: 45 minutes (includes chilling)
- Yield: 1 large tray of bark (serves 12–16)
Ingredients
– 24 oz white chocolate chips or vanilla candy melts
– 1 package Oreo cookies (regular or festive pink filling)
– 1/4 cup Valentine’s sprinkles (hearts, nonpareils, jimmies)
– Optional: red or pink candy melts for drizzle
– Optional: freeze-dried strawberries or chopped nuts
Instructions
1. Line a baking sheet with parchment paper or a silicone mat.
2. Crush about 2/3 of the Oreos into large and small pieces. Set aside the rest.
3. Melt white chocolate or candy melts in a microwave-safe bowl in 30-second intervals, stirring well each time, until fully melted and smooth.
4. Fold the crushed Oreos into the melted chocolate.
5. Spread the mixture onto the prepared baking sheet into a 1/4-inch thick layer.
6. Break remaining Oreos by hand and press into the top of the bark.
7. Immediately sprinkle Valentine’s sprinkles across the top.
8. Melt colored candy melts if using, and drizzle over bark using a spoon or piping bag.
9. Chill in the fridge for 30–45 minutes or freeze for 15–20 minutes until fully set.
10. Once firm, break into pieces and enjoy or gift!
Notes
Store in an airtight container in the fridge for up to 2 weeks.
Use high-quality white chocolate or melts for best flavor and texture.
Avoid letting any water contact the chocolate—this can cause it to seize.
Try adding other toppings like crushed pretzels, M&Ms, mini marshmallows, or sea salt.
Customize for any holiday with themed colors and toppings.
- Prep Time: 10 minutes
- Cook Time: 0 minutes
- Category: Dessert
- Method: No-Bake
- Cuisine: American
- Diet: Vegetarian
Nutrition
- Serving Size: 1 piece (approx. 1/16 of tray)
- Calories: 210
- Sugar: 18g
- Sodium: 85mg
- Fat: 12g
- Saturated Fat: 6g
- Unsaturated Fat: 5g
- Trans Fat: 0g
- Carbohydrates: 24g
- Fiber: 0.5g
- Protein: 2g
- Cholesterol: 5mg
Essential Ingredients You’ll Need
The beauty of this recipe lies in its short and accessible ingredient list. You only need a few basic items to create this spectacular Valentine’s Day treat. In addition, most of these ingredients are readily available at any local grocery store, especially around the holidays.
- White Chocolate or Candy Melts: You will need about 24 ounces of high-quality white chocolate chips or vanilla-flavored candy melts. Candy melts are often easier to work with as they are designed to melt smoothly without tempering. However, a good quality white chocolate will provide a richer flavor.
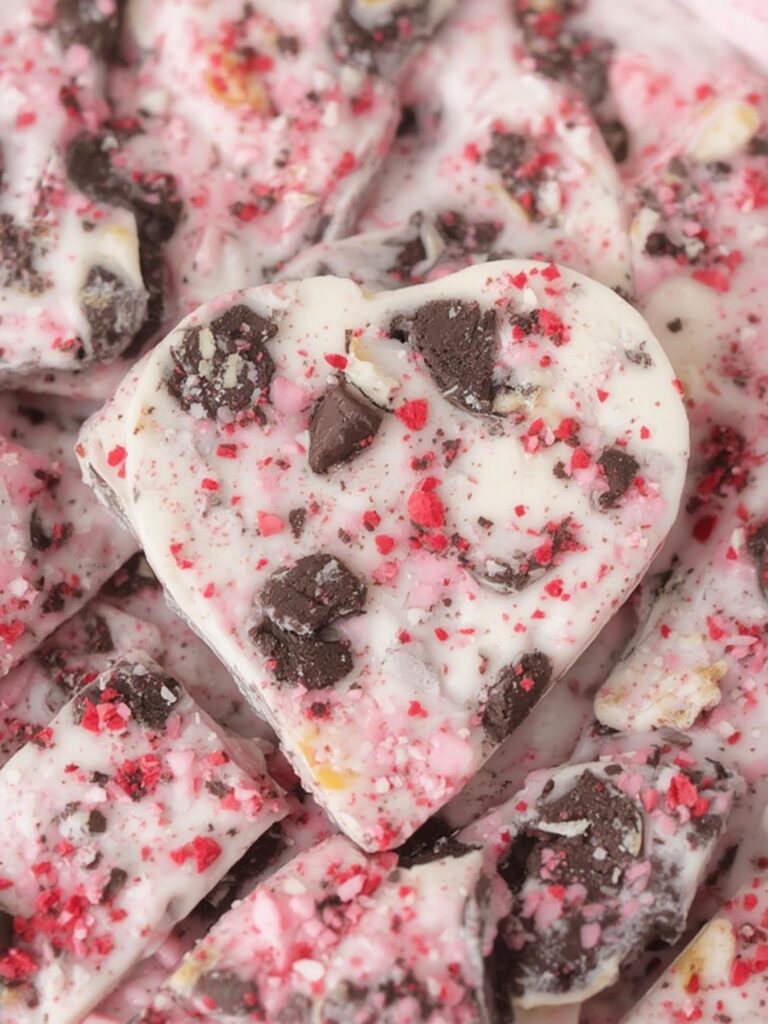
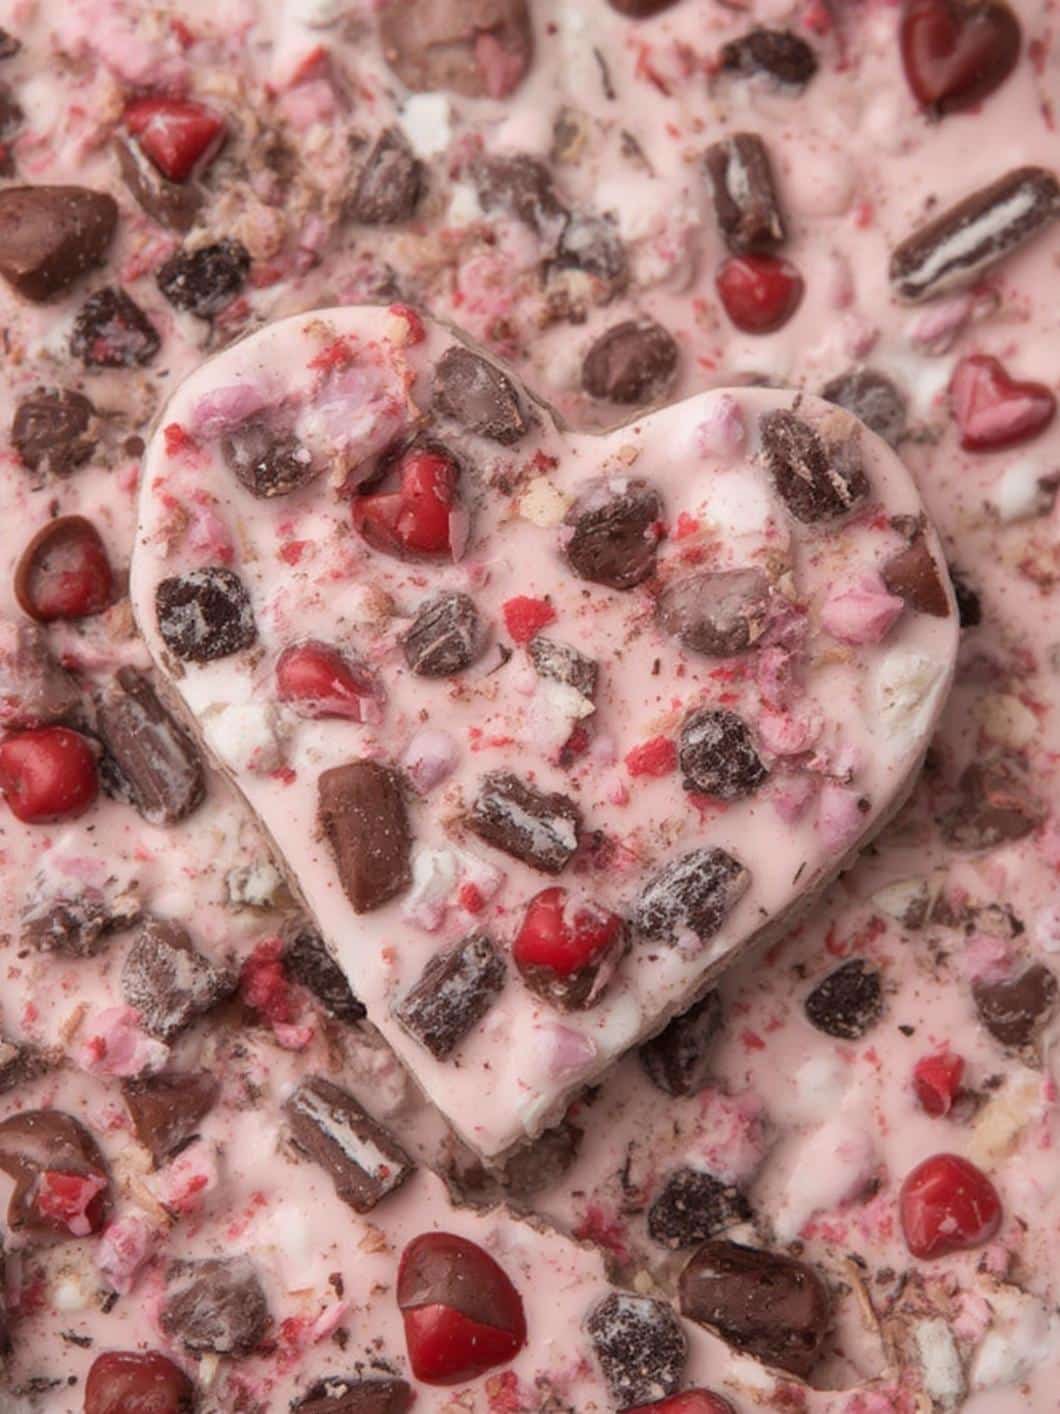
- Oreo Cookies: One standard package of Oreo cookies is perfect. You can use classic Oreos, Double Stuf for extra cream filling, or even the festive Valentine’s Day Oreos with pink or red filling.
- Valentine’s Sprinkles: This is where you can add a festive touch. Use a combination of red, pink, and white sprinkles, including hearts, nonpareils, or jimmies for visual appeal.
- Optional Add-Ins: To elevate your bark, consider having a small amount of pink or red candy melts on hand for drizzling. Freeze-dried strawberries or raspberries also add a lovely pop of color and a tangy flavor that complements the sweet chocolate. For those who enjoy creating a variety of no-bake treats, these decadent Red Velvet Truffles use similar simple techniques.
Step-by-Step Instructions
Creating your **Valentine Day Oreo cookie bark** is an incredibly simple process. By following these straightforward steps, you will have a beautiful and delicious treat ready in no time. Therefore, let’s get started on making this festive dessert.
Step 1: Prepare Your Workspace and Oreos
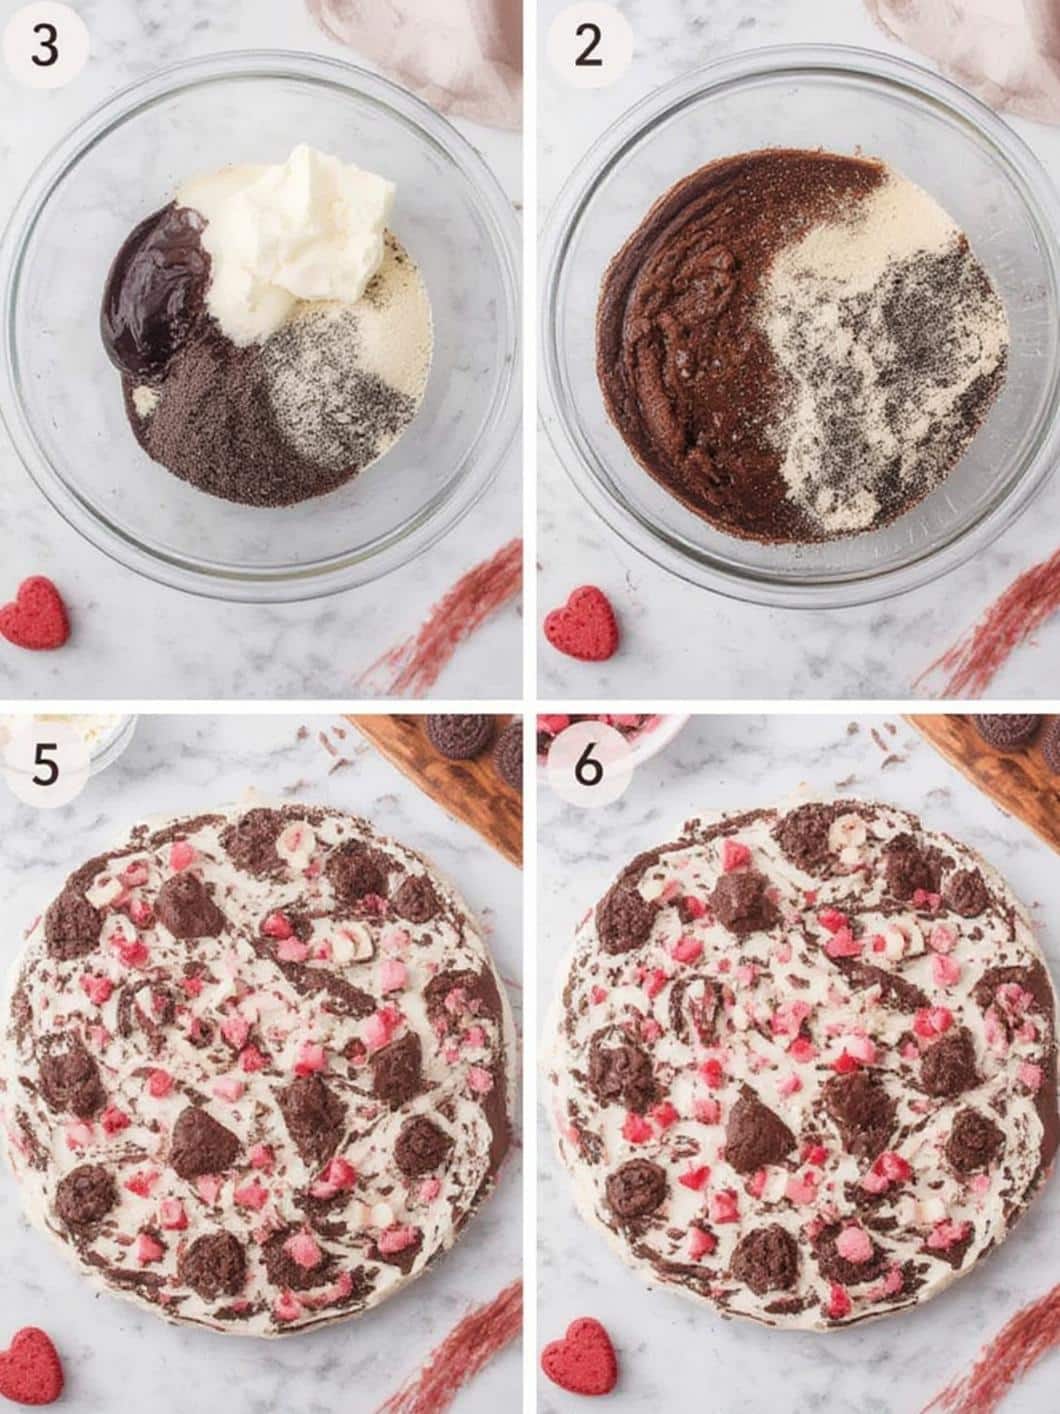
First, prepare a large baking sheet by lining it with parchment paper or a silicone baking mat. This step is crucial because it prevents the bark from sticking and ensures easy cleanup. Next, take about two-thirds of your Oreo cookies and place them in a large zip-top bag. Using a rolling pin or the bottom of a heavy glass, gently crush the cookies into a mix of large and small pieces. You want some texture, not fine crumbs. Set the remaining whole Oreos aside for now.
Step 2: Melt the Chocolate or Candy Melts
Now it’s time to melt your white chocolate or candy melts. The easiest method is using a microwave. Place the chips or melts in a microwave-safe bowl and heat in 30-second intervals, stirring well between each one. It is very important to stir thoroughly, as the melts will retain their shape even when they are melted. Continue this process until the mixture is smooth and completely melted. Alternatively, you can use a double boiler on the stovetop for a more gentle melting process.
Step 3: Combine and Spread the Mixture
Once your chocolate is perfectly smooth, pour in the crushed Oreo pieces you prepared earlier. Using a spatula, gently fold the cookie pieces into the melted chocolate until they are evenly distributed. Subsequently, pour the entire mixture onto your prepared baking sheet. Use the spatula to spread it out into an even layer, about 1/4 inch thick. Don’t worry about making the edges perfect; the rustic shape is part of the charm of cookie bark.
Step 4: Decorate Your Bark
This is the most creative part. Immediately after spreading the chocolate, take the remaining whole Oreo cookies and break them into larger pieces with your hands. Press these pieces gently into the top of the soft bark. Following that, generously scatter your Valentine’s sprinkles over the entire surface. If you are using colored candy melts for a drizzle, melt them now and use a spoon or piping bag to create festive lines across the top of the bark. This final touch adds a professional and colorful flair.
Step 5: Chill Until Firm
Finally, place the decorated baking sheet into the refrigerator to set. This process usually takes about 30 to 45 minutes. If you are in a hurry, you can place it in the freezer for about 15 to 20 minutes. The bark is ready when it is completely firm to the touch. Be careful not to leave it in the freezer for too long, as this can cause the chocolate to become brittle or sweat when it returns to room temperature.
Pro Tips for the Perfect Valentine’s Bark
While this recipe is straightforward, a few expert tips can help you perfect your **Valentine Day Oreo cookie bark**. These simple suggestions will ensure your final product is not only delicious but also visually stunning. Consequently, you can achieve confectionary-level results with minimal extra effort.
Choosing and Melting Chocolate Correctly
The type of chocolate you use can significantly impact the final result. For instance, vanilla candy melts are formulated for easy melting and a firm set, making them a foolproof option. However, if you prefer the richer taste of real white chocolate, choose a high-quality brand. When melting real chocolate, be extremely careful not to overheat it or allow any water to come into contact with it, as this can cause it to “seize” and become grainy. According to Healthline, chocolate quality can vary, so choosing one with a higher cocoa butter content often yields a smoother texture.
Creative Variations and Toppings
Don’t be afraid to experiment with different flavors and textures. For example, you could use Red Velvet Oreos for an even more festive color scheme. For a sweet and salty combination, try adding crushed pretzels or a sprinkle of flaky sea salt on top. Other fun additions include Valentine’s M&Ms, chopped nuts, or even mini marshmallows. The possibilities are truly endless. If you enjoy baking festive treats, you might also love these Valentine Day Cheesecake Brownies, which also offer room for creativity.
Storage and Gifting Ideas
Proper storage is key to keeping your bark fresh. Store the finished **Valentine Day Oreo cookie bark** in an airtight container in the refrigerator for up to two weeks. Keeping it chilled helps maintain its firm texture. When you are ready to gift it, break the bark into irregular-sized pieces. For an attractive presentation, place the pieces in a clear treat bag and tie it with a red, pink, or white ribbon. You can also layer the pieces in a decorative tin with parchment paper between each layer to prevent them from sticking together.
Common Questions and Troubleshooting
Even with a simple recipe, questions can arise. Here are answers to some common issues you might encounter while making your Oreo bark. Addressing these potential problems ahead of time can help ensure a smooth and successful experience.
Why did my chocolate seize up?
Chocolate seizes, or becomes thick and clumpy, for two main reasons: overheating or contact with water. Therefore, always melt your chocolate slowly and at a low temperature. When using the microwave, stick to short intervals and stir frequently. Additionally, ensure that all your bowls and utensils are completely dry, as even a tiny drop of water can ruin the texture. If your chocolate does seize, you can sometimes save it by stirring in a teaspoon of vegetable oil or shortening, but prevention is always the best approach.
How can I make this treat with a different theme?
This recipe is incredibly versatile and can be adapted for any holiday or occasion. For example, for Halloween, you could use orange and black sprinkles with Halloween-themed Oreos. For Christmas, use red and green sprinkles and perhaps Peppermint Oreos. The base of chocolate and cookies works for virtually any theme, making it a year-round favorite. You can find inspiration from other festive recipes, such as these Valentine Heart Shaped Cinnamon Rolls.
Is it okay to leave the bark at room temperature?
While the bark will hold its shape for a short time at room temperature, it is best stored in the refrigerator. This is especially true if you live in a warmer climate or if your home is kept warm. The chilled temperature ensures the bark stays crisp and doesn’t become soft or sticky. As with all sweet treats, enjoying them in moderation is a good practice for maintaining a balanced diet, a concept supported by health authorities like the Mayo Clinic.
Conclusion
In summary, this **Valentine Day Oreo cookie bark** is the perfect combination of simplicity, beauty, and deliciousness. With just a few ingredients and no oven required, you can whip up a batch of this festive treat in under an hour. Furthermore, its customizable nature allows you to add your personal touch, making it a thoughtful handmade gift for anyone on your list. This recipe proves that you don’t need complex techniques to create something truly special. So, embrace the fun and share the love this Valentine’s Day with a batch of delightful Oreo bark.
Frequently Asked Questions
How long does Oreo bark last?
When stored properly in an airtight container in the refrigerator, your Valentine Day Oreo cookie bark will stay fresh and delicious for up to two weeks. This makes it an excellent make-ahead treat for parties or gifts.
Can I make this Valentine Day Oreo cookie bark ahead of time?
Absolutely. In fact, this is an ideal recipe to make ahead of time. You can prepare it several days before you plan to serve or gift it. Just be sure to keep it well-sealed and refrigerated until you are ready to enjoy it.
What is the best way to melt candy melts without a microwave?
If you don’t have a microwave, a double boiler is the best alternative. If you don’t own one, you can easily create a makeshift version by placing a heat-safe bowl over a saucepan of simmering water. Ensure the bottom of the bowl does not touch the water, and stir the candy melts continuously until they are smooth.