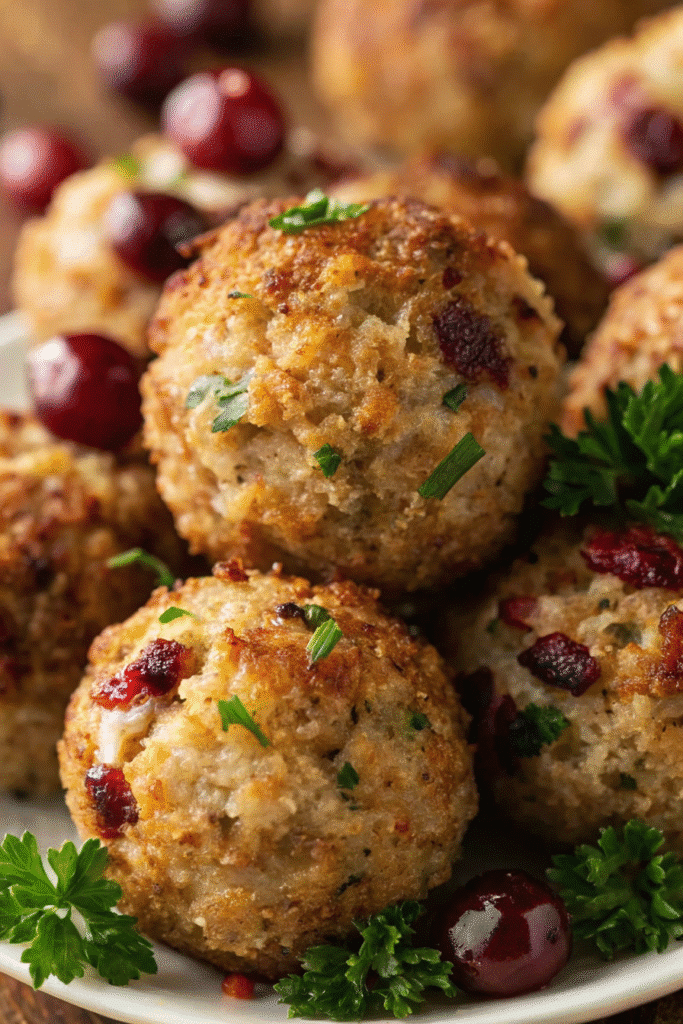
Let’s talk about Thanksgiving stuffing balls. For many, it’s the undisputed champion of the holiday table. While we love the soft, savory center, the real prize is always the crispy, golden-brown edges. Unfortunately, in a traditional casserole dish, those coveted crunchy bits are in short supply. But what if you could have that perfect crispy edge in every single bite? Well, that’s where these incredible Thanksgiving Stuffing Balls come in. This recipe transforms the classic side dish into perfectly portioned, incredibly delicious bites that are crispy on the outside and wonderfully moist and tender on the inside. In short, they are a game-changer for your holiday menu.
Moreover, these Thanksgiving stuffing balls are not only delicious but also incredibly practical. They are easy to serve, simple to make ahead of time, and guaranteed to be a hit with both kids and adults. Making dishes ahead is a great way to reduce stress and ensure food is handled safely, a key component of any holiday meal according to the FDA. Therefore, if you’re looking to elevate your side dish game this year, you’ve come to the right place. Get ready to discover your new favorite way to enjoy stuffing!
Why You’ll Absolutely Love This Thanksgiving Stuffing Balls Recipe
Switching from a classic casserole to individual Thanksgiving stuffing balls might seem like a small change, but the benefits are huge. In fact, once you try them, you may never go back to the old way. Here are several reasons why this recipe will become a permanent fixture on your holiday menu.
Perfectly Portioned for Easy Serving
One of the biggest challenges on Thanksgiving is serving a crowd from large, unwieldy casserole dishes. These Thanksgiving Stuffing Balls, however, solve that problem beautifully. Each ball is a perfect single serving, which means no more messy scooping or uneven portions. Consequently, guests can easily grab one or two, making the buffet line move much more smoothly. This also makes them fantastic for leftovers, as they are easy to pack and reheat.
Maximum Crispiness in Every Bite
As we mentioned, the best part of stuffing is the crispy top layer. With this recipe, you’re essentially creating a side dish that is all “edge” pieces. Because they are baked as individual balls, the hot air circulates around each one, creating a golden, crunchy exterior all the way around. Meanwhile, the inside stays perfectly moist and flavorful. It truly is the best of both worlds.
A Make-Ahead Lifesaver
Thanksgiving Day can be hectic in the kitchen. Therefore, any dish that can be prepared in advance is a true lifesaver. You can assemble these Thanksgiving stuffing balls up to two days ahead of time and store them in the refrigerator. Then, on Thanksgiving, you simply pop them in the oven to bake. This frees up valuable time and oven space, reducing your stress on the big day.
Incredibly Versatile and Customizable
This recipe provides a fantastic base, but it’s also incredibly easy to customize to your family’s tastes. For example, you can add different herbs, nuts, or dried fruits to create a unique flavor profile. Whether you prefer a classic sage and sausage combination or something a little sweeter with cranberries and pecans, these Thanksgiving stuffing balls are the perfect canvas for your culinary creativity.
Print
Thanksgiving Stuffing Balls: The Ultimate Crispy, Crave-Worthy Holiday Side
These Thanksgiving Stuffing Balls are crispy on the outside, moist and flavorful on the inside, and the perfect individually portioned holiday side dish. Easy to make ahead, customize, and reheat—your new favorite way to serve stuffing.
- Total Time: 1 hour
- Yield: 18 stuffing balls 1x
Ingredients
1 pound bulk pork sausage
1 large yellow onion, finely chopped
2 celery stalks, finely chopped
2 cloves garlic, minced
1 cup (2 sticks) unsalted butter, melted
1 loaf (about 12–14 ounces) sturdy white or sourdough bread, cut into 1/2-inch cubes and left out to dry overnight
1 tablespoon fresh sage, chopped
1 tablespoon fresh thyme, chopped
1 teaspoon salt
1/2 teaspoon black pepper
2 large eggs, lightly beaten
3 to 4 cups low-sodium chicken or turkey broth
Instructions
1. Preheat your oven to 375°F (190°C) and grease a large baking sheet or muffin tin.
2. In a skillet over medium-high heat, cook the pork sausage until browned and cooked through. Remove with a slotted spoon, reserving drippings.
3. Add chopped onion and celery to the skillet with drippings and cook until soft, about 5–7 minutes. Add garlic and cook 1 more minute.
4. In a large bowl, combine dried bread cubes, cooked sausage, and vegetable mixture. Toss gently.
5. Add chopped sage, thyme, salt, and pepper to the bowl and mix to evenly distribute.
6. In a separate bowl, whisk the eggs and melted butter together.
7. Pour the egg and butter mixture over the bread mixture and toss gently.
8. Gradually add 3 cups of broth to moisten the mixture, adding more if needed. Let sit 10 minutes to absorb.
9. Form into 2–3 inch balls and place on baking sheet or in muffin tin.
10. Bake for 25–30 minutes or until golden brown and crispy on the outside. Serve warm.
Notes
Use sourdough or sturdy white bread and let it dry overnight for the best texture.
Avoid overmixing the stuffing mixture to keep the stuffing balls light and fluffy.
Brush the tops with melted butter before baking for extra golden crispiness.
Make ahead: shape balls up to 2 days in advance and refrigerate. Bake when ready to serve.
Reheat leftovers in the oven or air fryer to regain crispy texture.
- Prep Time: 30 minutes
- Cook Time: 30 minutes
- Category: Side Dish
- Method: Baking
- Cuisine: American
Nutrition
- Serving Size: 1 stuffing ball
- Calories: 210
- Sugar: 2g
- Sodium: 390mg
- Fat: 15g
- Saturated Fat: 7g
- Unsaturated Fat: 7g
- Trans Fat: 0g
- Carbohydrates: 12g
- Fiber: 1g
- Protein: 7g
- Cholesterol: 55mg
Ingredients: Thanksgiving stuffing balls
To create the most flavorful and perfectly textured Thanksgiving Stuffing Balls, you’ll need a handful of simple, classic ingredients. Using high-quality components will make a noticeable difference in the final product. Here is what you will need:
- 1 pound bulk pork sausage
- 1 large yellow onion, finely chopped
- 2 celery stalks, finely chopped
- 2 cloves garlic, minced
- 1 cup (2 sticks) unsalted butter, melted
- 1 loaf (about 12-14 ounces) of sturdy white or sourdough bread, cut into 1/2-inch cubes and left out to dry overnight
- 1 tablespoon fresh sage, chopped
- 1 tablespoon fresh thyme, chopped
- 1 teaspoon salt
- 1/2 teaspoon black pepper
- 2 large eggs, lightly beaten
- 3 to 4 cups low-sodium chicken or turkey broth
Step-by-Step Instructions: Thanksgiving stuffing balls
Following these steps will ensure your Thanksgiving stuffing balls come out perfectly golden and delicious. The process is straightforward, even for beginner cooks. First, you’ll cook your aromatics, then combine all the ingredients, form the balls, and finally, bake them to perfection.
- Preheat your oven to 375°F (190°C). Then, lightly grease a large baking sheet or a standard 12-cup muffin tin. Using a muffin tin can help the balls hold their shape even better.
- In a large skillet over medium-high heat, cook the pork sausage until it is browned and crumbled. Be sure to break it up with a spoon as it cooks. For food safety, the USDA recommends cooking ground pork to 160°F. After that, remove the sausage with a slotted spoon and set it aside, leaving the drippings in the skillet.
- Add the chopped onion and celery to the same skillet. Cook, stirring occasionally, until the vegetables are soft and translucent, which should take about 5-7 minutes. Add the minced garlic and cook for one more minute until fragrant.
- In a very large bowl, combine the dried bread cubes, the cooked sausage, and the cooked vegetable mixture. Toss everything together gently.
- Add the chopped fresh sage, thyme, salt, and pepper to the bread mixture. Mix well to distribute the seasonings evenly throughout.
- In a separate, smaller bowl, whisk together the lightly beaten eggs and the melted butter.
- Pour the egg and butter mixture over the bread mixture. After that, toss gently until the bread is evenly coated.
- Slowly pour in 3 cups of the chicken or turkey broth, mixing as you go. You want the mixture to be very moist but not soupy. If it seems too dry, you can add up to one more cup of broth. Let the mixture sit for about 10 minutes to allow the bread to absorb the liquid.
- Using your hands or an ice cream scoop, form the stuffing mixture into 2 to 3-inch balls. Place them on the prepared baking sheet or into the cups of the muffin tin.
- Bake for 25-30 minutes, or until the Thanksgiving Stuffing Balls are golden brown and crispy on the outside. Serve warm and enjoy!
| Step | Action | Tips |
|---|---|---|
| 1 | Preheat & Prep | Using a muffin tin is great for uniform shapes and easy cleanup. |
| 2 | Cook Sausage | Leave the drippings in the pan for extra flavor when cooking the vegetables. |
| 3 | Sauté Vegetables | Cook until very soft to ensure a smooth texture inside the stuffing balls. |
| 4 | Combine Dry Ingredients | Use a very large bowl to make mixing easy and less messy. |
| 5 | Add Seasonings | Fresh herbs provide the best flavor, but you can use dried if needed. |
| 6 | Prepare Wet Ingredients | Whisking the eggs and butter together helps distribute them more evenly. |
| 7 | Mix Everything | Be gentle when tossing to avoid turning the bread into mush. |
| 8 | Add Broth & Rest | The resting period is crucial for the bread to properly absorb the liquid. |
| 9 | Form the Balls | An ice cream scoop ensures all your stuffing balls are the same size. |
| 10 | Bake | Bake until they are deeply golden brown for the best crispy texture. |
Tips and Tricks for the Best Results
To ensure your Thanksgiving stuffing balls are the star of the show, here are a few extra tips and tricks. These small details can make a big difference in the final taste and texture of your dish.
Choosing the Right Bread
The type of bread you use is very important. For instance, a sturdy, dense bread like sourdough, challah, or a good quality white bread works best. Avoid soft, pre-sliced sandwich bread, as it can become mushy. For the best texture, cut the bread into cubes and let them sit out on a baking sheet overnight to become stale. This helps them absorb the broth without falling apart.
Don’t Overmix the Mixture
When you combine the wet and dry ingredients, be careful not to overmix. You should toss everything together gently until just combined. Overmixing can compact the bread and result in dense, heavy Thanksgiving stuffing balls instead of light and tender ones. Therefore, a gentle hand is key.
Getting That Perfect Golden-Brown Crust
For an extra crispy and golden exterior, you can brush the tops of the Thanksgiving stuffing balls with a little extra melted butter before baking. This simple step adds more flavor and helps them achieve that beautiful, deep golden-brown color that everyone loves.
Storage and Reheating Instructions
These Thanksgiving Stuffing Balls are fantastic for leftovers. To store them, let them cool completely and then place them in an airtight container in the refrigerator for up to 4 days. To reheat, place them on a baking sheet and bake in a 350°F (175°C) oven for about 10-15 minutes, or until warmed through and crispy again. You can also use an air fryer for a few minutes for excellent results.
Conclusion About Thanksgiving stuffing balls
Ultimately, Thanksgiving is all about creating memorable dishes that bring everyone together. This recipe for Thanksgiving Stuffing Balls does just that. It takes a beloved classic and makes it even better by ensuring every single bite is packed with flavor and that perfect crispy texture. They are convenient, easy to make, and endlessly customizable. In addition, their make-ahead potential makes them a smart choice for any busy holiday host. So this year, give your traditional stuffing a fun and delicious twist. We are confident that these delightful Thanksgiving stuffing balls will earn a permanent spot on your Thanksgiving table for years to come.
Frequently Asked Questions About Thanksgiving Stuffing Balls
Can I make these Thanksgiving stuffing balls ahead of time?
Absolutely! This is one of the best features of this recipe. You can prepare the mixture and form the balls up to two days in advance. Simply cover them tightly and store them in the refrigerator. When you’re ready, just bake them according to the recipe instructions, possibly adding a few extra minutes to the baking time since they will be cold.
Can I use a store-bought stuffing mix?
Yes, you can certainly use a bagged stuffing mix as a shortcut. Prepare the mix according to the package directions, but you may need to reduce the amount of liquid slightly to ensure the mixture is firm enough to hold its shape. Then, add your cooked sausage and vegetables, form the balls, and bake as directed.
How do I prevent my stuffing balls from falling apart?
The key to holding the balls together is the right moisture level and the binding power of the eggs. Make sure your bread is stale, as it will hold its structure better. Also, ensure the mixture is moist enough but not wet. If it feels too crumbly, add a little more broth, one tablespoon at a time. Finally, pack the balls firmly when you form them.
Can I make these vegetarian?
Of course. To make a vegetarian version, simply omit the pork sausage and use vegetable broth instead of chicken or turkey broth. To replace the flavor and texture of the sausage, you could add sautéed mushrooms, chopped nuts like pecans or walnuts, or even a plant-based sausage substitute. It will be just as delicious.