Welcome to a dessert experience that perfectly captures the essence of a classic summer treat in one delightful, bite-sized package. If you adore the sweet, nostalgic flavor of strawberry shortcake, then you are absolutely going to fall in love with these easy, no-bake Strawberry Shortcake Truffles. In fact, they are the perfect confection for any occasion, from birthday parties and baby showers to a simple sweet indulgence after dinner. Moreover, this recipe combines the creamy, fruity goodness of the original dessert with a satisfyingly crunchy coating, creating a texture and flavor explosion that is simply irresistible. Consequently, you get all the beloved taste without ever needing to turn on your oven. So, let’s dive into how you can create these beautiful and delicious truffles right in your own kitchen.
Why You’ll Adore These Strawberry Shortcake Truffles
There are countless reasons to make these incredible little treats. First and foremost, they are incredibly simple to prepare. Unlike complex pastries that require baking and cooling, these truffles come together with just a few ingredients and a food processor. In addition, they are a fantastic make-ahead dessert. You can prepare them a day or two in advance, which makes them ideal for party planning and reducing last-minute stress. The flavor profile is another major highlight; imagine a creamy, strawberry-infused center that tastes just like the filling of a strawberry shortcake, all enrobed in a sweet white chocolate shell and rolled in a delightful crunchy topping. Ultimately, these strawberry shortcake truffles deliver a sophisticated look and taste with minimal effort, making you look like a pastry chef.
Print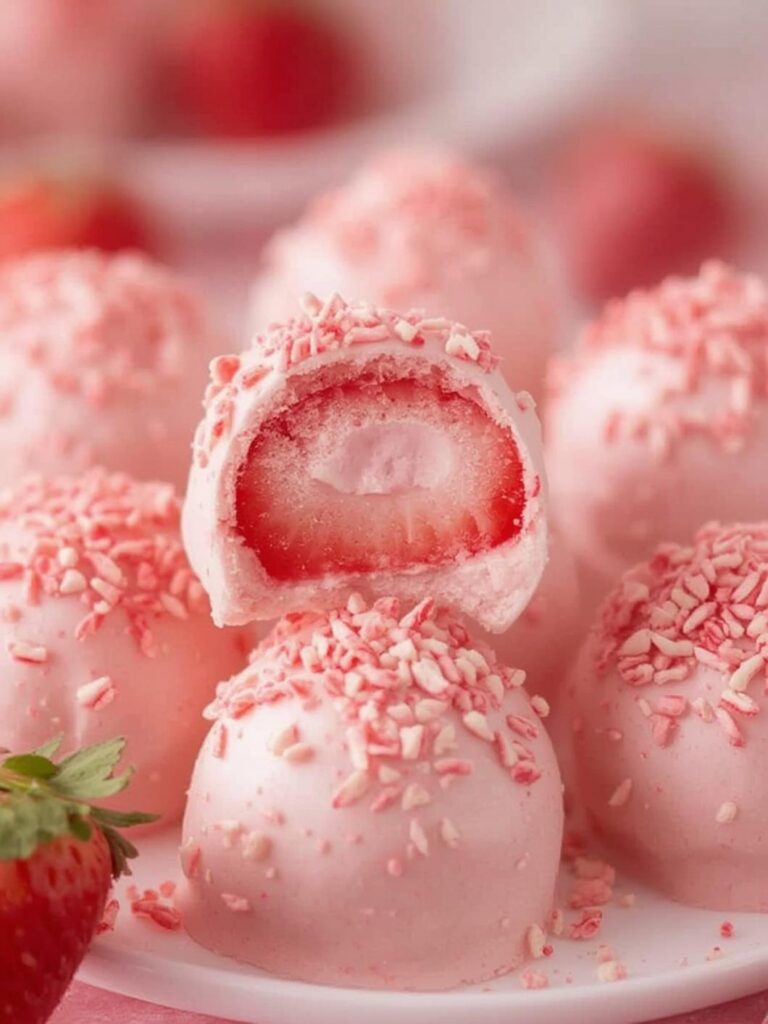
Strawberry Shortcake Truffles: The 12 Ultimate Steps for the Best No-Bake Treat
These no-bake Strawberry Shortcake Truffles are creamy, fruity, and coated in a crunchy strawberry-cookie topping — the perfect bite-sized treat.
- Total Time: 1 hour
- Yield: 24 truffles 1x
Ingredients
36 vanilla sandwich cookies (such as Golden Oreos), divided
1 oz freeze-dried strawberries, divided
8 oz full-fat cream cheese, softened
12 oz white chocolate melting wafers or almond bark
Optional: 1 tablespoon coconut oil (to thin chocolate for dipping)
Instructions
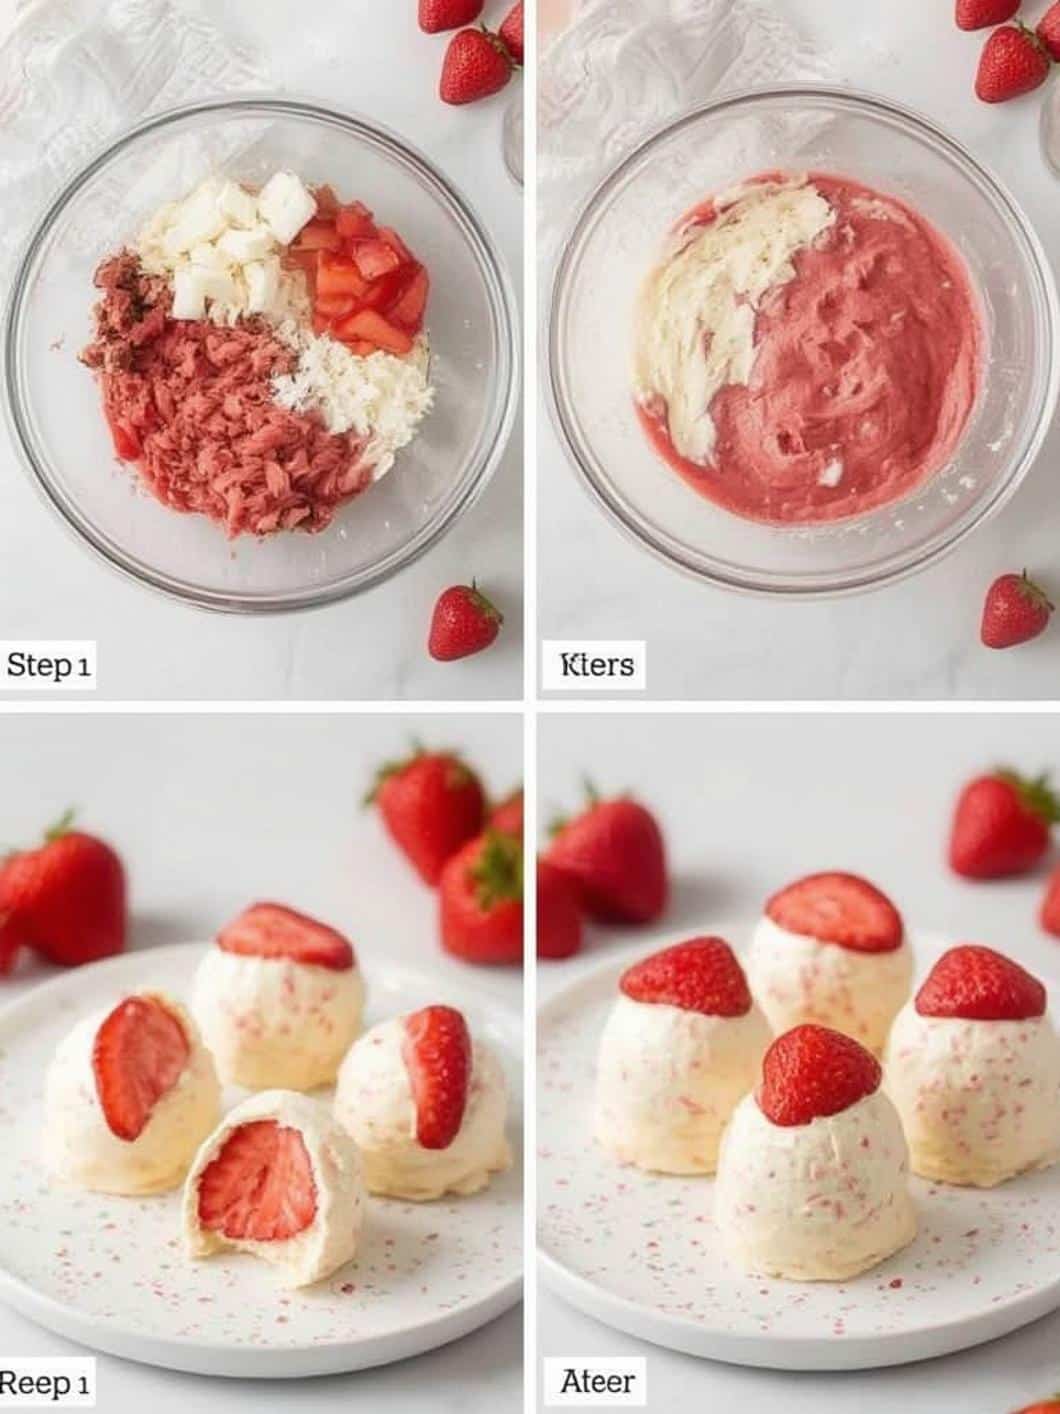
1. Place one-third of the cookies in a food processor and pulse into coarse crumbs.
2. Add half of the freeze-dried strawberries and pulse again to combine. Transfer this crunch topping to a shallow dish and set aside.
3. In the same processor bowl, add remaining cookies and freeze-dried strawberries. Process into fine crumbs.
4. Add softened cream cheese and process until a thick, smooth mixture forms.
5. Using a small cookie scoop, portion and roll the mixture into 1-inch balls. Place on a parchment-lined baking sheet.
6. Chill the truffle balls in the freezer for 30 minutes or in the fridge for 1 hour until firm.
7. Melt white chocolate wafers in a microwave-safe bowl in 30-second intervals, stirring between each, until smooth.
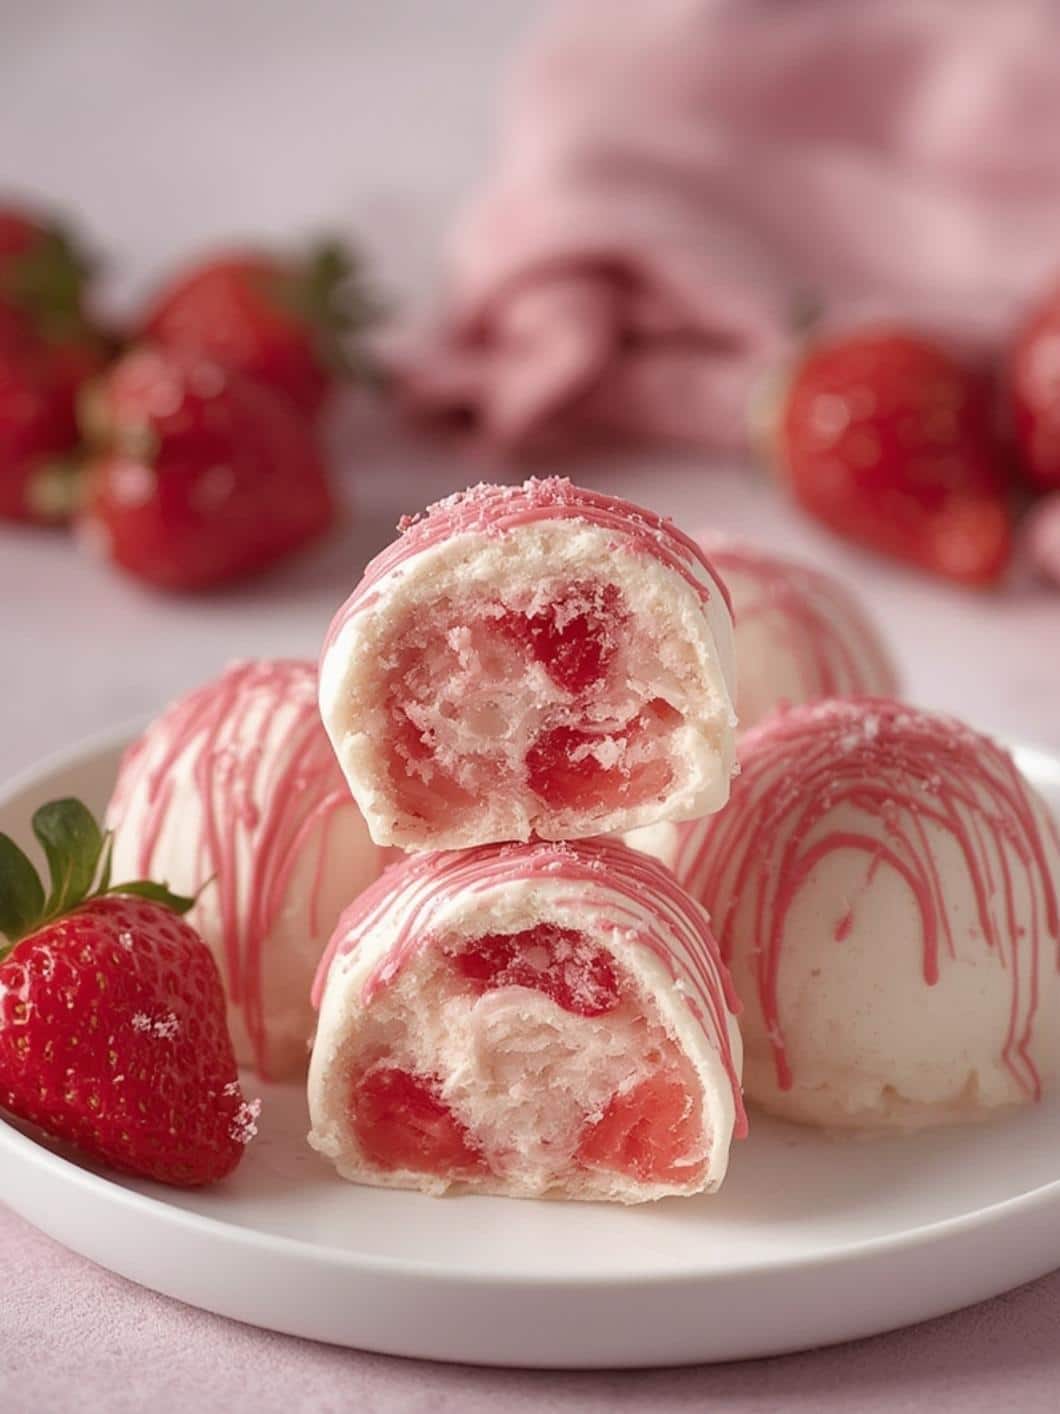
8. Dip each chilled truffle into the melted white chocolate, coating fully and letting excess drip off.
9. Immediately roll or sprinkle the dipped truffle in the reserved strawberry crunch topping.
10. Return coated truffles to the baking sheet. Repeat with remaining truffles.
11. Chill truffles again for 15–20 minutes to allow the coating to fully set.
12. Store in an airtight container in the refrigerator until ready to serve.
Notes
Do not skip the chilling step before dipping — it helps truffles hold their shape.
Add a little coconut oil to the white chocolate for a smoother, thinner coating.
Use a dry bowl and utensils to avoid seizing the chocolate.
Try lemon or shortbread cookies for a citrus variation.
Freeze truffles for up to 2 months; thaw in fridge before serving.
- Prep Time: 30 minutes
- Cook Time: 0 minutes
- Category: Dessert
- Method: No-Bake
- Cuisine: American
- Diet: Vegetarian
Nutrition
- Serving Size: 1 truffle
- Calories: 130
- Sugar: 11g
- Sodium: 70mg
- Fat: 7g
- Saturated Fat: 4g
- Unsaturated Fat: 2g
- Trans Fat: 0g
- Carbohydrates: 15g
- Fiber: 0g
- Protein: 1g
- Cholesterol: 10mg
Essential Ingredients You’ll Need
The beauty of this recipe lies in its simplicity. You only need a handful of easy-to-find ingredients to create these decadent bites. Before you begin, gather everything you need to ensure the process goes smoothly. Each component plays a crucial role in building the perfect truffle.
The Cookie Base
For the main structure of the truffle, we use vanilla sandwich cookies, such as Golden Oreos. These cookies provide the perfect sweet, cake-like base when crushed. Furthermore, their creamy filling adds extra richness that complements the other ingredients perfectly. If you can’t find them, shortbread cookies or Nilla wafers are excellent alternatives.
The Creamy Binder
To bring the cookie crumbs together and create that luscious, cheesecake-like texture, you will need a block of full-fat cream cheese. It is essential to let it soften to room temperature before using it. Consequently, this will allow it to blend seamlessly with the cookie crumbs, resulting in a smooth, lump-free filling for your strawberry shortcake truffles.
The Vibrant Strawberry Flavor
The key to achieving an intense, authentic strawberry flavor without adding excess moisture is using freeze-dried strawberries. These can be found in the dried fruit aisle of most major grocery stores. Unlike fresh strawberries, which contain a lot of water and could make the truffles soggy, freeze-dried ones provide concentrated flavor and a beautiful pink color. According to Healthline, strawberries are also a great source of Vitamin C and antioxidants, adding a small nutritional benefit to your treat.
The Sweet Coating and Crunchy Topping
For the outer shell, you’ll need white chocolate melting wafers or almond bark. These melt smoothly and create a firm shell that locks in the creamy center. Lastly, the signature “crunch” comes from a simple mixture of crushed vanilla cookies and the remaining freeze-dried strawberries. This topping not only adds texture but also enhances the overall strawberry shortcake experience.
Step-by-Step Instructions
Now that you have your ingredients ready, it’s time for the fun part. Follow these simple steps to create your own batch of delicious strawberry shortcake truffles. Remember, precision is less important than having fun with the process.
Step 1: Prepare the Strawberry Crunch Topping
First, you will make the iconic crunchy coating. To do this, take about one-third of your vanilla sandwich cookies and place them in a food processor. Pulse them until you have coarse crumbs. Next, add about half of your freeze-dried strawberries and pulse again briefly to combine. Be careful not to over-process; you want some texture to remain. Finally, transfer this mixture to a shallow dish and set it aside for later.
Step 2: Create the Truffle Filling
In the same food processor bowl (no need to clean it), add the remaining vanilla sandwich cookies and the rest of the freeze-dried strawberries. Process them until they become fine crumbs. Following this, add the softened block of cream cheese to the food processor. Blend everything together until a thick, dough-like mixture forms. It should be uniform in color and easy to handle.
Step 3: Roll and Chill the Truffles
Using a small cookie scoop for consistency, portion out the filling and roll it between your palms to form smooth, 1-inch balls. Place the rolled truffle balls onto a baking sheet lined with parchment paper. This step is important because chilling the truffles ensures they are firm enough to dip without falling apart. Therefore, place the baking sheet in the freezer for at least 30 minutes or in the refrigerator for an hour.
Step 4: Melt the White Chocolate
While the truffles are chilling, you can prepare the coating. Place your white chocolate melting wafers or chopped almond bark in a microwave-safe bowl. Microwave in 30-second intervals, stirring well between each one, until the chocolate is completely melted and smooth. Be careful not to overheat the chocolate, as it can burn or seize. For more no-bake dessert ideas, you might enjoy these strawberry cheesecake dump cake recipes.
Step 5: Dip and Coat the Truffles
Once the truffles are firm, remove them from the freezer. Using a fork or a dipping tool, dip each truffle ball into the melted white chocolate, ensuring it is fully coated. Tap the fork on the side of the bowl to allow any excess chocolate to drip off. Immediately after dipping, while the chocolate is still wet, sprinkle the strawberry crunch topping over the entire truffle or roll it in the topping dish. Then, place the finished truffle back on the parchment-lined baking sheet.
Step 6: The Final Set
After all the truffles have been dipped and coated, return the baking sheet to the refrigerator for about 15-20 minutes. This final chill allows the white chocolate shell to set completely, creating a firm, delicious exterior. After that, your strawberry shortcake truffles are ready to be served.
Pro Tips for the Best Strawberry Shortcake Truffles
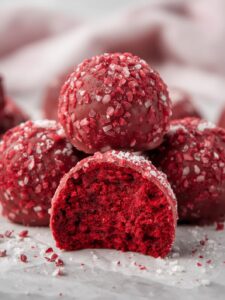
While this recipe is straightforward, a few tips can elevate your truffles from good to absolutely amazing. For instance, using a small cookie scoop ensures that all your truffles are uniform in size, which helps them chill and set evenly. Additionally, do not skip the chilling steps. A firm, cold truffle is much easier to dip in warm chocolate. If you enjoy making truffles, you should also check out this recipe for decadent red velvet truffles for another variation. When melting your chocolate, always use a dry bowl and utensils, as even a small drop of water can cause the chocolate to seize. A little bit of coconut oil can also be added to the chocolate to make it thinner and easier for dipping.
Variations and Storage
Feel free to get creative with this recipe. For example, you can use different cookies like shortbread or even lemon-flavored cookies for a strawberry lemonade twist. You could also swap the white chocolate for milk or dark chocolate for a different flavor profile. For another delicious strawberry recipe, give these strawberry cheesecake cookies a try. For a fun presentation, you can drizzle melted pink candy melts over the finished truffles. Storing your strawberry shortcake truffles is simple. Keep them in an airtight container in the refrigerator for up to one week. They can also be frozen for up to two months; just be sure to let them thaw in the refrigerator for a few hours before serving.
Conclusion
In summary, these Strawberry Shortcake Truffles are a delightful, no-bake dessert that captures a classic flavor in a perfect, bite-sized form. They are remarkably easy to make, requiring just a few simple ingredients and minimal effort. As a result, they are an ideal treat for parties, gatherings, or whenever a sweet craving strikes. The combination of the creamy strawberry filling and the crunchy white chocolate coating is truly a match made in heaven. We are confident that once you try this recipe, it will become a go-to favorite for you and your family.
Frequently Asked Questions (FAQ)
Can I use fresh or frozen strawberries instead of freeze-dried?
It is not recommended to use fresh or frozen strawberries for this recipe. Their high water content will make the truffle filling too wet and prevent it from setting properly. Freeze-dried strawberries provide intense flavor without the extra moisture, which is crucial for the texture of these truffles.
How long do these strawberry shortcake truffles last?
When stored in an airtight container in the refrigerator, these truffles will stay fresh for up to one week. For longer storage, you can freeze them for up to two months. According to the Mayo Clinic, proper food storage is key to preventing foodborne illness.
Can I make this recipe gluten-free?
Yes, you can easily adapt this recipe to be gluten-free. Simply substitute the vanilla sandwich cookies with your favorite brand of gluten-free vanilla cookies or shortbread. Ensure your other ingredients, like the white chocolate, are also certified gluten-free.