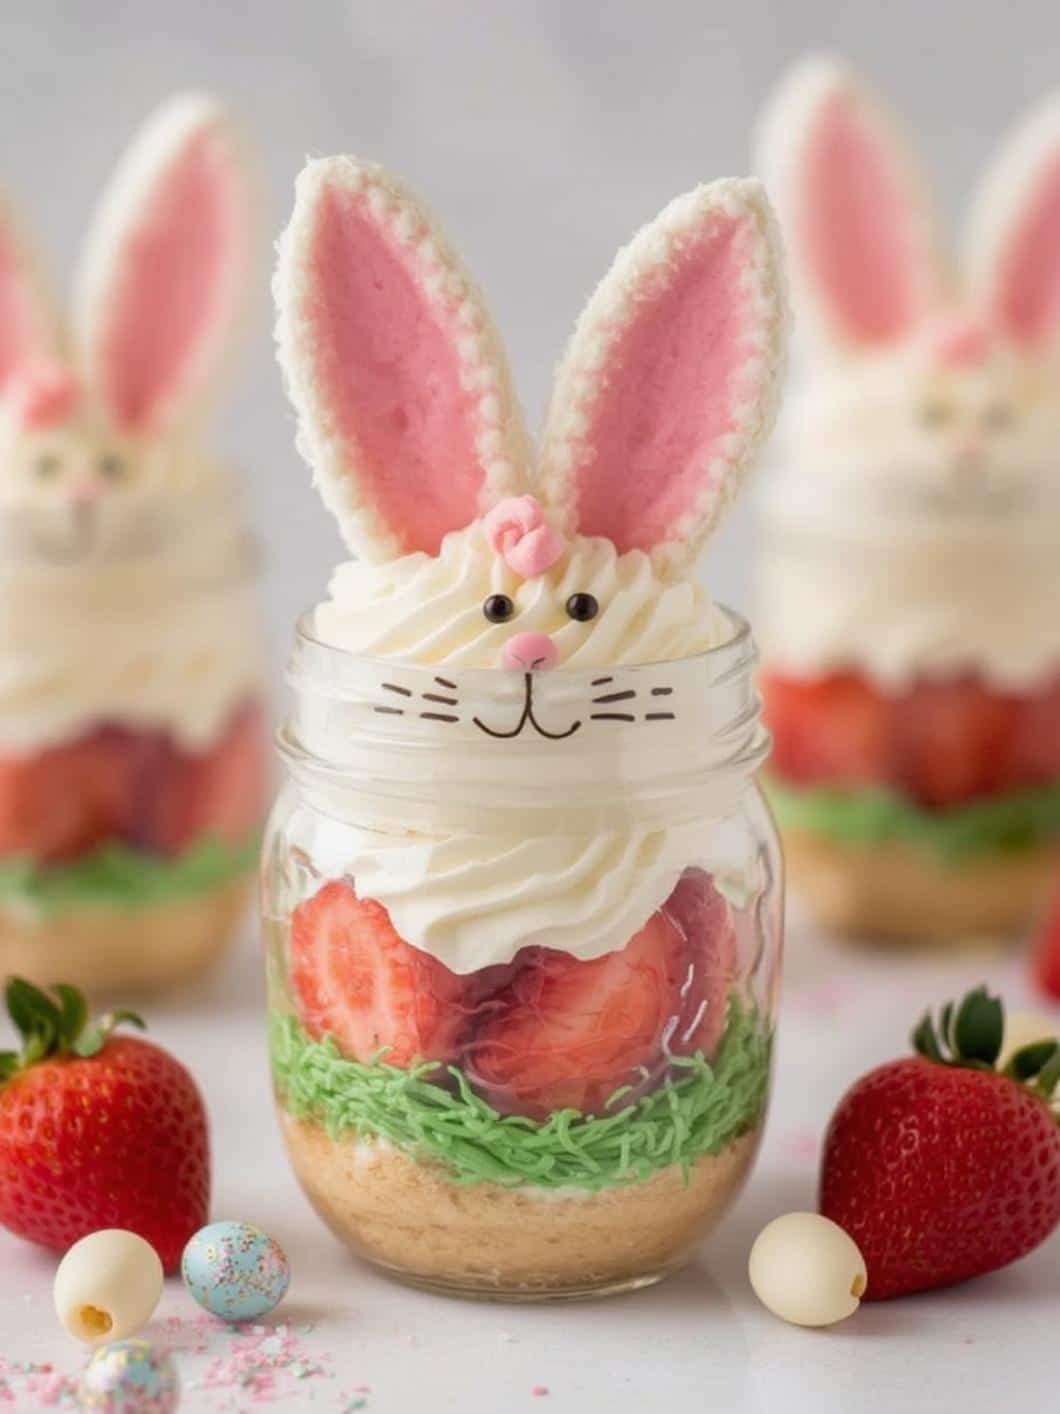
Get ready to hop into spring with a dessert that’s as delightful to look at as it is to eat. These Strawberry Easter Bunny Shortcake Jars are the perfect individual treats for your holiday celebration. Combining the classic, comforting flavors of strawberry shortcake with a whimsical Easter twist, this recipe is sure to become a new family favorite. Not only are these jars incredibly delicious, but they also serve as a beautiful centerpiece for your dessert table. Furthermore, they are surprisingly simple to assemble, making them an ideal choice for both seasoned bakers and beginners. In this guide, we will walk you through everything you need to know to create these adorable and tasty desserts for your next gathering.
Why You’ll Love These Strawberry Easter Bunny Shortcake Jars
There are countless reasons to adore this festive dessert. First and foremost, it takes a universally loved classic—strawberry shortcake—and gives it a seasonal, celebratory makeover. Consequently, it feels both familiar and excitingly new. The individual jar presentation also adds a touch of elegance and convenience, making serving a breeze. Let’s explore a few more reasons why these Strawberry Easter Bunny Shortcake Jars deserve a spot on your Easter menu.
A Festive Twist on a Classic
Everyone loves strawberry shortcake, with its layers of tender cake, juicy berries, and fluffy whipped cream. This recipe honors that tradition while adding a playful element perfect for Easter. By using a cookie cutter to create bunny-shaped pieces of shortcake, you instantly transform a simple dessert into a themed masterpiece. In fact, this small detail is what makes the dessert so special and memorable for guests of all ages. It’s a simple yet effective way to infuse your meal with holiday spirit.
Perfect for Parties and Gatherings
Serving dessert at a party can sometimes be messy, but these individual jars solve that problem entirely. Because each portion is self-contained, guests can easily grab one without the need for cutting and plating a large cake. This makes them ideal for buffets, potlucks, or any gathering where convenience is key. Additionally, the jars are portable, so guests can mingle while enjoying their sweet treat. For other great party ideas, consider making these Easter Egg Oreo Balls, which are always a crowd-pleaser.
Easy to Make and Assemble
Despite their charming appearance, these shortcake jars are not complicated to create. You can use a favorite homemade shortcake recipe, a simple box mix, or even store-bought pound cake or angel food cake to save time. The rest of the assembly involves layering basic components, a process that is both quick and forgiving. For this reason, it’s a wonderful recipe to involve the kids in, as they can help with layering the ingredients and placing the bunny on top.
Print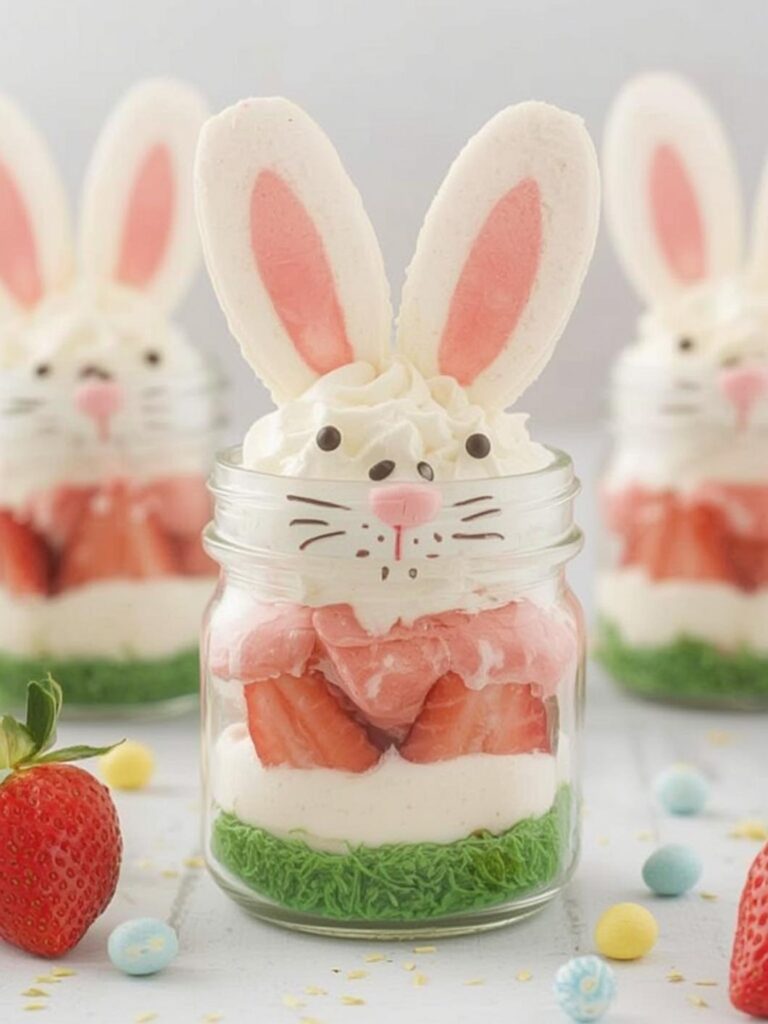
Strawberry Easter Bunny Shortcake Jars
A delightful spring dessert combining the classic flavors of strawberry shortcake with a whimsical Easter twist, served in individual jars.
- Total Time: 1 hour 30 minutes
- Yield: 6–8 servings 1x
Ingredients
1 batch prepared shortcake, pound cake, or angel food cake
2 pounds fresh strawberries, hulled and sliced
3 tablespoons granulated sugar
2 cups heavy whipping cream
1/2 cup powdered sugar
1 teaspoon vanilla extract
Mint sprigs or Easter sprinkles for garnish (optional)
Instructions
1. If baking cake, allow it to cool completely, then slice into ½-inch thick slabs.
2. Use a 2-3 inch bunny-shaped cookie cutter to cut shapes from the cake slices for topping.
3. Gently crumble the remaining cake scraps into bite-sized pieces for the layers.
4. In a medium bowl, toss the sliced strawberries with granulated sugar and let sit for 20-30 minutes to macerate.
5. In a separate chilled bowl, use an electric mixer to beat the heavy cream, powdered sugar, and vanilla extract until stiff peaks form.
6. Assemble the jars by layering crumbled cake, then macerated strawberries with their juice, then whipped cream.
7. Repeat the layers once more, finishing with a final swirl of whipped cream.
8. Gently place one shortcake bunny on top of the cream in each jar.
9. Refrigerate the jars for at least 30 minutes before serving to allow the flavors to meld.
Notes
For best results, assemble jars only a few hours before serving to prevent the cake from becoming soggy. Store covered in the refrigerator for up to 2 days. Feel free to customize with mixed berries, lemon curd, or different cookie cutter shapes.
- Prep Time: 30 minutes
- Cook Time: 30 minutes
- Category: Dessert
- Method: Assembling
- Cuisine: American
Nutrition
- Serving Size: 1 jar
- Calories: 480 kcal
- Sugar: 35 g
- Sodium: 250 mg
- Fat: 25 g
- Saturated Fat: 15 g
- Unsaturated Fat: 8 g
- Trans Fat: 0 g
- Carbohydrates: 55 g
- Fiber: 4 g
- Protein: 5 g
- Cholesterol: 70 mg
Essential Ingredients for Your Shortcake Jars
To create the most delicious Strawberry Easter Bunny Shortcake Jars, it’s important to start with quality ingredients. The beauty of this recipe lies in its simplicity, allowing the fresh flavors of the strawberries and cream to shine through. While you can certainly make every component from scratch, there are also convenient shortcuts available that yield fantastic results. Below is a list of what you’ll need for each layer.
- For the Shortcake: You can use one batch of your favorite shortcake or biscuit recipe, a yellow or white cake mix prepared according to package directions, or a store-bought pound cake or angel food cake. The key is to have a sturdy yet tender cake that can be cut into shapes.
- For the Strawberry Filling: Fresh strawberries are the star here. You will need about two pounds of ripe, juicy strawberries, hulled and sliced. A few tablespoons of granulated sugar will help draw out their natural juices, creating a delicious syrup. According to Healthline, strawberries are also packed with vitamins and antioxidants, making this a slightly healthier dessert choice.
- For the Whipped Cream: Heavy whipping cream, powdered sugar, and a splash of vanilla extract are all you need for a classic, stabilized whipped cream. For an even easier option, you can use a store-bought whipped topping.
- For Garnish (Optional): A few mint sprigs or some festive Easter sprinkles can add a final touch of color and flair to your dessert jars.
Equipment You’ll Need
You don’t need any highly specialized equipment to make these delightful shortcake jars. In fact, you probably already have most of these items in your kitchen. Having everything ready before you begin will make the assembly process smooth and enjoyable. Here’s a quick rundown of the tools that will come in handy.
- Glass Jars: 8-ounce mason jars or any small, clear glass jars or cups work perfectly. The clear glass allows the beautiful layers to be seen.
- Bunny-Shaped Cookie Cutter: A small bunny cookie cutter (around 2-3 inches) is essential for creating the signature Easter look.
- Mixing Bowls: You’ll need a few bowls for preparing the strawberry mixture and whipping the cream.
- Electric Mixer: A hand mixer or stand mixer will make whipping the cream quick and effortless.
- Piping Bag and Tip (Optional): While not strictly necessary, using a piping bag with a star tip to add the whipped cream creates a more professional and polished look. A simple spoon or spatula will also work just fine.
- Cutting Board and Knife: For slicing the strawberries and trimming the cake.
Step-by-Step Instructions
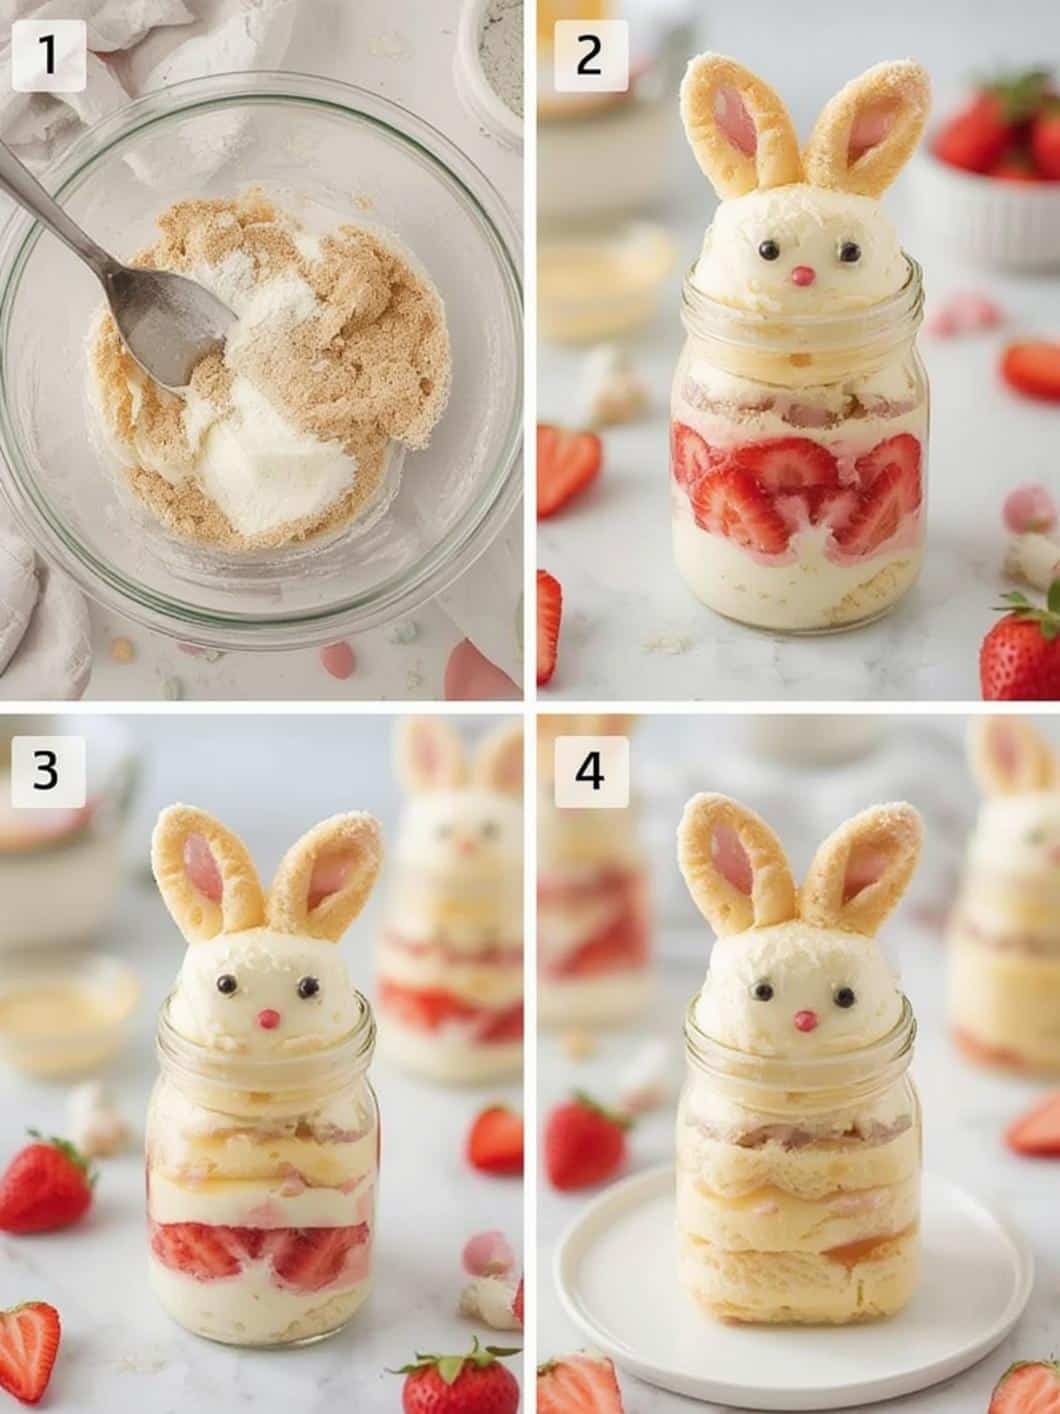
Now that you have your ingredients and equipment, it’s time for the fun part: putting it all together. Follow these simple steps to create your beautiful Strawberry Easter Bunny Shortcake Jars. This process is broken down into four main stages to keep things clear and organized.
Preparing the Shortcake Bunnies
First, you need to prepare your cake base. If you are baking a cake from scratch or a mix, allow it to cool completely before proceeding. Once cooled, slice the cake into ½-inch thick slabs. Next, take your bunny-shaped cookie cutter and press it firmly into the cake slices to create your bunnies. You will need one bunny for the top of each jar. Subsequently, take the remaining cake scraps and gently crumble them into bite-sized pieces. These crumbles will form the bottom layer of your jars, ensuring no delicious cake goes to waste.
Macerating the Strawberries
Next, prepare the strawberry filling. Begin by washing, hulling, and slicing your fresh strawberries. Place the sliced berries into a medium-sized mixing bowl. Then, sprinkle the granulated sugar over the strawberries and gently toss to combine. Let the mixture sit at room temperature for about 20-30 minutes. During this time, the sugar will dissolve and draw out the natural juices from the berries, creating a sweet, luscious syrup. This process, known as macerating, significantly enhances the flavor of the strawberries.
Whipping the Cream
While the strawberries are macerating, you can prepare the whipped cream. In a large, chilled mixing bowl, combine the heavy whipping cream, powdered sugar, and vanilla extract. Using an electric mixer, start on low speed and gradually increase to high. Continue to beat the cream until stiff peaks form. This means that when you lift the beaters out of the cream, the peak that forms will hold its shape without collapsing. Be careful not to over-whip, or the cream will turn buttery. For more sweet ideas for Easter, check out our amazing Strawberry Shortcake Easter Egg Bombs.
Assembling Your Strawberry Easter Bunny Shortcake Jars
Finally, it’s time to assemble your jars. Start by placing a layer of the crumbled cake pieces at the bottom of each jar. Next, spoon a generous layer of the macerated strawberries and their juice over the cake. After that, add a thick layer of the freshly whipped cream; you can pipe it in for a neater look or simply spoon it on top. Repeat the layers one more time: another layer of cake crumbles, followed by more strawberries, and topped with a final swirl of whipped cream. For the finishing touch, gently place one of your shortcake bunnies on top of the cream in each jar. Refrigerate the jars for at least 30 minutes before serving to allow the flavors to meld together.
Tips and Tricks for Perfect Shortcake Jars
To ensure your Strawberry Easter Bunny Shortcake Jars are absolutely perfect, here are a few extra tips and tricks. These suggestions cover everything from making the dessert ahead of time to customizing it to your personal taste. Proper storage is also key to maintaining freshness, which you can learn more about from sources like the Mayo Clinic on food safety.
Make-Ahead Tips
You can prepare several components of this dessert in advance to save time on Easter day. The shortcake can be baked and cut into bunnies a day or two ahead; just be sure to store it in an airtight container at room temperature. The strawberries can also be macerated a few hours in advance and kept in the refrigerator. However, for the best texture, it is recommended to whip the cream and assemble the jars just a few hours before you plan to serve them. If assembled too far in advance, the cake may become soggy.
Customization and Variations
Feel free to get creative with this recipe! You could, for example, use a mix of berries like raspberries and blueberries along with the strawberries. Another delicious idea is to add a layer of lemon curd for a tangy contrast. For a richer dessert, consider using a chocolate pound cake or adding a drizzle of chocolate sauce between the layers. You could even swap the bunny cookie cutter for a chick or an egg shape to vary the Easter theme. If you’re looking for another fun brownie-based recipe, try these Easter Deviled Brownies.
Storage Instructions
Once assembled, the Strawberry Easter Bunny Shortcake Jars should be stored in the refrigerator. They are best enjoyed within 24 hours for optimal freshness and texture. If you need to store them longer, they will keep for up to two days, but be aware that the cake will soften considerably over time as it absorbs moisture from the strawberries and cream. Ensure you cover the tops of the jars with lids or plastic wrap to prevent the whipped cream from absorbing any other fridge odors.
Conclusion
In summary, these Strawberry Easter Bunny Shortcake Jars are a delightful and festive dessert perfect for any spring celebration. They offer a charming, convenient, and delicious way to enjoy the classic flavors of strawberry shortcake. Moreover, with simple ingredients and an easy-to-follow assembly process, this recipe is accessible to everyone, regardless of their baking skill level. The individual portions make serving a crowd effortless and add a personal touch to your Easter table. Ultimately, creating these beautiful dessert jars is a wonderful way to bring joy and sweetness to your holiday gathering.
Frequently Asked Questions (FAQ)
Can I use store-bought angel food cake or pound cake?
Absolutely! Using store-bought cake is a fantastic time-saver and works wonderfully in this recipe. Both angel food cake and pound cake have a great texture for layering in the jars and are sturdy enough to be cut into bunny shapes without crumbling apart.
How far in advance can I make these jars?
For the best results, it’s ideal to assemble the jars the day you plan to serve them, preferably no more than 4-6 hours in advance. While they can be stored in the refrigerator for up to two days, the cake will become much softer over time as it absorbs the strawberry juice.
What size jars work best for this recipe?
Small, individual-serving jars are best. 8-ounce mason jars are a popular choice because they are the perfect size for a single portion and their clear sides beautifully showcase the layers. Small glass tumblers or dessert cups also work well.
Are there other fruits I can use besides strawberries?
Yes, you can easily adapt this recipe to use other fruits. A mix of fresh berries like blueberries, raspberries, and blackberries would be delicious. In the summer, peaches or nectarines would also make a wonderful seasonal variation.