As March rolls around, festive green decorations and the promise of spring fill the air. St. Patrick’s Day is a time for celebration, and what better way to celebrate than with a delightful, easy-to-make treat? Consequently, if you’re searching for the perfect party dessert or a fun kitchen project with the kids, look no further. These no-bake St. Patricks Day Oreo Balls are incredibly simple to prepare, wonderfully decadent, and festively decorated to bring a touch of magic to your celebration.
Moreover, this recipe requires just a few simple ingredients and doesn’t involve any complicated baking techniques. In fact, the most difficult part is waiting for them to chill before you can take the first delicious bite. These little truffles are a fantastic combination of rich chocolate cookies and tangy cream cheese, all wrapped up in a sweet, vibrant green candy coating. Therefore, get ready to create a memorable treat that will have everyone feeling the luck of the Irish. These St. Patricks Day Oreo Balls are sure to become a new holiday tradition.
Why You’ll Love These Festive St. Patricks Day Oreo Balls
There are countless reasons to fall in love with this recipe, especially during the festive season. First and foremost, their simplicity is a major advantage. As a completely no-bake dessert, you can skip preheating the oven and dealing with complex measurements. This makes them an excellent choice for beginner cooks or for when you need a quick dessert without a lot of fuss. All you need is a way to crush cookies and a bowl to mix everything together, which as a result, saves you a lot of time and effort.
In addition, these St. Patricks Day Oreo Balls are incredibly fun to make and customize. The process of rolling the cookie mixture and dipping them in colorful candy melts is a perfect activity to involve children in the kitchen. They can help crush the Oreos, roll the balls, and, most importantly, add the festive sprinkles. This hands-on experience not only creates a delicious treat but also builds lasting family memories. Furthermore, the visual appeal of these green truffles is undeniable. Decorated with gold sprinkles or shamrocks, they instantly brighten up any dessert table and fit the holiday theme perfectly.
Finally, the taste is simply irresistible. The classic combination of chocolate sandwich cookies and cream cheese creates a rich, fudgy texture that is both sweet and slightly tangy. Dipping them in a sweet candy coating adds another layer of flavor and a satisfying crunch. Whether you use mint Oreos for an extra festive kick or classic Oreos, the result is a decadent bite-sized dessert that pleases almost every palate. Consequently, these St. Patricks Day Oreo Balls are a guaranteed crowd-pleaser for any party or family gathering.
Print
St. Patricks Day Oreo Balls: The 10 Ultimate Steps for a Magical Treat
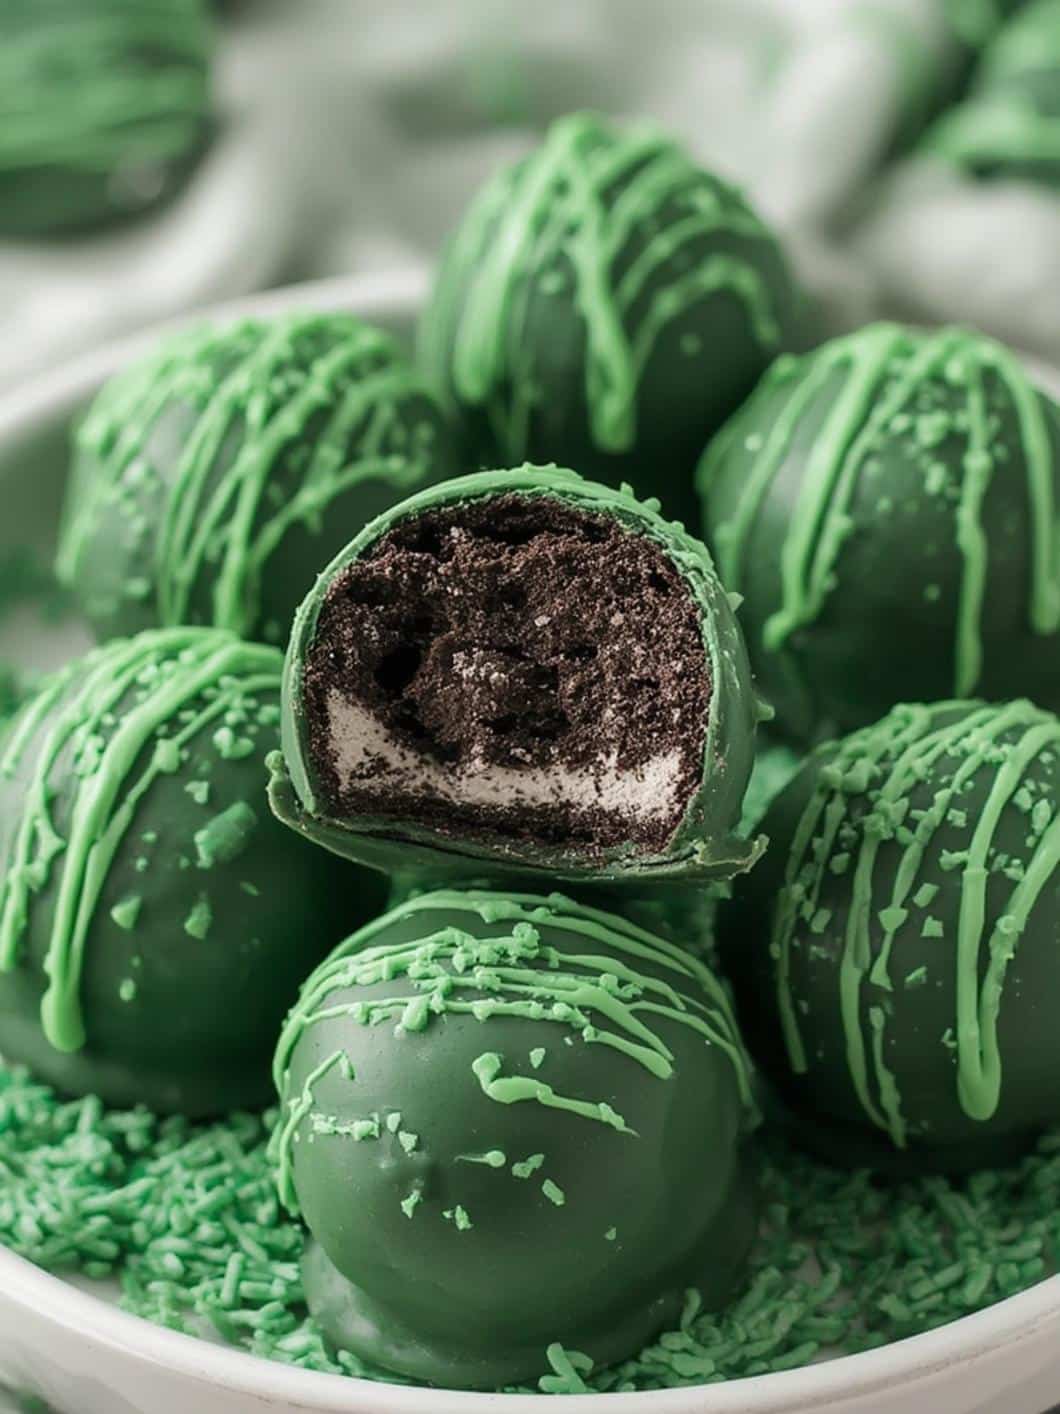
Festive no-bake Oreo truffles made with mint Oreos and cream cheese, dipped in vibrant green candy coating and topped with St. Patrick’s Day sprinkles for a magical holiday treat.
- Total Time: 45 minutes
- Yield: 30 Oreo balls 1x
Ingredients
1 (14.3-ounce) package Mint Oreo cookies
8 ounces full-fat cream cheese, softened
12 ounces green candy melts
1/4 cup white or dark chocolate for drizzle (optional)
St. Patrick’s Day sprinkles (shamrocks, gold, green and white nonpareils)
1/2 teaspoon peppermint extract (optional for extra mint flavor)
1 teaspoon coconut oil (optional, for thinning candy melts)
Instructions
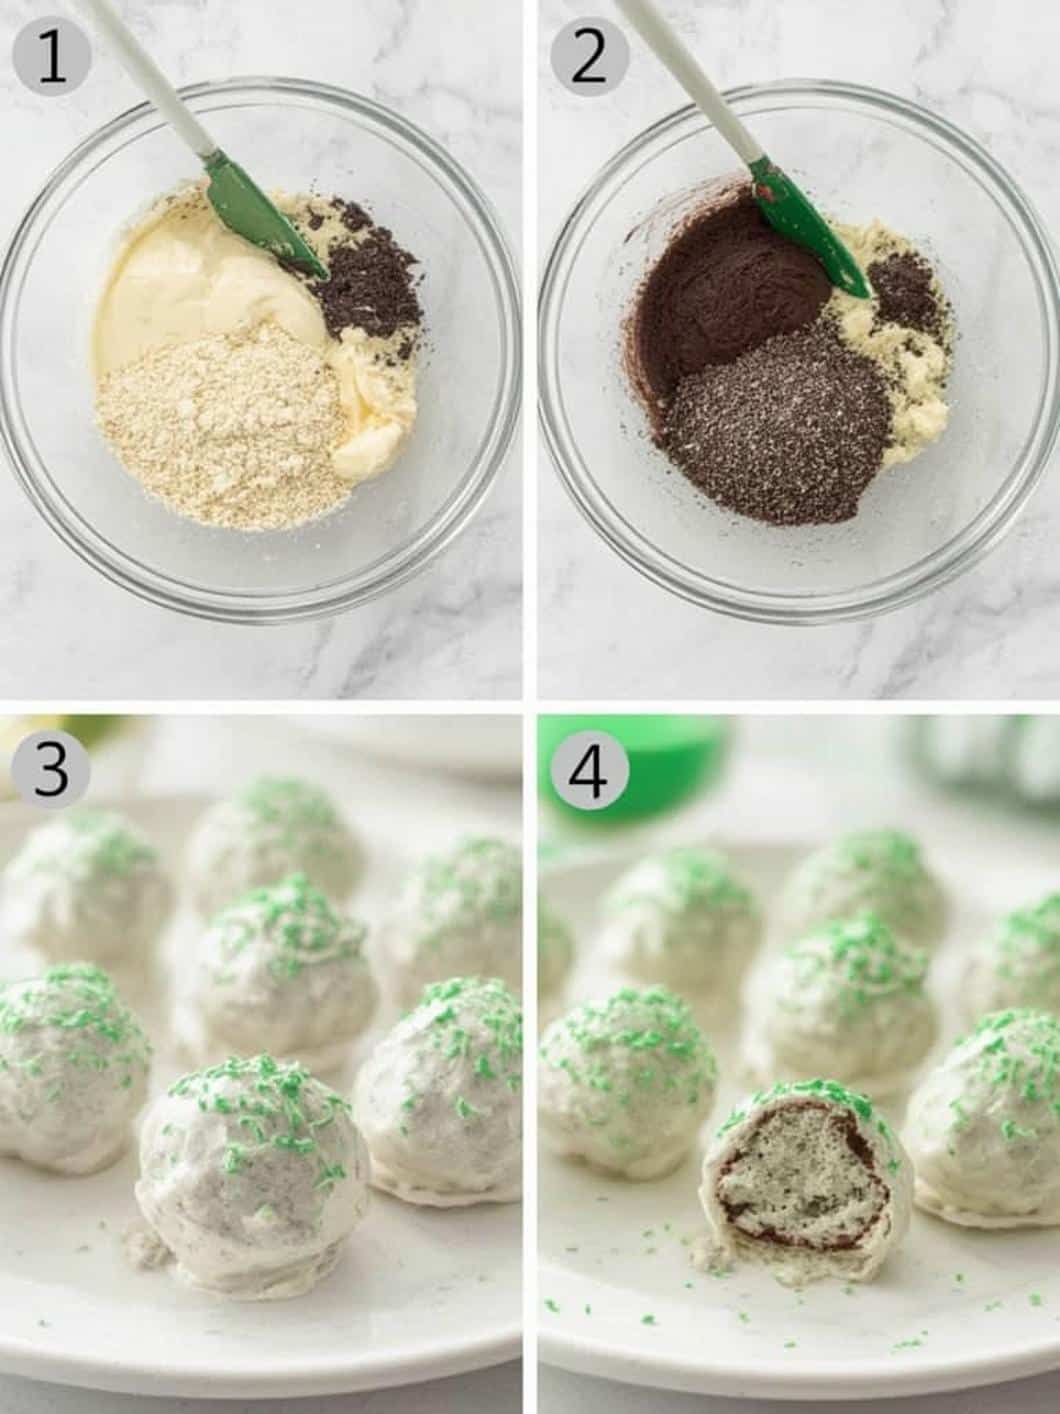
1. Place the Oreo cookies in a food processor and pulse until fine crumbs form, or crush in a sealed bag with a rolling pin.
2. Transfer crumbs to a large mixing bowl and add softened cream cheese.
3. Mix thoroughly until fully combined into a thick, smooth dough-like mixture.
4. Scoop about 1 tablespoon of mixture and roll into smooth balls, placing them on a parchment-lined baking sheet.
5. Freeze the Oreo balls for 15–20 minutes until firm.
6. Meanwhile, melt green candy melts in a microwave-safe bowl in 30-second intervals, stirring between each, until smooth.
7. Stir in coconut oil if needed to thin the melted coating.
8. Using forks or a dipping tool, dip each chilled ball into melted candy, ensuring full coverage and tapping off excess.
9. Place coated balls back onto parchment paper and immediately decorate with festive sprinkles.
10. If desired, drizzle with melted white or dark chocolate after coating has set.
11. Refrigerate for 10–15 minutes until coating is firm, then serve.
Notes
Use full-fat, softened cream cheese for the smoothest texture.
Chill thoroughly before dipping to prevent balls from falling apart.
Melt candy slowly to avoid overheating and thickening.
Store in an airtight container in the refrigerator for up to 2 weeks.
Freeze for up to 2 months and thaw in the refrigerator before serving.
- Prep Time: 25 minutes
- Cook Time: 0 minutes
- Category: Dessert
- Method: No-Bake
- Cuisine: American
- Diet: Vegetarian
Nutrition
- Serving Size: 1 Oreo ball
- Calories: 150
- Sugar: 13g
- Sodium: 90mg
- Fat: 8g
- Saturated Fat: 4g
- Unsaturated Fat: 3g
- Trans Fat: 0g
- Carbohydrates: 18g
- Fiber: 0g
- Protein: 2g
- Cholesterol: 10mg
Essential Ingredients and Tools
Before you begin, gathering all your ingredients and tools will make the process much smoother and more enjoyable. Fortunately, the list is short and features items that are easy to find at any local grocery store, especially around the holiday.
For the Oreo Balls:
- Mint Oreo Cookies: One standard package (about 36 cookies) is needed. The mint flavor adds a wonderful, festive touch. However, if you can’t find them, regular Oreos work just as well.
- Cream Cheese: You will need one 8-ounce block of full-fat cream cheese. It should be softened to room temperature to ensure it mixes easily and smoothly with the cookie crumbs.
- Green Candy Melts: A 12-ounce bag of green candy melts will provide the perfect festive coating. You can choose a vibrant lime or a deeper kelly green, depending on your preference.
For Decoration (Optional but Recommended!):
- White or Dark Chocolate: A small amount for drizzling over the top adds a professional touch.
- St. Patrick’s Day Sprinkles: Think green shamrocks, gold coins, or a mix of festive green and white nonpareils to make your St. Patricks Day Oreo Balls truly stand out.
Necessary Kitchen Tools:
- Food Processor: This is the quickest and easiest way to turn your cookies into fine crumbs.
- Large Plastic Bag and Rolling Pin: If you don’t have a food processor, this is a great alternative for crushing the cookies.
- Large Mixing Bowl: For combining the cookie crumbs and cream cheese.
- Baking Sheet Lined with Parchment Paper: This is essential for chilling the balls and allowing the coating to set without sticking.
- Microwave-Safe Bowl: For melting the candy melts.
- Forks or a Candy Dipping Tool: These will help you dip the truffles cleanly.
Step-by-Step Instructions
Now that you have everything ready, it’s time for the fun part. Follow these simple steps to create your delicious St. Patricks Day Oreo Balls.
Step 1: Crush the Oreos. First, place the entire package of Oreo cookies into a food processor. Pulse until they become fine, consistent crumbs. If you don’t have a food processor, alternatively, place the cookies in a large, sealable plastic bag, press the air out, and crush them with a rolling pin until they are finely ground.
Step 2: Mix with Cream Cheese. Next, transfer the cookie crumbs to a large mixing bowl. Add the softened block of cream cheese. Then, using a spatula or your hands, mix until the crumbs and cream cheese are thoroughly combined into a thick, dough-like consistency.
Step 3: Roll into Balls. After mixing, scoop out portions of the mixture, about one tablespoon each, and roll them between your palms to form smooth, uniform balls. Place the rolled balls onto a baking sheet that has been lined with parchment paper. This recipe should yield approximately 30-35 balls.
Step 4: Chill the Balls. This step is crucial for success. Place the baking sheet with the Oreo balls into the freezer for at least 15-20 minutes. Chilling makes them firm, which as a result, helps them hold their shape and makes dipping them into the melted candy much easier.
Step 5: Melt the Candy Melts. While the balls are chilling, prepare your coating. Place the green candy melts into a microwave-safe bowl. Microwave them in 30-second intervals, stirring between each interval, until they are completely melted and smooth. Be careful not to overheat the candy, as it can become thick and clumpy.
Step 6: Dip the Balls. Now, remove the chilled Oreo balls from the freezer. Using two forks or a candy dipping tool, dip each ball into the melted green candy, ensuring it is fully coated. Gently tap the fork on the side of the bowl to allow any excess coating to drip off.
Step 7: Decorate. Immediately after dipping, place the coated ball back onto the parchment-lined baking sheet. Before the candy coating sets, sprinkle your festive St. Patrick’s Day sprinkles on top. If you plan to add a chocolate drizzle, wait for the green coating to set first.
Step 8: Let Them Set. Finally, once all the St. Patricks Day Oreo Balls are dipped and decorated, place the baking sheet in the refrigerator for about 10-15 minutes, or until the candy coating is completely firm. After that, they are ready to serve and enjoy!
Tips and Tricks for Perfect Oreo Balls
To ensure your St. Patricks Day Oreo Balls turn out perfectly every time, here are a few expert tips and tricks. These small adjustments can make a big difference in the final product, leading to a smoother process and a more delicious result.
Getting the Right Consistency
For the best texture, always use a block of full-fat cream cheese, not the whipped or low-fat kind. Furthermore, make sure the cream cheese is fully softened to room temperature before mixing. This allows it to blend seamlessly with the Oreo crumbs, creating a smooth, easy-to-roll mixture. If your mixture seems too sticky, you can chill it for a few minutes before rolling.
Dipping Without the Mess
Dipping can sometimes be a messy process, but there are ways to keep it clean. For instance, using a candy dipping tool or the two-fork method is highly effective. To do this, simply drop a chilled ball into the melted candy, use one fork to roll it around, and then lift it out. Use the second fork to gently slide the coated ball onto the parchment paper. This technique helps prevent fingerprints and ensures an even coating. Tapping off excess candy is key to a neat finish.
Creative Variations
While the classic recipe is fantastic, don’t be afraid to get creative. You can, for example, add half a teaspoon of peppermint extract to the Oreo mixture for an extra burst of minty flavor. Another idea is to dip the balls in white chocolate and then drizzle them with green candy melts for a different look. For a truly festive spread, consider making other themed treats like these fun St. Patricks Day Green Shake Pudding Cups to serve alongside your St. Patricks Day Oreo Balls.
Making Ahead and Storage
One of the best things about this recipe is that it’s perfect for making in advance. You can store the finished St. Patricks Day Oreo Balls in an airtight container in the refrigerator for up to two weeks. They can also be frozen for up to two months. If you freeze them, simply let them thaw in the refrigerator for a few hours before serving. This makes them an ideal dessert for planning ahead for a party.
Nutritional Information and Healthy Considerations
While St. Patricks Day Oreo Balls are undeniably a delicious indulgence, it is also important to consider them as a special treat within a balanced diet. Like most desserts, they are high in sugar and fat, so enjoying them in moderation is key. The small, bite-sized nature of these truffles actually helps with portion control, making it easier to savor one or two without overdoing it.
To enjoy treats like these responsibly, it’s helpful to maintain an overall healthy lifestyle. According to experts at the Mayo Clinic, a balanced diet is rich in fruits, vegetables, whole grains, and lean proteins. Therefore, desserts should be a mindful addition rather than a daily staple. When you do indulge, focusing on quality and savoring the experience can make it more satisfying.
If you are mindful of sugar intake, it’s worth noting that candy melts are a significant source of sugar. While there aren’t many ways to alter this specific recipe to be “healthy,” you can make conscious choices in other meals throughout the day. For example, pairing this festive dessert with a nutritious, protein-packed dinner like this Sheet Pan Cashew Chicken can help create a balanced day of eating. Additionally, understanding your daily sugar limits, as outlined by sources like Healthline, can empower you to make informed decisions about your sweet treats. Ultimately, these St. Patricks Day Oreo Balls are meant to be a joyful part of a celebration.
Conclusion
In summary, these St. Patricks Day Oreo Balls are the perfect no-bake dessert to add a festive and delicious touch to your holiday celebration. With just a few simple ingredients and easy-to-follow steps, you can create a delightful treat that everyone will love. The combination of rich Oreo crumbs and creamy cheese, all enrobed in a sweet green candy coating, is truly irresistible. Furthermore, this recipe is incredibly versatile and fun for the whole family to make together. Whether you are hosting a party or just want a special dessert, these truffles are a fantastic choice. Ultimately, making these St. Patricks Day Oreo Balls is a wonderful way to create sweet memories this holiday.
Frequently Asked Questions (FAQ)
How long do Oreo balls last?
When stored properly in an airtight container in the refrigerator, these Oreo balls will stay fresh and delicious for up to two weeks. Consequently, they are a great make-ahead dessert option for any party or event.
Can I freeze Oreo balls?
Yes, absolutely! You can freeze Oreo balls for up to two months. Place them in a single layer in a freezer-safe container or bag. To thaw, simply move them to the refrigerator a few hours before you plan to serve them.
My candy coating is too thick. How can I fix it?
If your melted candy melts seem too thick for dipping, you can easily thin them out. Add a very small amount, about a quarter to a half teaspoon, of coconut oil or paramount crystals and stir well. Add more only if needed, as a little goes a long way.
What if I don’t have a food processor?
No food processor? No problem! An effective alternative is to place the Oreo cookies in a large, heavy-duty zip-top bag. After sealing it, use a rolling pin, meat mallet, or even a heavy can to crush the cookies into fine crumbs. Just make sure the crumbs are as fine as possible for the best texture.