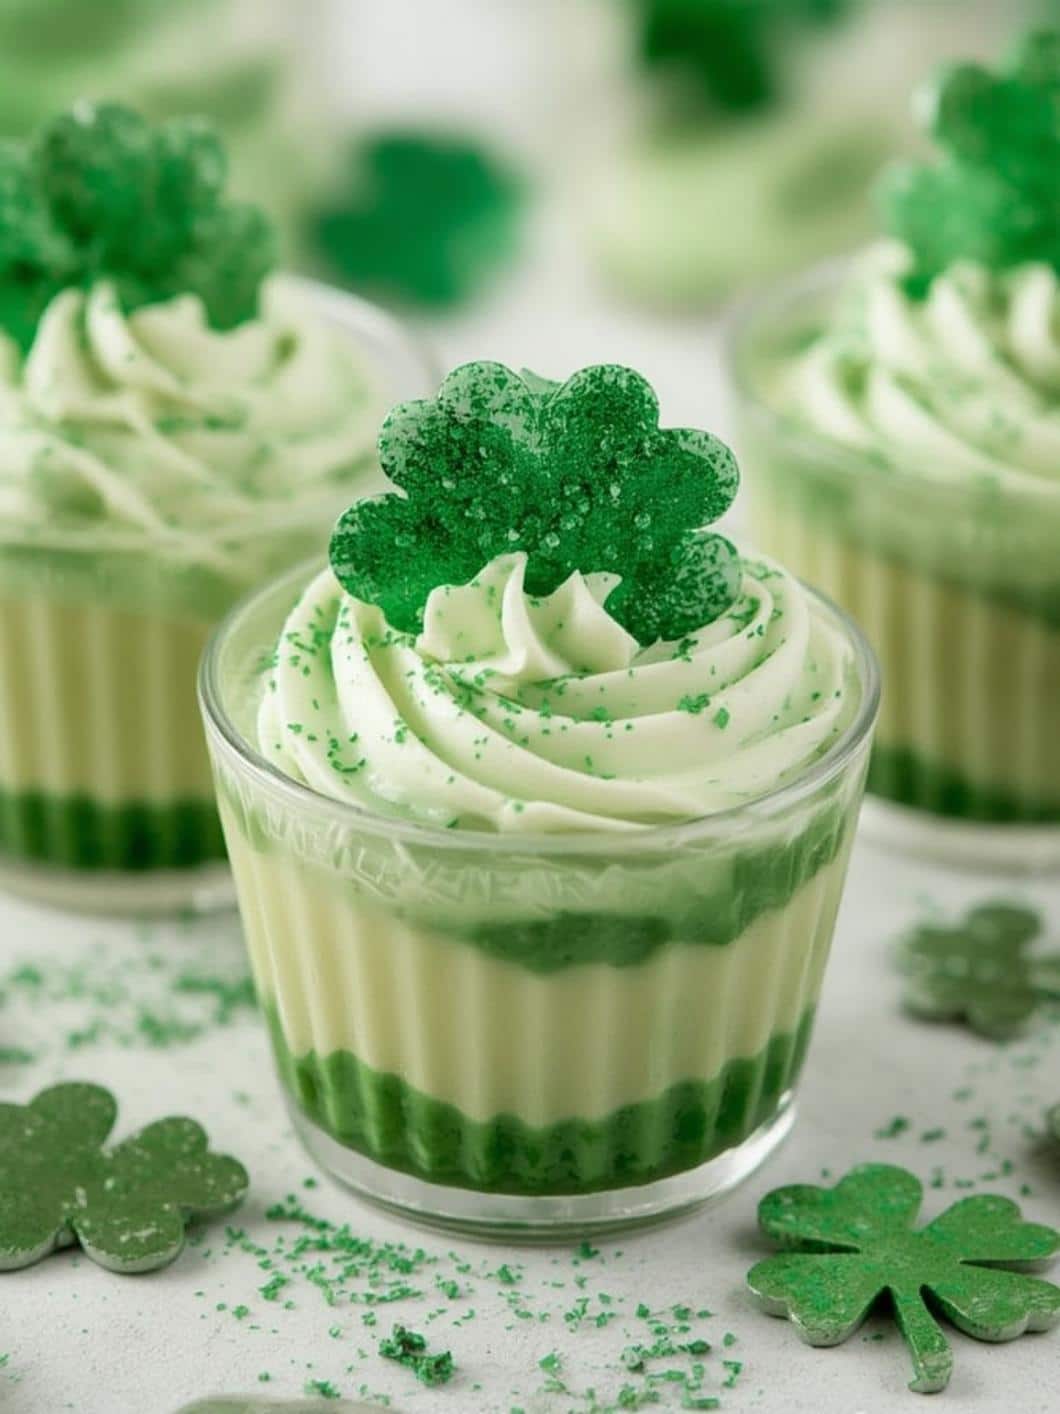
As March rolls around, visions of shamrocks, leprechauns, and all things green begin to fill our minds. St. Patrick’s Day is a wonderfully festive time, but you don’t need the luck of the Irish to create a memorable and delicious treat for your celebration. If you’re looking for a simple, no-bake dessert that both kids and adults will adore, then you have come to the right place. These incredible ST PATRICKS Day Green Shake Pudding Cups capture the minty, creamy flavor of that famous seasonal green shake, all in a fun, single-serving dessert cup. Consequently, they are incredibly easy to prepare, making them perfect for parties or a special family treat. This guide will walk you through everything you need to know to create these delightful green desserts that are sure to be a hit.
Why You’ll Absolutely Love This Recipe
There are countless reasons to fall in love with these festive pudding cups. First and foremost, they are unbelievably easy to make. In fact, you won’t need to turn on your oven at all, which makes this an ideal recipe for getting kids involved in the kitchen. The combination of rich chocolate cookie crumbs, cool mint pudding, and fluffy whipped topping creates a perfect balance of flavors and textures. Moreover, they taste just like the iconic minty green shakes from your favorite fast-food restaurant, but in a spoonable, pudding form. Because they are served in individual cups, they are perfect for portion control and easy serving at any gathering. Ultimately, this dessert is not only delicious but also visually stunning, adding a beautiful pop of green to your St. Patrick’s Day celebration.
Print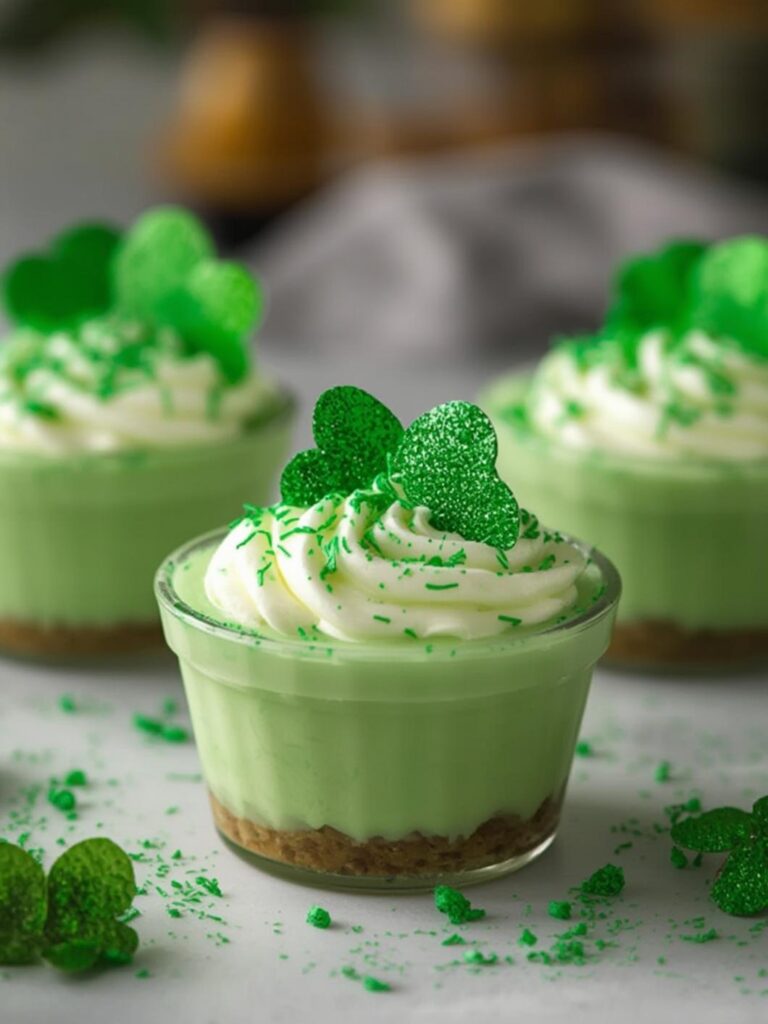
ST PATRICKS Day Green Shake Pudding Cups: The 10 Ultimate Steps for a Festive Treat
Creamy mint-flavored green pudding layered over chocolate cookie crumbs and topped with fluffy whipped cream—these no-bake St. Patrick’s Day Green Shake Pudding Cups are festive and fun.
- Total Time: 50 minutes
- Yield: 6 pudding cups 1x
Ingredients
1 (3.4-ounce) package vanilla instant pudding mix
2 cups cold whole milk
1/2 teaspoon mint extract
Green food coloring
15–20 chocolate sandwich cookies, crushed
4 tablespoons unsalted butter, melted
1 cup heavy whipping cream or 8 ounces whipped topping
2 tablespoons powdered sugar (if making fresh whipped cream)
1/4 teaspoon vanilla extract (if making fresh whipped cream)
Green sprinkles or chocolate shavings
Maraschino cherries (optional)
Instructions
1. Crush chocolate sandwich cookies into fine crumbs using a food processor or sealed bag and rolling pin.
2. Mix cookie crumbs with melted butter until evenly moistened.
3. Spoon about 2 tablespoons of crumb mixture into the bottom of each serving cup and press firmly to form a crust layer.
4. In a large bowl, whisk together instant pudding mix and cold milk for about 2 minutes until thickened.
5. Stir in mint extract and green food coloring until evenly combined and desired shade is reached.
6. Spoon or pipe the green pudding evenly over the cookie crust layer in each cup.
7. Refrigerate cups for at least 30 minutes to allow pudding to fully set.
8. If making fresh whipped cream, beat heavy cream with powdered sugar and vanilla until stiff peaks form.
9. Top each chilled pudding cup with whipped cream or whipped topping.
10. Garnish with sprinkles, chocolate shavings, and a maraschino cherry before serving.
Notes
Use mint extract rather than peppermint for a smoother, classic shake flavor.
Chill pudding thoroughly before adding toppings for best texture.
For a mint chocolate chip version, fold mini chocolate chips into the pudding before chilling.
Store covered in the refrigerator for up to 3 days.
Add whipped topping and garnishes just before serving for best presentation.
- Prep Time: 20 minutes
- Cook Time: 0 minutes
- Category: Dessert
- Method: No Bake
- Cuisine: American
- Diet: Vegetarian
Nutrition
- Serving Size: 1 pudding cup
- Calories: 310
- Sugar: 26g
- Sodium: 350mg
- Fat: 16g
- Saturated Fat: 9g
- Unsaturated Fat: 6g
- Trans Fat: 0g
- Carbohydrates: 38g
- Fiber: 1g
- Protein: 4g
- Cholesterol: 35mg
Essential Ingredients for ST PATRICKS Day Green Shake Pudding Cups
Before you begin, gathering all your ingredients is an important first step. This recipe uses simple, easy-to-find items that come together to create something truly special. For instance, the use of instant pudding mix saves a significant amount of time. Here is what you will need:
For the Mint Pudding Layer
- 1 package (3.4 ounces) vanilla instant pudding mix
- 2 cups of cold milk (whole milk provides the richest flavor)
- 1/2 teaspoon of mint extract (not peppermint, for that classic shake flavor)
- Green food coloring (gel or liquid)
For the Chocolate Cookie Crust
- 15-20 chocolate sandwich cookies (like Oreos)
- 4 tablespoons of unsalted butter, melted
For the Fluffy Topping
- 1 cup of heavy whipping cream or 1 container (8 ounces) of whipped topping (like Cool Whip)
- 2 tablespoons of powdered sugar (if making fresh whipped cream)
- 1/4 teaspoon of vanilla extract (if making fresh whipped cream)
- Green sprinkles or chocolate shavings for garnish
- Maraschino cherries (optional, for that classic shake look)
A quick note on the mint extract: be sure to use mint extract rather than peppermint. While they sound similar, peppermint has a much stronger, sharper flavor, whereas mint extract provides that smoother, cooler taste you’re looking for. The health benefits of mint are also widely discussed, as noted by sources like Healthline, which makes this a flavorful choice.
Step-by-Step Instructions
Now, let’s get to the fun part of putting these delightful treats together. Following these steps carefully will ensure your pudding cups turn out perfectly every single time.
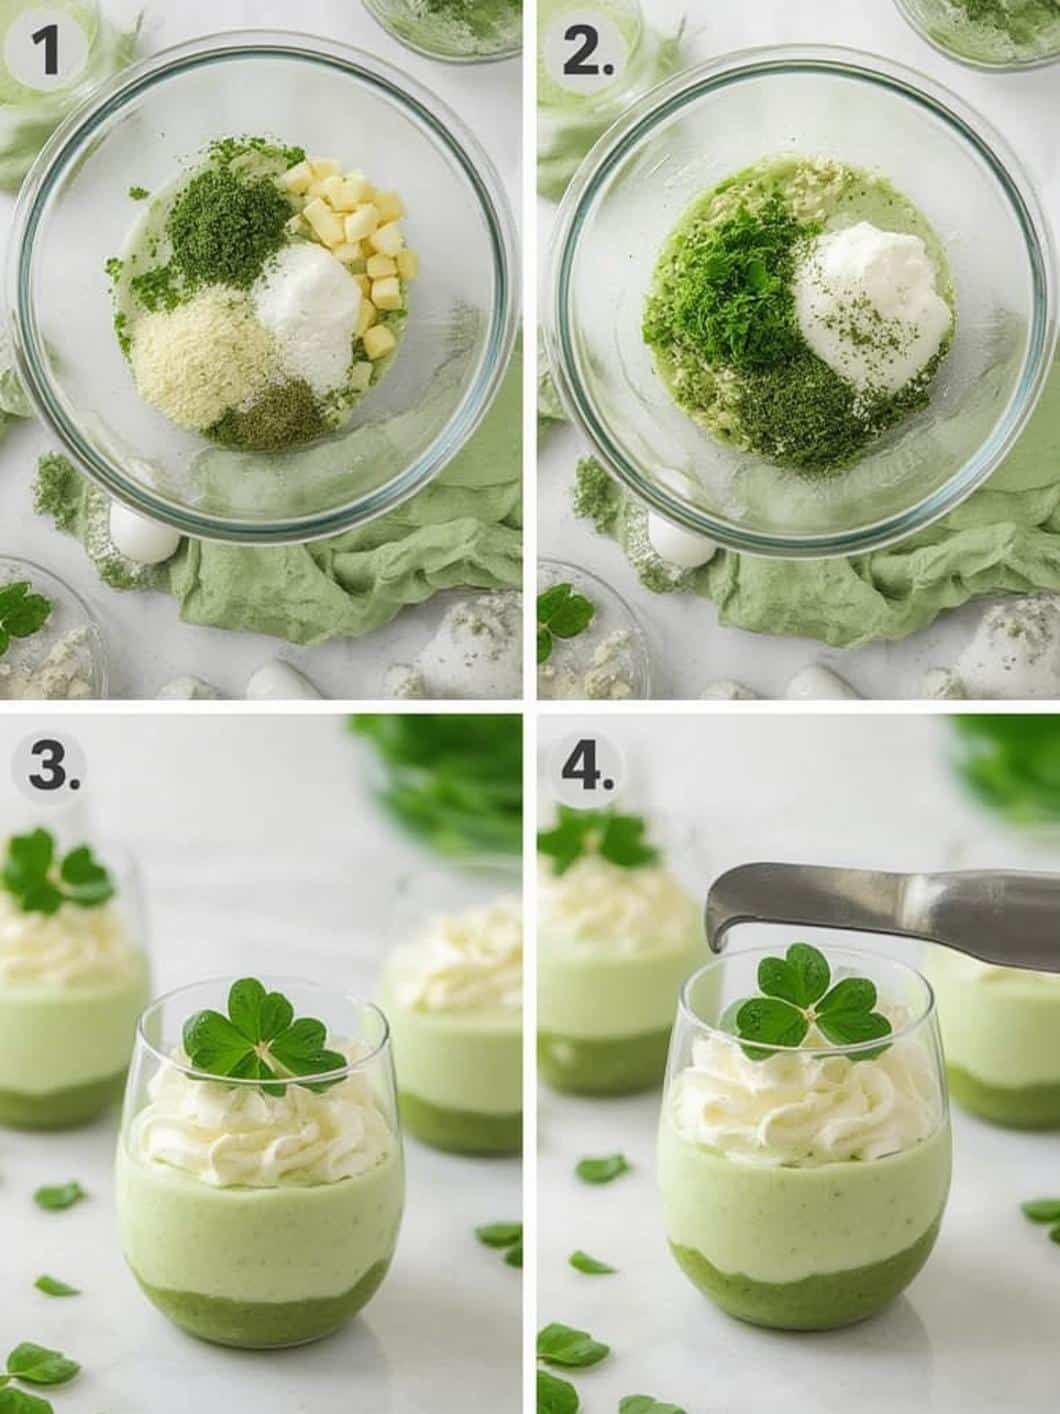
1. Prepare the Chocolate Cookie Crumbs
First, you will need to create the crumbly chocolate base. Place your chocolate sandwich cookies in a food processor and pulse until they become fine crumbs. Alternatively, if you don’t have a food processor, you can place the cookies in a sealed plastic bag and crush them with a rolling pin. Next, transfer the crumbs to a medium bowl. Pour the melted butter over the crumbs and mix with a fork until all the crumbs are evenly moistened.
2. Assemble the Crust Layer
After your crust is prepared, it’s time to build the foundation of your dessert. You will need about 6-8 small, clear cups or glasses for this recipe. Spoon approximately two tablespoons of the buttery cookie crumb mixture into the bottom of each cup. Then, gently press the crumbs down with the back of a spoon to create a firm, even layer. Set these cups aside while you prepare the pudding.
3. Mix the Green Pudding
In a large mixing bowl, combine the vanilla instant pudding mix and the two cups of cold milk. Whisk them together for about two minutes, or until the mixture begins to thicken. Subsequently, add the mint extract and a few drops of green food coloring. Continue to whisk until everything is well combined and you achieve your desired shade of green. You can add more food coloring, a drop at a time, to get a more vibrant color. For information on food coloring safety, you can always consult reliable sources like WebMD.
4. Layer the Pudding and Chill
Once the pudding is ready, carefully spoon or pipe the green mint pudding mixture evenly over the cookie crust layer in each of your cups. Afterward, place the pudding cups in the refrigerator to chill for at least 30 minutes. This chilling time is crucial as it allows the pudding to set completely, ensuring a firm and delicious dessert.
5. Add the Toppings Before Serving
Finally, just before you are ready to serve your ST PATRICKS Day Green Shake Pudding Cups, it’s time to add the finishing touches. You can make fresh whipped cream by beating heavy cream, powdered sugar, and vanilla until stiff peaks form. Or, for a quicker option, simply use a container of prepared whipped topping. Dollop or pipe a generous amount of whipped cream on top of the set pudding. Then, finish with a sprinkle of green sugar crystals or chocolate shavings and, if desired, a bright red maraschino cherry on top.
Tips and Fun Variations
While this recipe is fantastic as is, there are many ways to customize it to your liking. Here are a few ideas to inspire your creativity.
Flavor Twists and Add-Ins
For an interesting change, you could use pistachio instant pudding for a nutty, green base instead of vanilla. Another idea is to fold some mini chocolate chips into the pudding mixture before chilling for a mint chocolate chip version. Furthermore, if you love different textures, you could add a layer of chocolate pudding between the crust and the mint pudding. If you’re looking for other festive treats, these Springtime Crinkle Cookies are also a colorful and fun option.
Make it an Adult Treat
For a grown-up version of these pudding cups, you can easily add a bit of booze. Simply add a splash of crème de menthe or a creamy Irish liqueur like Baileys to the pudding mixture along with the mint extract. This will give the dessert a subtle, warming kick that is perfect for an adult St. Patrick’s Day party. If you enjoy creating unique cocktails and desserts, you might also like this decadent Cherry Rose Mudslide recipe.
Dietary Modifications
This recipe can also be adapted for various dietary needs. For a gluten-free version, simply use your favorite brand of gluten-free chocolate sandwich cookies. To make it dairy-free, use a dairy-free pudding mix and substitute the whole milk with a creamy plant-based milk like almond or oat milk. In addition, you can use a coconut-based or other dairy-free whipped topping. Always check the labels on your ingredients to ensure they meet your dietary requirements, and you can find more information about dietary choices at institutions like the Mayo Clinic.
Making Ahead and Storage Instructions
One of the best things about this recipe is its convenience. You can easily prepare these pudding cups ahead of time, which is a lifesaver when planning for a party. You can assemble the crust and pudding layers up to 24 hours in advance. Just be sure to cover them tightly with plastic wrap and store them in the refrigerator. However, for the best results, you should always wait to add the whipped topping and other garnishes until right before you plan to serve them. This prevents the whipped cream from deflating and the sprinkles from bleeding their color. If you have any leftovers, they can be stored, covered, in the refrigerator for up to three days. For more make-ahead dessert ideas, these Strawberry Shortcake Bars are always a crowd-pleaser.
Conclusion
In conclusion, these ST PATRICKS Day Green Shake Pudding Cups are a fantastic way to celebrate the holiday with a fun and festive dessert. They deliver that beloved minty-chocolate flavor in a creamy, easy-to-make package that requires absolutely no baking. Because they are so simple to prepare, they are a perfect activity to do with family. This recipe is not only delicious but also highly customizable, allowing you to add your own creative twists. Therefore, give these charming green pudding cups a try for your next St. Patrick’s Day celebration and watch them disappear.
Frequently Asked Questions (FAQ)
Can I use cook-and-serve pudding instead of instant?
While you can use cook-and-serve pudding, it will change the preparation method significantly. You would need to cook it on the stovetop according to the package directions and then let it cool completely before layering it in the cups. Instant pudding is recommended for this recipe for its simplicity and quick setting time.
How long do these pudding cups last in the fridge?
When stored properly covered in the refrigerator, these pudding cups will stay fresh for up to three days. However, they are best enjoyed within the first 24-48 hours for the optimal texture, especially for the cookie crust layer.
What can I use if I don’t have mint extract?
If you don’t have mint extract, you could use peppermint extract, but be sure to use less, as it has a much stronger flavor. Start with 1/4 teaspoon and add more to taste if needed. Alternatively, you could omit the mint flavor altogether and simply have a festive vanilla green pudding cup.