As the weather warms and flowers begin to bloom, our kitchens often call for something equally bright and cheerful. For this reason, there is no better treat to celebrate the season than a batch of beautiful Spring Blossom Cookies. These delightful cookies are a festive twist on the classic peanut butter blossom, featuring a soft sugar cookie base rolled in colorful pastel sugars and topped with a sweet chocolate candy. Consequently, they are not only delicious but also visually stunning, resembling little flowers blooming on a plate. This recipe will guide you through creating these perfect little bites of spring, ensuring they become a new favorite for your family gatherings, Easter celebrations, or simply as a way to welcome the new season. Ultimately, making these cookies is a joyful activity that brings the colors of spring right into your home.
Why You’ll Adore These Spring Blossom Cookies
There are countless reasons to fall in love with this Spring Blossom Cookies recipe. First and foremost, their appeal is undeniable. The vibrant pastel colors immediately catch the eye, making them a perfect centerpiece for any dessert table. Furthermore, they are incredibly versatile. You can customize the colors to match any event theme, from baby showers to birthday parties. For instance, you could use soft pinks and blues for a baby shower or bright yellows and greens for an Easter brunch. In addition to their looks, these cookies boast a wonderfully soft and chewy texture that pairs perfectly with the creamy chocolate center. They are also remarkably simple to make, which means even novice bakers can achieve impressive results. This makes them a fantastic project to do with kids, who will absolutely love rolling the dough balls in the sparkling colored sugar. In short, these cookies offer a delightful combination of taste, beauty, and fun.
Print
Spring Blossom Cookies: The 15 Ultimate Steps for the Prettiest Spring Treats
These Spring Blossom Cookies feature a soft, chewy sugar cookie rolled in pastel sanding sugar and topped with a sweet chocolate center—perfect for Easter, baby showers, and cheerful spring celebrations.
- Total Time: 55 minutes
- Yield: 24 cookies 1x
Ingredients
2 3/4 cups all-purpose flour
1 teaspoon baking soda
1/2 teaspoon salt
1 cup unsalted butter, softened
1 1/2 cups granulated sugar
1 large egg
2 teaspoons pure vanilla extract
Pastel sanding sugars (pink, yellow, lavender, green)
24–30 chocolate kisses, unwrapped
Instructions
1. Preheat oven to 375°F (190°C) and line baking sheets with parchment paper.
2. In a medium bowl, whisk together flour, baking soda, and salt. Set aside.
3. In a large bowl, beat softened butter and sugar until light and fluffy, about 2–3 minutes.
4. Add egg and vanilla extract, mixing until fully combined.
5. Gradually mix dry ingredients into wet ingredients on low speed until just combined. Do not overmix.
6. Chill the dough for at least 30 minutes to prevent spreading.
7. Scoop dough into 1-inch balls and roll until smooth.
8. Roll each dough ball in pastel sanding sugar until fully coated.
9. Place cookies 2 inches apart on prepared baking sheets.
10. Bake for 8–10 minutes, until edges are lightly golden and centers are set.
11. Immediately press a chocolate kiss into the center of each warm cookie.
12. Cool on the baking sheet for 5 minutes before transferring to a wire rack to cool completely.
Notes
Chilling the dough is essential for thick, puffy cookies with beautiful cracks.
Press the chocolate into the cookies immediately after baking for the classic blossom look.
Store cookies in an airtight container at room temperature for up to 5 days.
Freeze unbaked dough balls for up to 3 months and bake directly from frozen, adding 1–2 minutes to baking time.
For flavor variation, substitute almond extract for part of the vanilla or add citrus zest for brightness.
- Prep Time: 15 minutes
- Cook Time: 10 minutes
- Category: Dessert
- Method: Baking
- Cuisine: American
- Diet: Vegetarian
Nutrition
- Serving Size: 1 cookie
- Calories: 170
- Sugar: 13g
- Sodium: 80mg
- Fat: 8g
- Saturated Fat: 5g
- Unsaturated Fat: 2g
- Trans Fat: 0g
- Carbohydrates: 23g
- Fiber: 0g
- Protein: 2g
- Cholesterol: 25mg
Essential Ingredients and Tools
Before you begin your baking adventure, it’s important to gather all your necessary ingredients and tools. Being prepared ensures the process goes smoothly from start to finish. Most of these items are pantry staples, which makes this recipe even more convenient.
For the Cookie Dough:
- All-purpose flour
- Baking soda
- Salt
- Unsalted butter, softened to room temperature
- Granulated sugar
- One large egg
- Pure vanilla extract
- A few drops of food coloring (optional, for colored dough)
For the Colorful Coating and Topping:
- Colored sanding sugars (pastels like pink, yellow, lavender, and green work beautifully)
- Chocolate Kisses, or your favorite small chocolate candies
Necessary Kitchen Tools:
- Mixing bowls (one large, one medium)
- Electric mixer (stand or handheld)
- Whisk
- Measuring cups and spoons
- Cookie sheets
- Parchment paper or silicone baking mats
- A small cookie scoop (about 1 tablespoon)
Step-by-Step Instructions for Perfect Spring Blossom Cookies
Now that you have everything ready, let’s walk through the process of creating these gorgeous cookies. Following these steps carefully will guarantee a perfect batch every time.
First, preheat your oven to 375°F (190°C). Then, line your cookie sheets with parchment paper to prevent sticking and ensure even baking. This simple preparation step makes cleanup significantly easier later on.
Next, in a medium bowl, whisk together the all-purpose flour, baking soda, and salt. Combining the dry ingredients separately ensures they are evenly distributed throughout the dough, which is crucial for the cookies’ texture. After that, set this bowl aside.
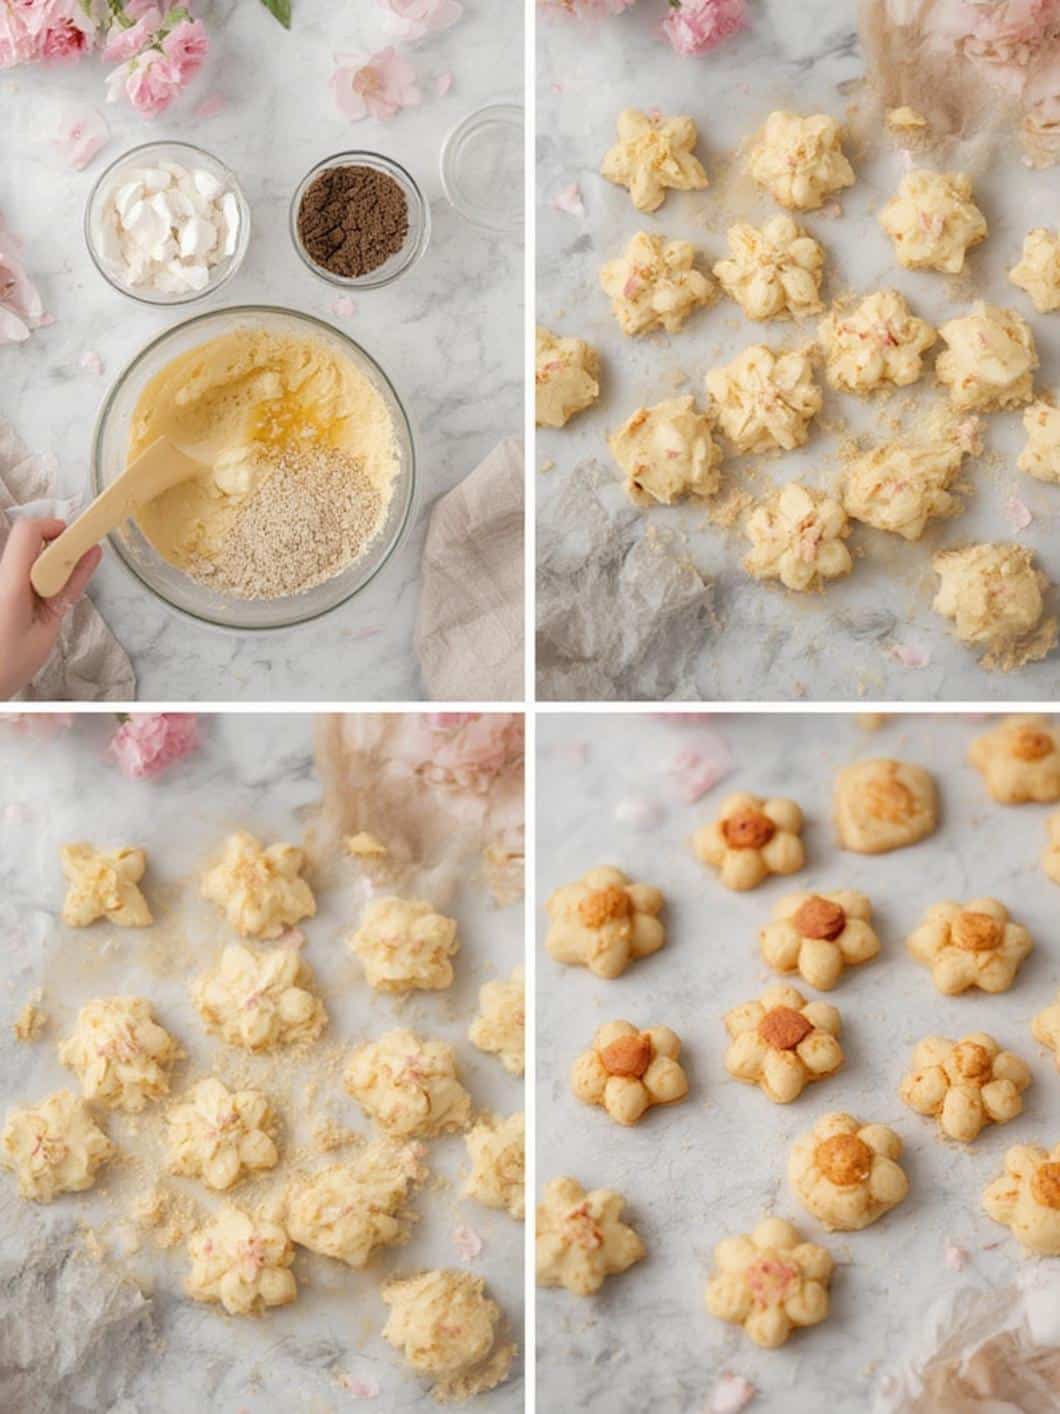
In a large bowl, using an electric mixer, cream the softened unsalted butter and granulated sugar together until the mixture is light and fluffy. This process, which usually takes about 2-3 minutes, incorporates air into the dough, resulting in a softer cookie. Subsequently, beat in the large egg and pure vanilla extract until they are fully combined.
Following this, gradually add the dry ingredient mixture to the wet ingredients. Mix on low speed until just combined. Be careful not to overmix the dough, as this can lead to tough cookies. The dough should be soft and easy to handle. For an extra pop of color, you can divide the dough and mix in a few drops of different pastel food colorings into each portion.
Once the dough is ready, it is highly recommended to chill it for at least 30 minutes. This step is vital because it solidifies the butter, which in turn prevents the cookies from spreading too much in the oven. While the dough chills, you can prepare your colored sugars by placing each color in a separate shallow bowl.
After chilling, use a small cookie scoop to portion the dough into 1-inch balls. This ensures that all your Spring Blossom Cookies will be uniform in size. Then, roll each ball of dough between your palms to make it smooth.
Immediately after shaping, roll each dough ball in the colored sanding sugars until it is completely coated. The sparkling sugar gives the cookies a beautiful, festive finish. Next, place the sugar-coated balls about 2 inches apart on your prepared cookie sheets.
Bake the cookies for 8 to 10 minutes, or until the edges are lightly golden and the centers are set. They will look slightly puffy when you take them out of the oven. As soon as you remove the cookies from the oven, gently press a chocolate candy into the center of each one. The heat from the cookie will soften the chocolate just enough to hold it in place. This technique is similar to how you make delicious Strawberry Kiss Cookies.
Finally, allow the cookies to cool on the baking sheet for about five minutes before transferring them to a wire rack to cool completely. This prevents them from breaking while they are still warm and delicate. Your beautiful Spring Blossom Cookies are now ready to be enjoyed!
Tips and Tricks for a Flawless Batch
To ensure your Spring Blossom Cookies turn out perfectly every single time, here are a few expert tips and tricks. Adhering to these suggestions can make a significant difference in the final result.
Don’t Skip Chilling the Dough
As mentioned earlier, chilling the dough is a critical step. A warmer dough will spread more during baking, resulting in thin, flat cookies. Consequently, for that classic puffy, soft blossom shape, you must let the dough rest in the refrigerator. Even 30 minutes makes a substantial difference in texture and appearance.
Choose Your Colors and Candies Wisely
The beauty of these cookies lies in their appearance. Therefore, choose high-quality sanding sugars in vibrant pastel shades for the best effect. In terms of the candy center, classic milk chocolate kisses are a great choice, but you can also experiment. For example, white chocolate, caramel-filled, or even dark chocolate candies can add a unique flavor twist.
Perfect Timing for the “Blossom”
The key to the perfect blossom is pressing the chocolate into the cookie immediately after it comes out of the oven. At this point, the cookie is hot and pliable enough to form a crackled top without crumbling. If you wait too long, the cookie will be too firm. Similarly, if you try to add the chocolate before baking, it will melt completely. This step requires precise timing for that signature look.
Fun Variations and Customizations
While the classic recipe is fantastic, there are many ways to customize your Spring Blossom Cookies to make them your own. For instance, you can easily alter the flavor profile or change the toppings for a new experience.
Flavor Twists
For a subtle change, consider adding a teaspoon of almond extract along with the vanilla for a richer, nuttier flavor. Alternatively, a bit of lemon or orange zest in the dough can add a bright, citrusy note that pairs wonderfully with the sweet chocolate. According to Healthline, citrus zest can also add a small boost of beneficial compounds. When you’re done with baking, you might want a savory meal like some delicious shredded chicken tacos to balance out the sweetness.
Gluten-Free Option
To make these cookies gluten-free, simply substitute the all-purpose flour with a high-quality 1-to-1 gluten-free baking flour blend. Most modern blends contain xanthan gum, which helps mimic the structure of gluten. As a result, you can achieve a similar soft and chewy texture without any major adjustments to the recipe. It is always important to follow dietary guidelines carefully if you are baking for someone with allergies or sensitivities, as advised by major health organizations like the WebMD.
How to Store Your Cookies
Proper storage is essential to keep your Spring Blossom Cookies fresh and delicious for as long as possible. Luckily, they store quite well. To store them at room temperature, place the completely cooled cookies in an airtight container. They will stay fresh for up to five days. You can place a slice of bread in the container to help maintain their softness.
Furthermore, these cookies are great for making ahead. You can prepare the dough, wrap it tightly in plastic wrap, and refrigerate it for up to three days before baking. Alternatively, you can freeze the unbaked dough balls. Simply place them on a baking sheet in the freezer until firm, then transfer them to a freezer-safe bag. They can be frozen for up to three months. When you’re ready to bake, you can bake them directly from frozen, just adding a couple of extra minutes to the baking time.
Conclusion

In summary, these Spring Blossom Cookies are the perfect way to celebrate the arrival of a new season. With their soft, chewy texture, sweet chocolate center, and beautiful pastel colors, they are guaranteed to bring a smile to anyone’s face. This recipe is not only simple to follow but also offers plenty of room for customization, allowing you to create a treat that is uniquely yours. Consequently, whether you’re an experienced baker or just starting, you can confidently create a stunning and delicious batch. Ultimately, baking a tray of these delightful cookies is a wonderful way to share the joy and freshness of spring with your friends and family.
Frequently Asked Questions (FAQ)
Why did my cookies spread too much?
The most common reason for cookies spreading is that the dough was too warm when it went into the oven. Chilling the dough for at least 30 minutes before baking is crucial. Additionally, ensure your butter is softened but not melted, as overly soft butter can also cause spreading.
Can I make the dough ahead of time?
Yes, absolutely. The cookie dough can be made and stored in the refrigerator for up to three days. Just wrap it tightly in plastic wrap. You can also freeze the portioned dough balls for up to three months for a quick and easy treat whenever the craving strikes.
What other candies can I use besides chocolate kisses?
You can get creative with the center topping. Mini peanut butter cups, chocolate hearts, caramel-filled chocolates, or even a simple round chocolate candy disc would work wonderfully. Just be sure to press it into the cookie right after baking for the best result.
How do I get the sanding sugar to stick well?
The key is to roll the dough balls in the sanding sugar immediately after you shape them. The natural moisture and warmth from your hands will make the surface of the dough slightly tacky, which helps the sugar adhere perfectly. Avoid letting the dough balls sit out and dry before rolling them.