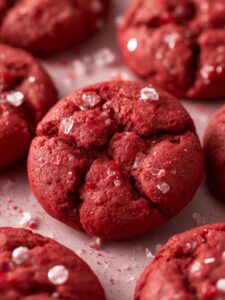
There is something undeniably luxurious about red velvet cake. With its striking color, delicate hint of cocoa, and tangy cream cheese frosting, it has earned its place as a classic American dessert. But what if you could capture all that decadent flavor in a single, perfect bite? That is precisely what you get with these incredible Red Velvet Truffles. These no-bake treats are surprisingly simple to make, yet they look and taste like they came from a high-end bakery. Consequently, they are perfect for holidays, special occasions, or just when you need a little indulgence.
In this guide, we will walk you through everything you need to know to create the most delicious red velvet truffles you have ever tasted. From gathering the right ingredients to mastering the perfect chocolate dip, you will have all the steps for dessert success. Moreover, if you love simple yet impressive desserts, you might also enjoy this heavenly strawberry cheesecake dump cake. Ultimately, preparing these beautiful truffles is a fun and rewarding kitchen project.
What Makes Red Velvet So Special?
Before we dive into the recipe, let’s explore what gives red velvet its unique character. Unlike a standard chocolate cake, red velvet has a much milder cocoa flavor. Historically, the reaction between acidic ingredients like buttermilk and vinegar with non-Dutched cocoa powder created a subtle reddish-brown hue. Today, of course, that iconic vibrant red comes from food coloring. The flavor, however, remains complex and unique.
The subtle chocolate note is beautifully balanced by a slight tang, which traditionally comes from vinegar and buttermilk in the cake batter. In our easy recipe for red velvet truffles, that essential tang comes from cream cheese, which mimics the flavor of classic cream cheese frosting. According to sources like Healthline, cocoa is also rich in polyphenols, which have significant health benefits. Therefore, this faint chocolatey taste not only adds depth but also a touch of goodness. This perfect balance of sweet, tangy, and chocolatey is precisely what makes red velvet a timeless favorite and an ideal base for our truffles.
Print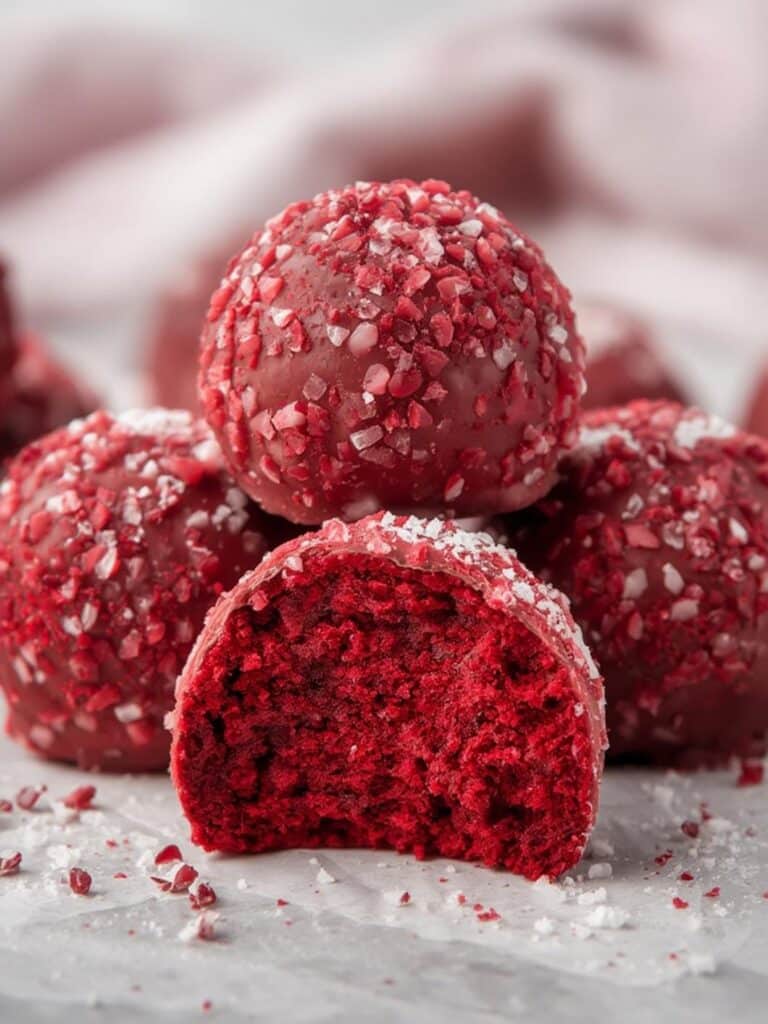
Red Velvet Truffles: The 15 Ultimate Steps for Decadent Perfection
Decadent no-bake red velvet truffles made with rich cake crumbs, tangy cream cheese, and a smooth white chocolate coating for an irresistible bite-sized dessert.
- Total Time: 2 hours
- Yield: 36 truffles 1x
Ingredients
1 box (15.25 oz) red velvet cake mix, baked and cooled
Ingredients listed on cake mix box (eggs, oil, water)
8 ounces full-fat cream cheese, softened
16–24 ounces white chocolate melting wafers or almond bark
Optional: red candy melts or festive sprinkles for decorating
Instructions
1. Prepare and bake the red velvet cake according to package directions in a 9×13-inch pan.
2. Allow the cake to cool completely.
3. Crumble the cooled cake into fine crumbs using hands or a food processor.
4. Add softened cream cheese to the cake crumbs and mix until fully combined.
5. Cover and chill the mixture in the refrigerator for at least 1 hour.
6. Scoop about 1 tablespoon of mixture and roll into smooth balls.
7. Place truffle balls on a parchment-lined baking sheet.
8. Freeze the truffle balls for 30 minutes to firm up.
9. Melt white chocolate wafers in the microwave in 30-second intervals, stirring until smooth.
10. Dip each truffle into melted chocolate, coating completely.
11. Lift out, let excess drip off, and place back on parchment paper.
12. Decorate immediately if desired before chocolate sets.
13. Allow coating to fully harden at room temperature or in the refrigerator.
14. Repeat until all truffles are coated.
Notes
Use full-fat cream cheese for best flavor and texture.
Chilling and freezing steps are essential for easy rolling and dipping.
If chocolate is too thick, add 1 teaspoon coconut oil or shortening to thin.
Store truffles refrigerated in an airtight container.
Great for holidays, gifting, and special occasions.
- Prep Time: 30 minutes
- Cook Time: 30 minutes
- Category: Dessert
- Method: No-Bake
- Cuisine: American
- Diet: Vegetarian
Nutrition
- Serving Size: 1 truffle
- Calories: 120
- Sugar: 10g
- Sodium: 75mg
- Fat: 7g
- Saturated Fat: 4g
- Unsaturated Fat: 2g
- Trans Fat: 0g
- Carbohydrates: 14g
- Fiber: 0.5g
- Protein: 2g
- Cholesterol: 20mg
Gathering Your Ingredients for Perfect Red Velvet Truffles
One of the best things about this recipe is its simplicity. You only need a few key ingredients to create these stunning confections. For that reason, it is an accessible recipe for bakers of all skill levels. Here is what you will need to get started.
The Cake Base
The foundation of our red velvet truffles is, naturally, red velvet cake. You have two excellent options here. First, for convenience, you can use a boxed red velvet cake mix. Simply prepare it according to the package directions. On the other hand, if you have a favorite from-scratch red velvet cake recipe, feel free to use that instead. The goal is to have one fully baked and cooled 9×13 inch cake.
- 1 box (around 15.25 oz) red velvet cake mix
- Ingredients listed on the box (typically water, vegetable oil, and eggs)
The Creamy Binder
To turn our cake crumbs into a decadent, moldable truffle filling, we need a binder. Cream cheese is the classic and best choice, as it provides the signature tangy flavor of red velvet cake’s traditional frosting. For instance, using full-fat block cream cheese will give you the richest flavor and best texture.
- 8 ounces cream cheese, softened to room temperature
The Chocolate Coating
A smooth, beautiful coating is what makes a truffle truly special. While you can use chocolate chips, they often contain stabilizers that can make them difficult to melt smoothly. Therefore, we highly recommend using melting wafers or almond bark for the best results. They are designed to melt easily and set with a lovely, glossy finish.
- 16-24 ounces white chocolate melting wafers or white almond bark
- Optional: Red candy melts or sprinkles for decoration
Step-by-Step Instructions for Making Red Velvet Truffles
Now that your ingredients are ready, it is time for the fun part. Follow these detailed steps to create your own batch of irresistible Red Velvet Truffles.
First, you need to bake your red velvet cake. Prepare the cake mix following the instructions on the box and bake it in a 9×13 inch pan. Once it’s baked, you must let it cool completely. This is a crucial step; otherwise, the warm cake will melt the cream cheese, resulting in a greasy, overly soft mixture that is impossible to roll.
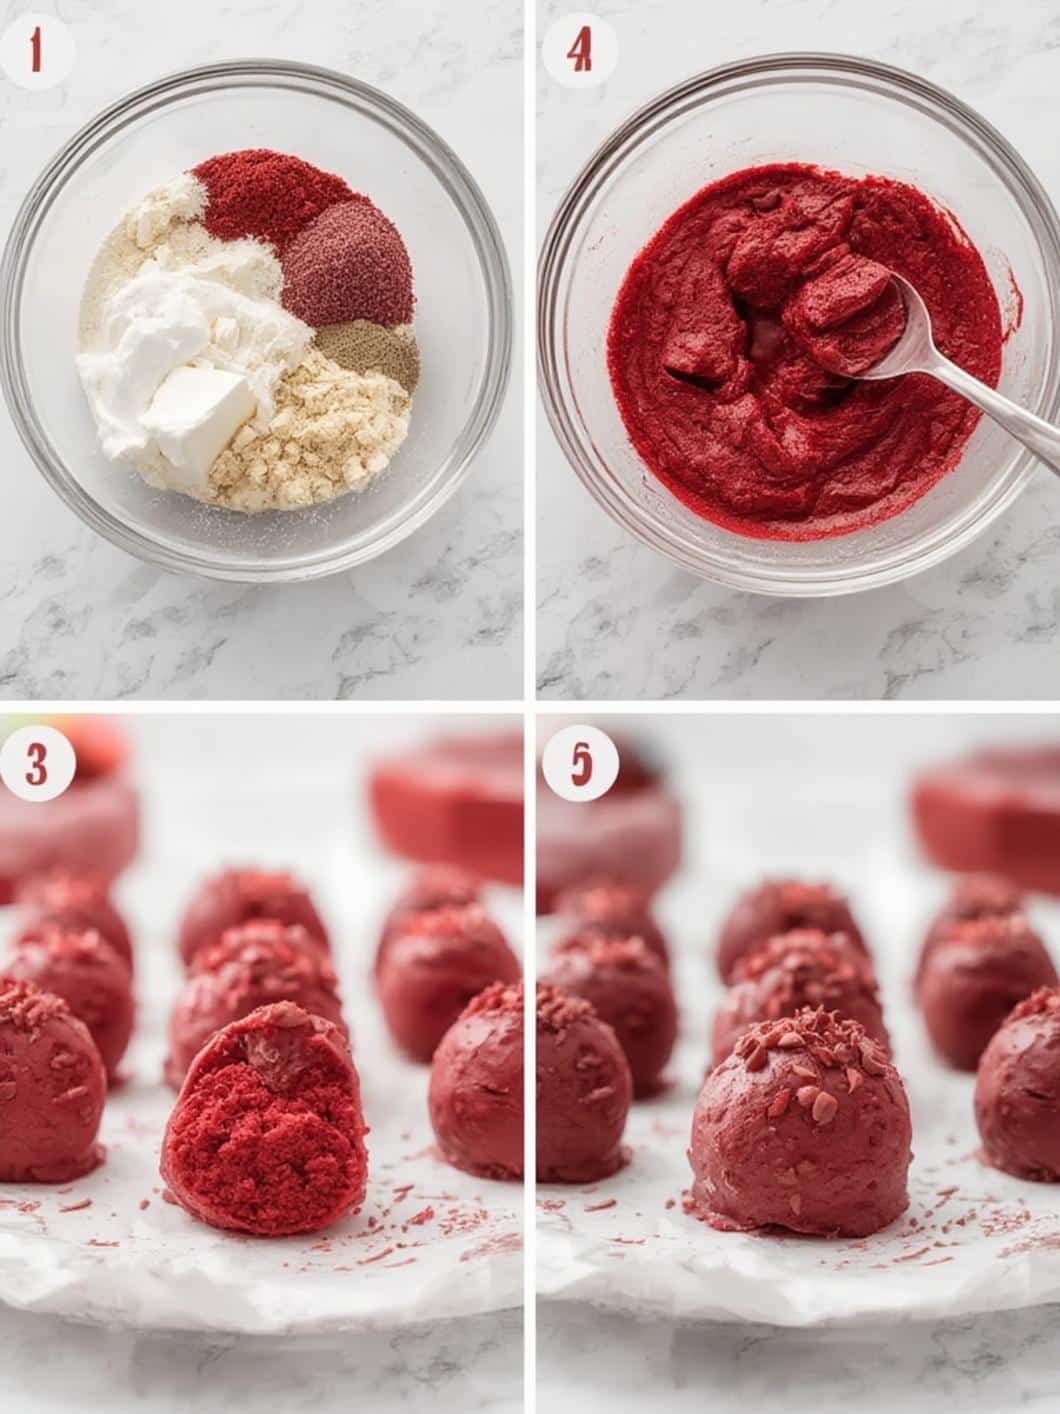
Next, once the cake is completely cool, it is time to crumble it. You can do this by hand, breaking it apart into a large bowl, or you can use a food processor. Pulse the cake in the food processor until you have fine, uniform crumbs. This ensures a smooth texture for your truffles.
Afterward, add the softened cream cheese to the bowl of cake crumbs. Using your hands or a sturdy spatula, mix the cream cheese and crumbs together until they are thoroughly combined. The mixture should be moist and hold its shape easily when pressed together. Be careful not to overmix, as this can make the filling oily.
Then, cover the bowl with plastic wrap and chill the mixture in the refrigerator for at least one hour, or in the freezer for about 20-30 minutes. Chilling the mixture makes it much easier to handle and roll into balls. Following this, use a small cookie scoop (about 1 tablespoon) to portion out the mixture. Roll each portion between your palms to form a smooth, round ball. Place the rolled balls on a baking sheet lined with parchment paper.
For an extra firm set that makes dipping much cleaner, place the baking sheet of truffle balls into the freezer for at least 30 minutes. While the truffles are chilling, you can prepare the coating. Place your white chocolate melting wafers in a microwave-safe bowl. Microwave in 30-second intervals, stirring in between each one, until the chocolate is completely melted and smooth.
Finally, it is time to dip your red velvet truffles. Using two forks or a dipping tool, lower one frozen truffle ball into the melted white chocolate. Roll it around to coat it completely. Lift it out, allowing any excess chocolate to drip back into the bowl. Place the coated truffle back on the parchment-lined baking sheet. If you are adding sprinkles or other decorations, do so immediately before the chocolate sets. Repeat with the remaining truffles. Let the truffles sit at room temperature or in the refrigerator until the coating is completely firm.
Tips and Tricks for Flawless Results
Creating beautiful homemade truffles is easy, but a few professional tips can elevate your treats from good to absolutely perfect. Keep these tricks in mind as you work.
Use a Cookie Scoop
For perfectly uniform red velvet truffles, a small cookie scoop is your best friend. It ensures that every truffle is the same size, which not only looks professional but also helps them set at the same rate. This simple tool makes the portioning process fast and mess-free.
The Importance of Chilling
Do not skip the chilling steps. Chilling the cake crumb mixture before rolling makes it less sticky and easier to shape. Furthermore, freezing the rolled balls before dipping is the ultimate secret to success. A frozen truffle is firm and will not fall apart in the warm chocolate. It also helps the chocolate coating set much faster.
Achieve a Smooth Coating
If your melted white chocolate seems too thick for dipping, you can stir in a teaspoon of coconut oil or vegetable shortening. This will thin it out slightly, creating a smoother, more even coating on your red velvet truffles. Be sure not to add any water-based liquids like milk or water, as this will cause the chocolate to seize.
Fun Variations and Serving Suggestions
While the classic white chocolate-coated Red Velvet Truffles are fantastic on their own, there are many ways to customize them. Feel free to get creative and make this recipe your own!
Creative Coating Ideas
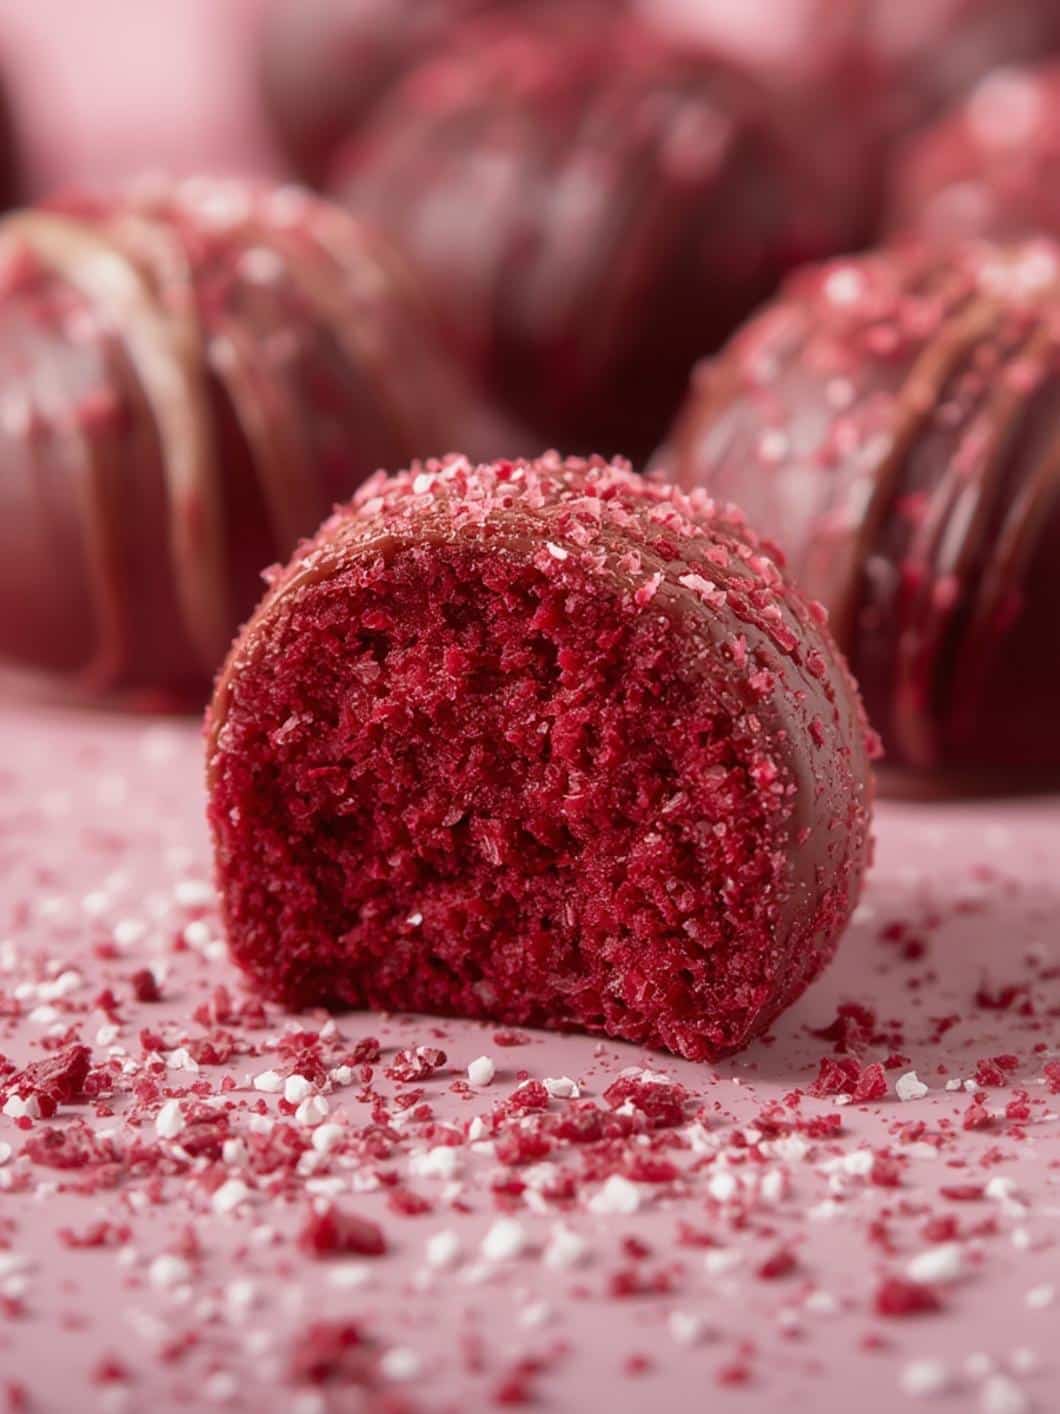
White chocolate is a classic pairing, but you can certainly switch things up. For example, dipping your truffles in milk chocolate or semi-sweet chocolate will create a richer, more intense flavor profile. Additionally, you could roll the freshly dipped truffles in crushed nuts, festive sprinkles, or even more red velvet cake crumbs for added texture and visual appeal.
Serving and Gifting
These truffles are a showstopper for any occasion. They are particularly popular for Valentine’s Day, Christmas, and birthday parties. For a truly special presentation, try making other festive treats like these heart-shaped brownies to serve alongside them. If you are giving the truffles as a gift, place them in mini cupcake liners inside a decorative box. They will look just like they came from a fancy candy shop. This also makes them a wonderful addition to a dessert platter with other small bites, such as these delicious mini Valentine’s Day cheesecake bites.
How to Store Your Homemade Truffles
Proper storage is essential to keep your red velvet truffles fresh and delicious. Because they contain cream cheese, they must be kept in the refrigerator. Store them in an airtight container to prevent them from drying out or absorbing any other odors from the fridge.
In the refrigerator, your truffles will stay fresh for up to one week. If you want to make them further in advance, they also freeze beautifully. To freeze, place the finished truffles in a single layer in a freezer-safe container. You can place parchment paper between layers to prevent sticking. They will keep in the freezer for up to three months. When you are ready to enjoy them, simply let them thaw in the refrigerator for a few hours. Following proper food safety guidelines, like those suggested by the Mayo Clinic, is key to enjoying homemade treats safely.
Conclusion
In summary, making homemade Red Velvet Truffles is a simple and delightful process that yields incredibly impressive results. By combining crumbled red velvet cake with tangy cream cheese, you create a rich and moist filling that perfectly captures the essence of the classic dessert. Subsequently, dipping these little bites in smooth white chocolate transforms them into elegant confections fit for any celebration. This recipe is wonderfully versatile, allowing for fun variations with different coatings and decorations. Ultimately, these red velvet truffles are a perfect no-bake treat to share with loved ones or to enjoy all by yourself.
Frequently Asked Questions (FAQ)
What if I don’t have a red velvet cake mix?
If you prefer not to use a boxed mix, you can absolutely use your favorite from-scratch red velvet cake recipe. You will need one baked and cooled 9×13 inch cake to yield a similar number of truffles.
Why are my truffles too soft to roll into balls?
If the mixture is too soft, it most likely needs to be chilled for a longer period. Place the bowl back in the refrigerator for another 30 minutes or in the freezer for 15 minutes to help it firm up before attempting to roll again.
Can I use regular chocolate chips for the coating?
You can, but it is not recommended for the best results. Chocolate chips contain ingredients that prevent them from melting as smoothly as candy wafers or almond bark. If you do use them, add a teaspoon of coconut oil or shortening to help create a smoother consistency for dipping.
Why did my chocolate coating crack after setting?
This can sometimes happen if the truffle balls are frozen solid when you dip them in the warm chocolate. The extreme temperature difference can cause the chocolate to crack as it sets. To prevent this, let the frozen truffles sit at room temperature for about 5-10 minutes before dipping.