There is something undeniably magical about a batch of freshly baked red velvet cookies. With their vibrant, eye-catching color and a complex flavor that dances between subtle chocolate and tangy vanilla, these treats are a true showstopper. Consequently, they are perfect for holidays like Valentine’s Day and Christmas, or simply for any day you need a special pick-me-up. Unlike a simple sugar or chocolate chip cookie, these beautiful cookies offer a unique “velvet” texture that is soft, chewy, and utterly delightful. This guide will walk you through everything you need to know to create the most perfect, bakery-quality red velvet cookies right in your own kitchen.
What Makes Red Velvet Cookies So Special?
Before we dive into the recipe, it’s helpful to understand what gives red velvet its signature characteristics. The allure is certainly more than just its stunning color; it’s a combination of flavor, texture, and visual appeal that makes these cookies a perennial favorite.
The Unique Flavor Profile
The flavor of red velvet is often a delicious mystery to those who try it for the first time. It is not intensely chocolatey, nor is it purely vanilla. Instead, it strikes a perfect balance. A small amount of cocoa powder provides a subtle chocolatey undertone, while a generous splash of vanilla extract adds warmth and sweetness. Furthermore, the secret ingredient that provides the characteristic tang is either buttermilk or a touch of vinegar. This acidity not only tenderizes the crumb but also brightens the other flavors, creating a truly unique and memorable taste.
The Iconic Red Color
Historically, the “red” in red velvet desserts came from a chemical reaction between non-Dutched cocoa powder and an acid like buttermilk, which brought out reddish anthocyanins in the cocoa. However, to achieve the brilliant, deep red we associate with modern red velvet, bakers now rely on red food coloring. This vibrant hue makes red velvet cookies incredibly festive and visually appealing, ensuring they stand out on any dessert platter. As a result, they are a fantastic choice for themed parties and special occasions.
The Perfect Chewy Texture
A great red velvet cookie is defined by its texture. It should be soft and tender on the inside with slightly crisp edges. This delightful chewiness is achieved through the right balance of ingredients, specifically the ratio of butter and sugar, and the crucial step of chilling the dough. This process ensures the cookies don’t spread too thin while baking, resulting in a thicker, more satisfyingly chewy cookie.
Print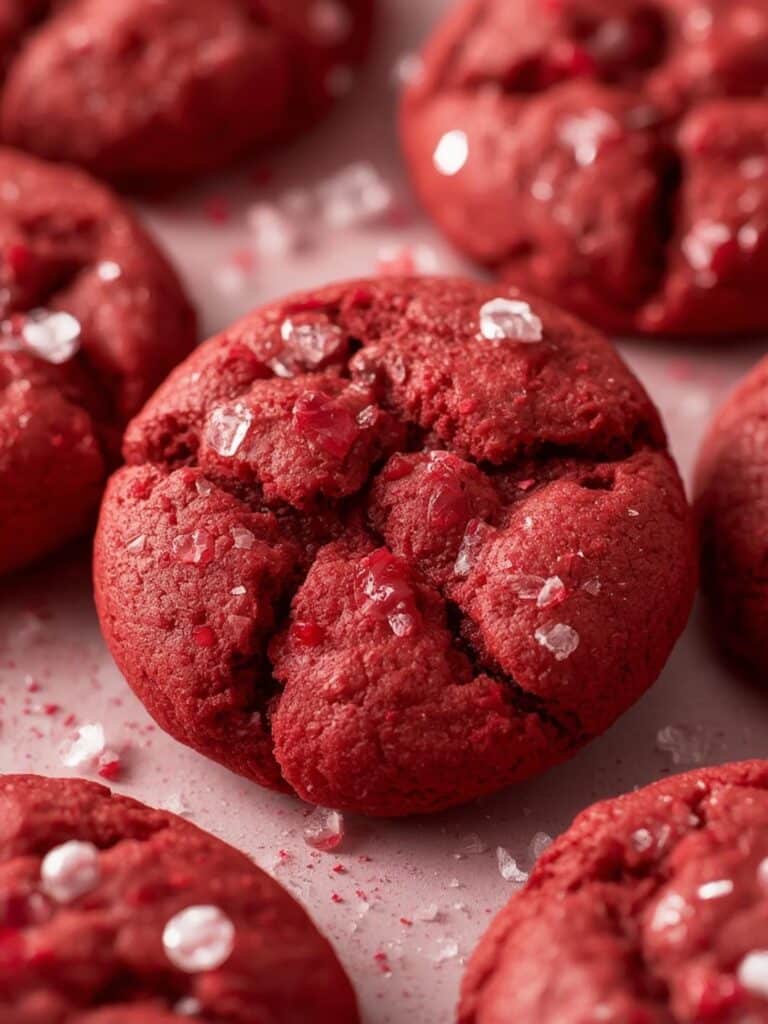
Red Velvet Cookies: The 12 Ultimate Steps for Irresistibly Chewy Treats
Soft, chewy red velvet cookies with a subtle chocolate flavor, tangy undertone, and creamy white chocolate chips—perfect for holidays or anytime indulgence.
- Total Time: 1 hour 32 minutes
- Yield: 24 cookies 1x
Ingredients
2 1/4 cups all-purpose flour
2 tablespoons unsweetened cocoa powder
1 teaspoon baking soda
1/2 teaspoon salt
3/4 cup unsalted butter, softened
1/2 cup granulated sugar
1/2 cup brown sugar, packed
2 large eggs, room temperature
2 teaspoons vanilla extract
1 teaspoon white vinegar
1 tablespoon red gel food coloring
1 1/2 cups white chocolate chips
Instructions
1. Preheat oven to 375°F (190°C) and line baking sheets with parchment paper.
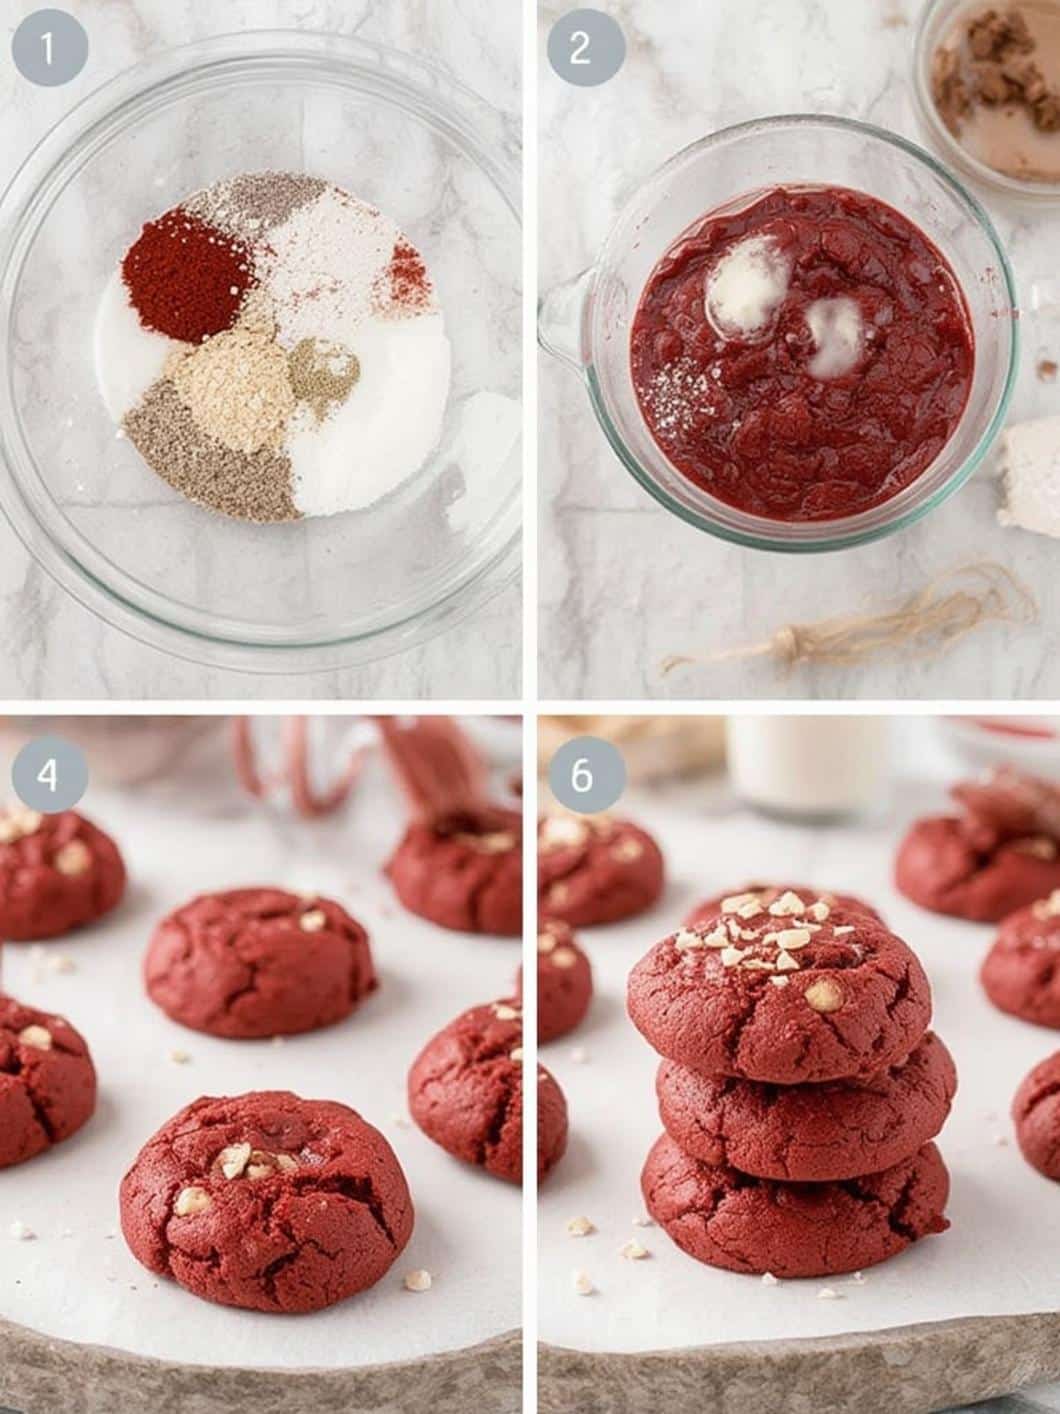
2. In a medium bowl, whisk together flour, cocoa powder, baking soda, and salt.
3. In a large bowl, beat butter, granulated sugar, and brown sugar until light and fluffy.
4. Add eggs one at a time, mixing well after each addition.
5. Mix in vanilla extract, white vinegar, and red food coloring until evenly combined.
6. Gradually add dry ingredients to wet ingredients, mixing just until combined.
7. Gently fold in white chocolate chips.
8. Cover and chill dough in the refrigerator for at least 1 hour.
9. Scoop dough into 1 1/2 tablespoon balls and place 2 inches apart on baking sheets.
10. Bake for 10–12 minutes until edges are set and centers look slightly soft.
11. Let cookies cool on the baking sheet for 5 minutes.
12. Transfer to a wire rack to cool completely.
Notes
Chilling the dough is essential to prevent excessive spreading.
Do not overmix after adding flour to keep cookies tender.
Gel food coloring gives vibrant color without adding excess liquid.
Cookies can be frosted with cream cheese frosting or made into sandwich cookies.
Store in an airtight container at room temperature for up to 5 days.
- Prep Time: 20 minutes
- Cook Time: 12 minutes
- Category: Dessert
- Method: Baking
- Cuisine: American
- Diet: Vegetarian
Nutrition
- Serving Size: 1 cookie
- Calories: 160
- Sugar: 14g
- Sodium: 95mg
- Fat: 7g
- Saturated Fat: 4g
- Unsaturated Fat: 3g
- Trans Fat: 0g
- Carbohydrates: 22g
- Fiber: 0.5g
- Protein: 2g
- Cholesterol: 28mg
Essential Ingredients for the Best Red Velvet Cookies
Gathering the right ingredients is the first step toward baking success. For these cookies, most items are standard pantry staples, but each plays a critical role in the final outcome. Here is what you will need:
- All-Purpose Flour: This forms the structural foundation of our cookies.
- Unsweetened Cocoa Powder: Just a few tablespoons are needed for that signature hint of chocolate flavor. According to Healthline, cocoa is also rich in antioxidants.
- Baking Soda: This leavening agent reacts with the acid in the recipe to help the cookies rise and become tender.
- Salt: A pinch of salt is essential for balancing the sweetness and enhancing the overall flavor.
- Unsalted Butter: Make sure your butter is softened to room temperature for proper creaming. This adds richness and creates a tender texture.
- Granulated and Brown Sugar: Using a combination of both sugars provides sweetness, while the molasses in the brown sugar adds moisture and contributes to a chewier cookie.
- Eggs: These act as a binder, holding all the ingredients together.
- Vanilla Extract: Pure vanilla extract offers the best flavor to complement the cocoa.
- White Vinegar: This small amount of acid tenderizes the dough and helps activate the baking soda.
- Red Food Coloring: For best results, use a gel food coloring, as it provides a vibrant color without adding excess liquid to the dough.
- White Chocolate Chips: These are the classic mix-in for red velvet cookies, offering creamy pockets of sweetness that pair perfectly with the tangy cookie base.
Step-by-Step Instructions for Making Red Velvet Cookies
Now that you have your ingredients ready, it is time to start baking. Following these steps carefully will guarantee a perfect batch of chewy, delicious red velvet cookies every time. This process is straightforward and rewarding.
Step 1: Prepare Your Station
First, preheat your oven to 375°F (190°C). Then, line two large baking sheets with parchment paper to prevent the cookies from sticking and to ensure even baking. This simple step also makes cleanup significantly easier.
Step 2: Combine the Dry Ingredients
In a medium-sized bowl, whisk together the all-purpose flour, unsweetened cocoa powder, baking soda, and salt. Whisking helps to evenly distribute the ingredients, which is crucial for a consistent cookie texture. After that, set this bowl aside.
Step 3: Cream the Butter and Sugars
In a separate large bowl, using either a stand mixer or a hand mixer, beat the softened butter with the granulated sugar and brown sugar. Continue beating on medium speed for about 2-3 minutes, or until the mixture is light, fluffy, and pale in color. This process incorporates air into the dough, which is essential for a soft texture.
Step 4: Add the Wet Ingredients
Next, beat in the eggs one at a time, followed by the vanilla extract and white vinegar. Then, add the red food coloring. Start with about one tablespoon of gel coloring and add more if needed until you achieve your desired shade of red. Scrape down the sides of the bowl as needed to ensure everything is well combined.
Step 5: Mix the Dough
With the mixer on low speed, gradually add the dry ingredient mixture to the wet ingredients. Mix only until the flour is just combined. Be careful not to overmix at this stage, as it can lead to tough cookies.
Step 6: Fold in the White Chocolate Chips
Finally, remove the bowl from the mixer and use a spatula to gently fold in the white chocolate chips. This ensures they are evenly distributed without overworking the dough.
Step 7: Chill the Dough
This step is absolutely critical. Cover the bowl with plastic wrap and chill the cookie dough in the refrigerator for at least one hour, or up to 24 hours. Chilling the dough solidifies the butter, which prevents the cookies from spreading too much in the oven. Additionally, it allows the flavors to meld together more deeply.
Step 8: Scoop and Bake
Once the dough is chilled, use a medium cookie scoop (about 1.5 tablespoons) to portion out uniform balls of dough. Place them about two inches apart on your prepared baking sheets. Bake for 10-12 minutes, or until the edges are set. The centers should still look slightly soft. They will continue to bake on the hot pan after you remove them from the oven.
Step 9: Cool the Cookies
Let the red velvet cookies cool on the baking sheet for about 5 minutes before transferring them to a wire rack to cool completely. This allows them to set up properly without breaking.
Tips and Tricks for Bakery-Quality Results
To elevate your red velvet cookies from good to absolutely amazing, keep these professional tips in mind. Small adjustments can indeed make a big difference.
Don’t Overmix the Dough
Once you add the flour, you are developing gluten. Overmixing the dough will result in tough, dense cookies instead of the soft, tender ones you want. Therefore, mix only until you no longer see streaks of flour.
The Importance of Chilling
We cannot stress this enough: do not skip chilling the dough. This single step is the key to preventing flat, greasy cookies. A properly chilled dough results in thicker, chewier cookies with a more concentrated flavor. If you enjoy baking, you’ll notice this tip applies to many other recipes, including these delicious Chocolate Snowball Cookies.
Getting the Perfect Shape
For perfectly round and uniform cookies, a spring-loaded cookie scoop is your best friend. This ensures that all your cookies are the same size, which means they will bake evenly. If you don’t have one, you can use two spoons, but a scoop is a worthwhile investment for any avid baker.
Fun Variations and Add-Ins
While the classic white chocolate chip red velvet cookie is fantastic on its own, there are many ways to get creative. Feel free to experiment with these fun variations.
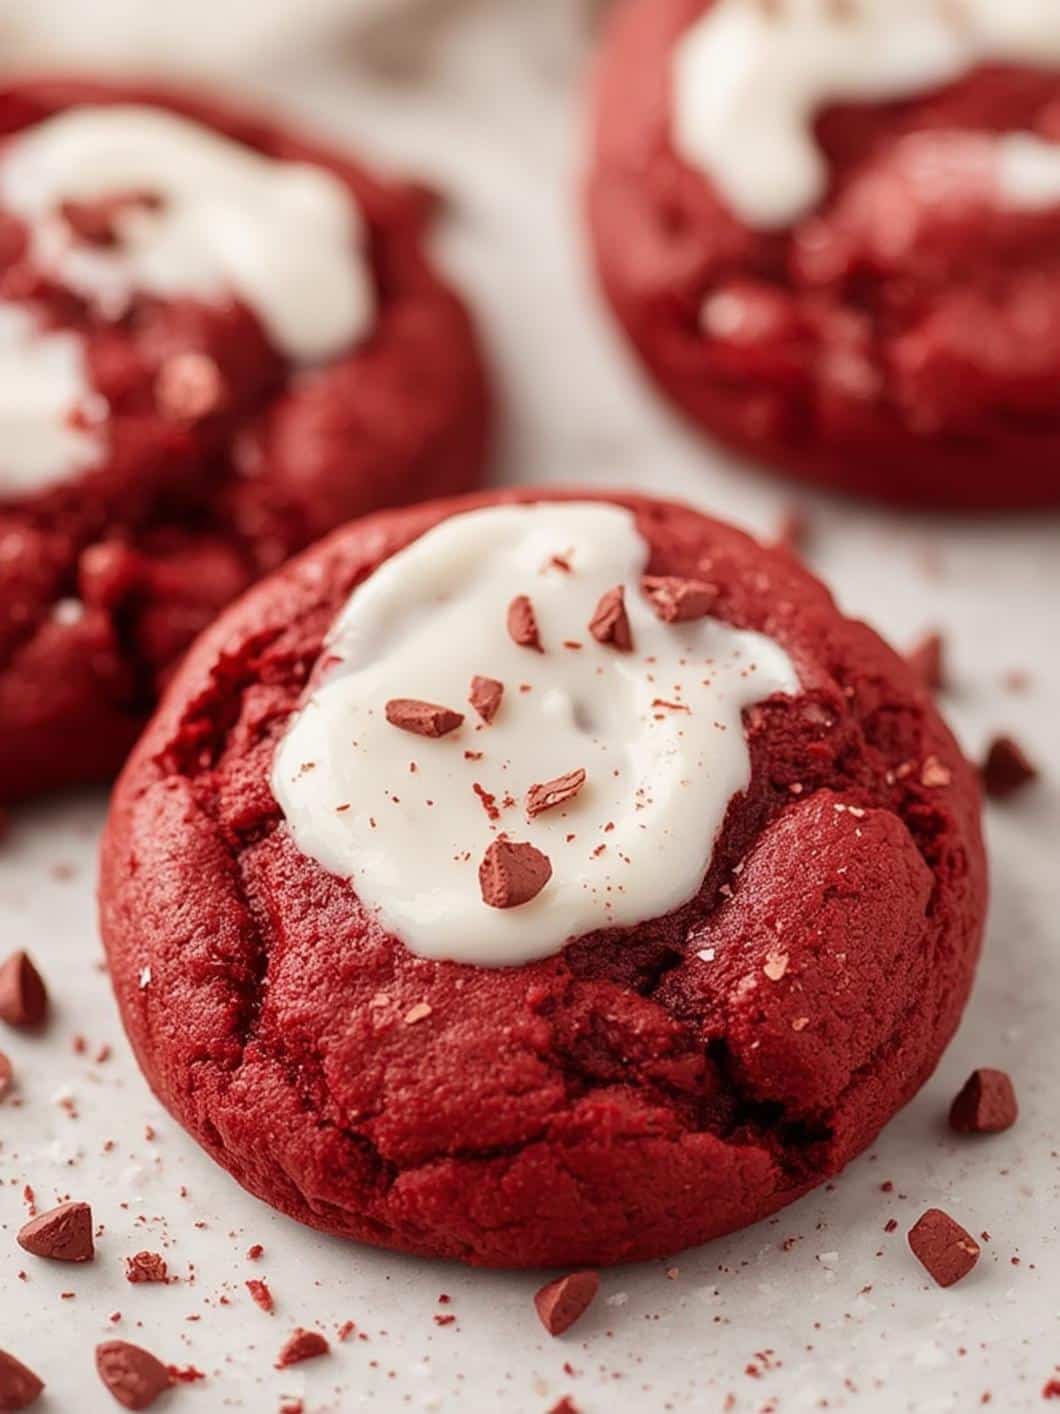
Cream Cheese Frosting
Red velvet and cream cheese are a match made in heaven. You can either frost the tops of the cooled cookies with a simple cream cheese frosting or turn them into sandwich cookies with a creamy filling. This addition takes them to a whole new level of decadence.
Stuffed Red Velvet Cookies
For an extra surprise, try stuffing your cookies. Simply freeze small balls of a cream cheese frosting mixture, then wrap the cookie dough around them before baking. The result is a gooey, creamy center that is absolutely irresistible. For another treat featuring a delicious cream cheese element, check out these Strawberry Cream Cheese Heart Danishes.
Holiday Variations
These cookies are easily adaptable for holidays. For instance, you can add some festive green sprinkles for Christmas or press a candy heart into the center for Valentine’s Day. They are a wonderful alternative to traditional holiday treats. If you’re baking for Valentine’s Day, you might also love these Heart-Shaped Brownies.
How to Store Your Cookies
Proper storage will keep your red velvet cookies fresh and delicious for as long as possible. Here are the best methods:
At Room Temperature
Store cooled cookies in an airtight container at room temperature. They will stay fresh for up to five days. To keep them extra soft, you can add a slice of bread to the container; the cookies will absorb moisture from the bread.
Freezing Cookies or Dough
You can also freeze the baked cookies or the raw dough. To freeze baked cookies, place them in a single layer on a baking sheet until frozen solid, then transfer them to a freezer-safe bag or container. They will last for up to three months. Alternatively, you can freeze the balls of raw cookie dough and bake them directly from frozen, adding a few extra minutes to the baking time.
Conclusion
Baking a batch of homemade red velvet cookies is a deeply satisfying experience that yields a truly special treat. With their striking appearance and wonderfully complex flavor, these cookies are destined to become a new favorite. By following the detailed steps and tips in this guide, you can confidently create perfectly soft and chewy cookies every time. Ultimately, this recipe provides a fantastic way to impress friends and family or simply to indulge your own sweet tooth. So, go ahead and bring the magic of red velvet cookies into your home.
Frequently Asked Questions (FAQ)
Why did my red velvet cookies spread too much?
The most common reason for cookies spreading is that the dough was not chilled long enough. Chilling solidifies the fat (butter) in the dough, which melts more slowly in the oven, preventing excessive spread. Another reason could be using butter that was too soft or melted.
Can I make these cookies without red food coloring?
Yes, you absolutely can. If you omit the food coloring, the cookies will simply have a brownish color from the cocoa powder but will taste exactly the same. They will be “velvet” cookies with a hint of chocolate.
What is the difference between red velvet cake and red velvet cookies?
The primary difference lies in the texture and form. Red velvet cake has a light, airy, and moist crumb, while red velvet cookies are denser and chewier. They share the same core flavor profile of vanilla, cocoa, and a slight tang, but the ratios of ingredients are adjusted to create these different textures.