There are few desserts as universally loved as a classic peanut butter pie. It’s the perfect marriage of sweet and salty, with a texture that is simultaneously rich, creamy, and light. If you’ve been searching for the ultimate no-bake dessert that is guaranteed to be a hit at any gathering, then look no further. This definitive peanut butter pie recipe is incredibly easy to follow and yields a show-stopping dessert every single time. Consequently, even beginner bakers can achieve a perfect result with minimal effort.
In fact, the beauty of this particular recipe lies in its simplicity. You don’t need to turn on your oven, and the ingredients are likely already in your pantry. We will guide you through every step, from creating a crunchy cookie crust to whipping up the dreamiest peanut butter filling imaginable. Furthermore, we will share essential tips and creative variations to help you customize this dessert to your exact liking. Get ready to create a dessert that your friends and family will be requesting for years to come.
Why You’ll Love This Easy Peanut Butter Pie Recipe
Before we dive into the instructions, let’s talk about why this specific peanut butter pie recipe is destined to become your new favorite. There are numerous reasons this dessert stands out from the rest, making it a go-to for weeknight treats and special occasions alike.
- Completely No-Bake: First and foremost, this recipe is a lifesaver during warmer months or when your oven is already occupied. Since it requires no baking, it keeps your kitchen cool and frees up valuable oven space.
- Incredibly Simple to Make: With just a few basic steps, you can assemble this pie in under 30 minutes. Therefore, it’s the perfect last-minute dessert that still feels special and homemade.
- Rich and Creamy Texture: The filling is the star of the show. By combining cream cheese, peanut butter, and whipped topping, we achieve a velvety smooth texture that simply melts in your mouth.
- A Crowd-Pleasing Favorite: The classic combination of chocolate and peanut butter is a flavor profile that appeals to nearly everyone. As a result, this pie is always a guaranteed hit at potlucks, family dinners, and holiday celebrations.
- Customizable: This recipe serves as a fantastic base for your creativity. For example, you can swap the crust, add mix-ins, or go wild with toppings to make it uniquely yours.
Essential Ingredients for Success
The key to a truly phenomenal peanut butter pie is using high-quality, simple ingredients. There’s no need for complicated or hard-to-find items. In fact, you probably have most of what you need right now. Here’s a breakdown of what you’ll need for both the crust and the filling.
For the Chocolate Cookie Crust:
- Chocolate Sandwich Cookies: A classic Oreo-style cookie provides the perfect chocolatey, crunchy base that contrasts wonderfully with the creamy filling. You will need about 24 cookies.
- Unsalted Butter: Melted butter acts as the glue that holds the cookie crumbs together, creating a firm and delicious crust.
For the Creamy Peanut Butter Filling:
- Cream Cheese: For the best results, use a full-fat block of cream cheese and make sure it’s softened to room temperature. This is crucial for a lump-free filling.
- Creamy Peanut Butter: A standard commercial creamy peanut butter like Jif or Skippy works best. Natural peanut butters that separate are not ideal as they can alter the filling’s texture. Peanut butter is a good source of protein and healthy fats, which you can learn more about at Healthline.
- Powdered Sugar: Also known as confectioners’ sugar, this ingredient dissolves easily, sweetening the filling without any graininess.
- Milk or Heavy Cream: Just a splash is needed to help thin the filling to the perfect consistency, making it smooth and spreadable.
- Frozen Whipped Topping: An 8-ounce container of thawed Cool Whip or a similar product makes the filling light and airy. You can also use stabilized homemade whipped cream if you prefer.
Step-by-Step Instructions To Make Peanut Butter Pie
Now that you have your ingredients assembled, it’s time to create this delicious dessert. Following these steps carefully will ensure your peanut butter pie turns out perfectly. This process is straightforward and rewarding.
Step 1: Prepare the Crust
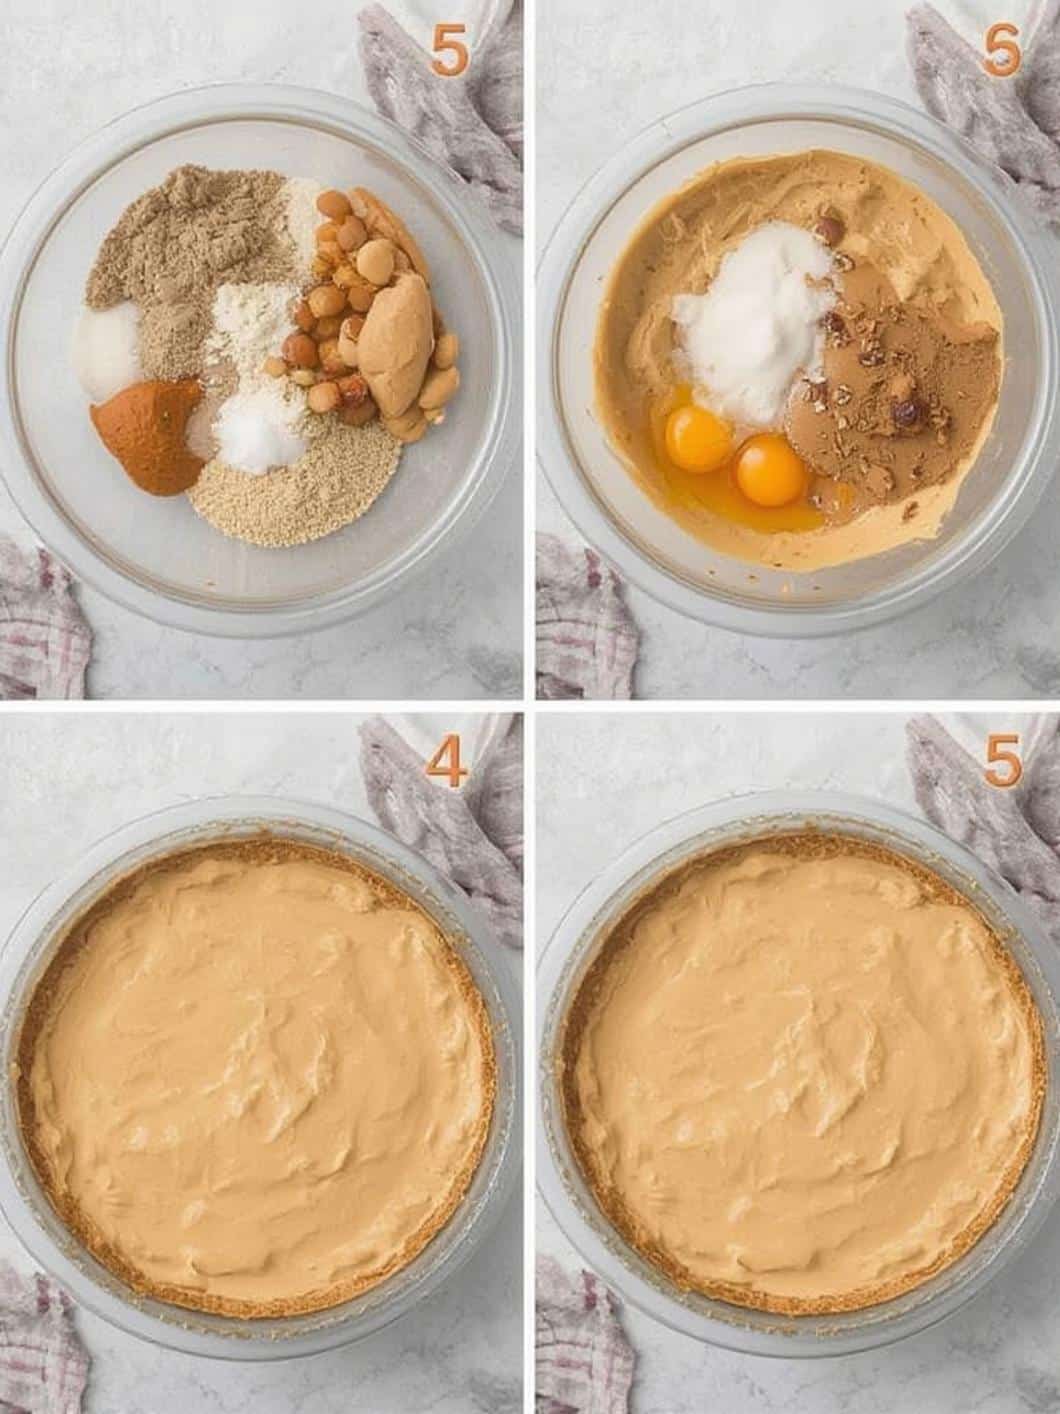
First, place the chocolate sandwich cookies into a food processor and pulse until they become fine crumbs. Alternatively, if you don’t have a food processor, you can place them in a zip-top bag and crush them with a rolling pin. Next, pour the melted butter over the crumbs and pulse or stir until the mixture resembles wet sand.
Step 2: Form the Crust
Afterward, press the crumb mixture firmly and evenly into the bottom and up the sides of a 9-inch pie plate. Using the flat bottom of a measuring cup can help you create a compact and even layer. Place the crust in the freezer to set while you prepare the filling.
Step 3: Beat the Cream Cheese and Peanut Butter
In a large mixing bowl, use an electric hand mixer or a stand mixer to beat the softened cream cheese until it is smooth and creamy. Then, add the creamy peanut butter and continue to beat until the two are fully combined and fluffy.
Step 4: Add Sugar and Milk
Gradually add the powdered sugar to the cream cheese mixture, beating on low speed until it’s incorporated. Subsequently, add the milk or heavy cream and beat until the mixture is completely smooth.
Step 5: Fold in the Whipped Topping
Now, gently fold in the thawed whipped topping using a spatula. Be careful not to overmix; you want to keep the filling light and airy. Continue folding just until no white streaks remain.
Step 6: Fill the Pie Crust
Retrieve your chilled crust from the freezer. Carefully spoon the peanut butter filling into the crust and spread it out into an even layer with your spatula.
Step 7: Chill the Pie
Cover the pie with plastic wrap and place it in the refrigerator to chill for at least 6-8 hours, or preferably overnight. This chilling time is essential, as it allows the filling to set up properly. Without this step, your peanut butter pie recipe will not have the right sliceable consistency.
Step 8: Garnish and Serve
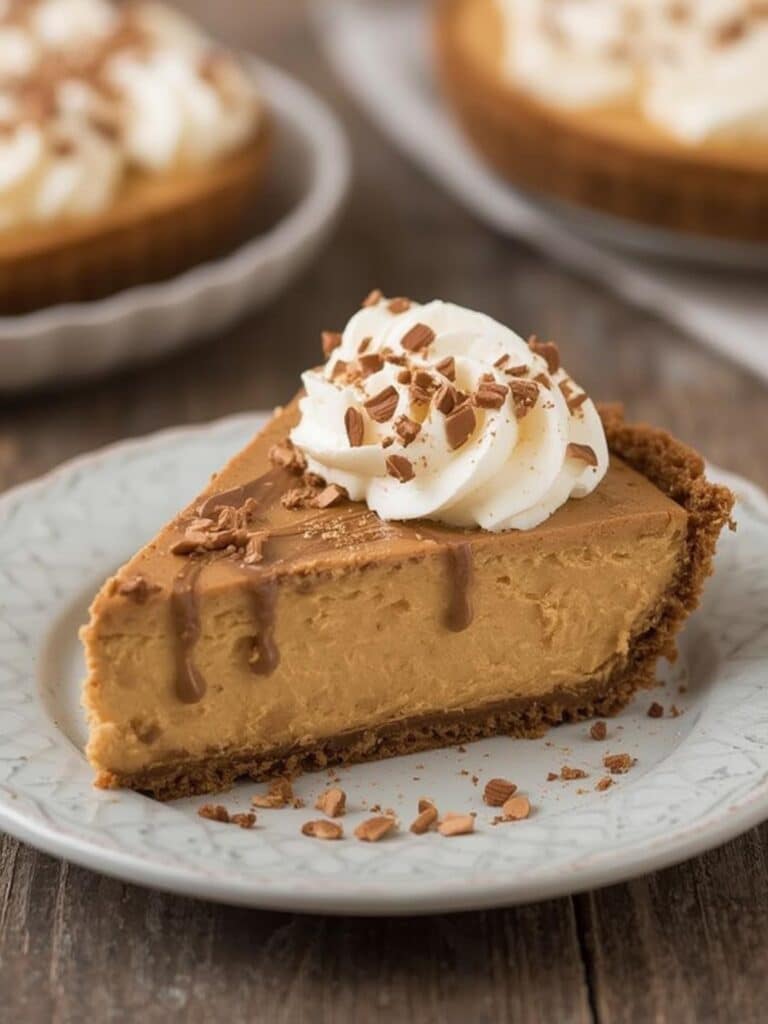
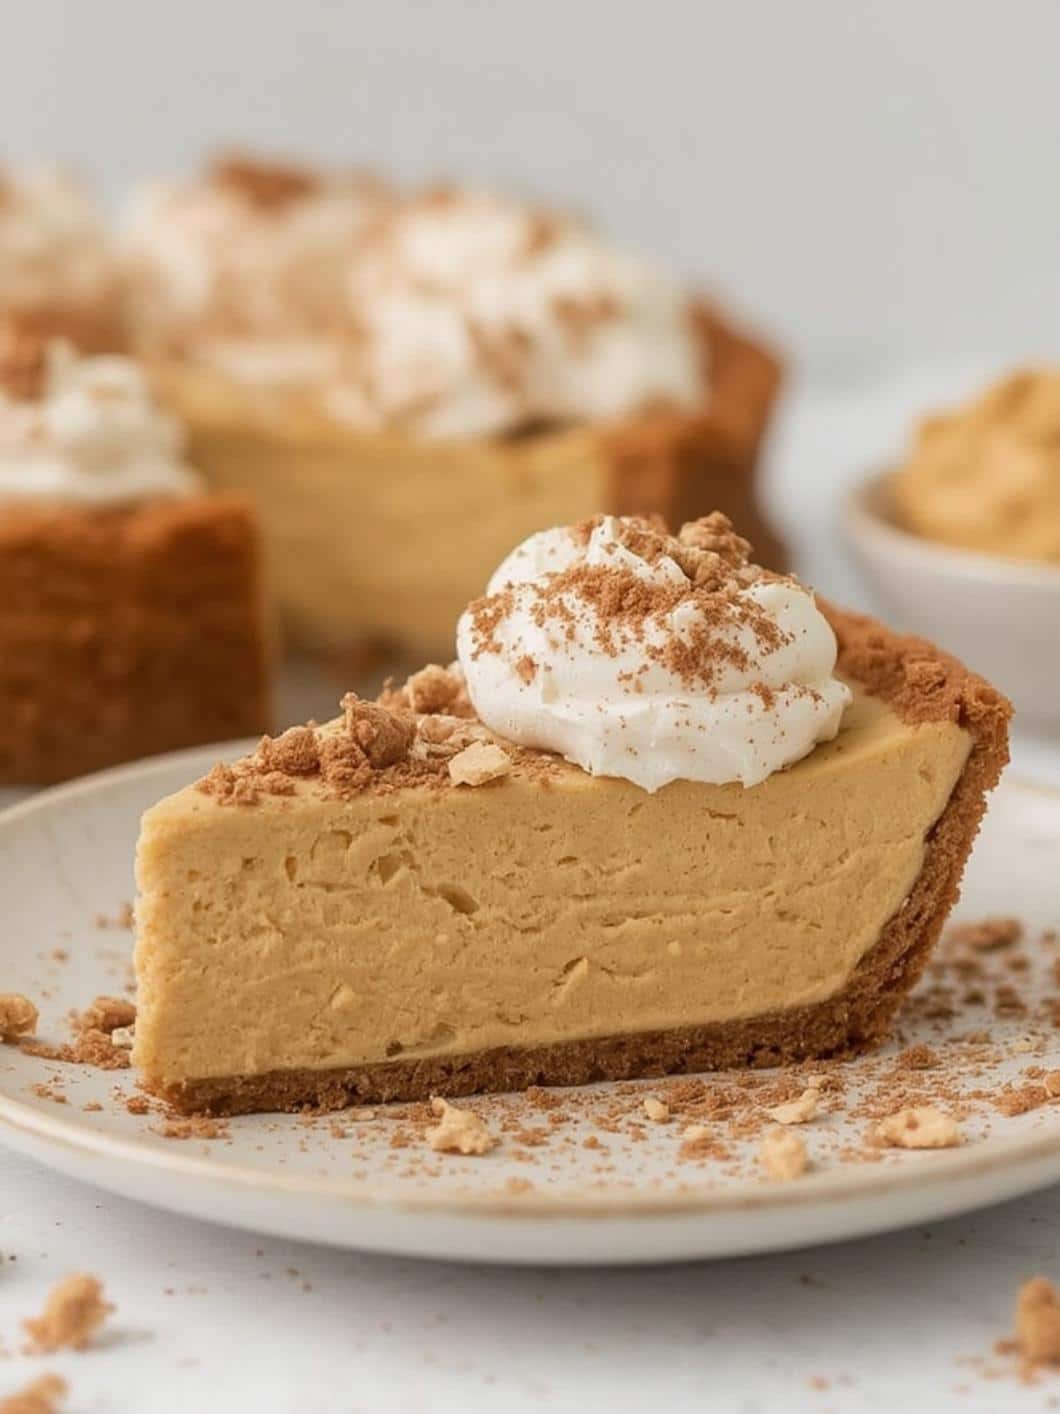
Once the pie is fully set, you can decorate it. Popular toppings include a drizzle of chocolate syrup, a dollop of whipped cream, chopped peanuts, or mini peanut butter cups. If you love decadent holiday treats, you might find inspiration in this Christmas Crack Recipe.
Tips for the Perfect Peanut Butter Pie
While this recipe is quite simple, a few expert tips can elevate your pie from great to absolutely unforgettable. Keeping these suggestions in mind will guarantee a flawless result every time.
Use Room Temperature Ingredients
This is arguably the most important tip. Softened, room-temperature cream cheese is essential for a smooth, lump-free filling. If your cream cheese is too cold, it won’t blend properly with the other ingredients, resulting in a clumpy texture. Therefore, remember to take it out of the fridge about an hour before you begin.
Choose the Right Peanut Butter
For this type of no-bake pie, a conventional, processed creamy peanut butter provides the best texture and stability. Natural peanut butters, which tend to separate, can make the filling oily or less firm. For information on different food choices, you can visit a reliable source like WebMD.
Don’t Rush the Chilling Time
Patience is key. The pie needs adequate time in the refrigerator to set completely. Rushing this step will result in a soft, messy pie that doesn’t hold its shape when sliced. For this reason, making it the day before you plan to serve it is always a great idea.
Variations and Topping Ideas
One of the best things about this peanut butter pie recipe is how easy it is to adapt. Here are a few fun ideas to put your own spin on this classic dessert.
Crust Alternatives
Not a fan of chocolate crusts? No problem. You can easily substitute the chocolate cookies with 2 cups of graham cracker crumbs or even shortbread cookie crumbs. The method remains the same; just mix the crumbs with melted butter and press into the pan.
Filling Add-Ins
For some extra texture and flavor, consider gently folding in some additions to the filling. For instance, a half-cup of mini chocolate chips, chopped peanut butter cups, or toffee bits would be delicious. Just be sure to fold them in gently at the end.
Creative Toppings
The topping is where you can truly let your creativity shine. Besides the classic whipped cream and chocolate drizzle, consider a layer of rich chocolate ganache, a sprinkle of sea salt for a salty-sweet contrast, or a handful of crushed pretzels for an added crunch. For other dessert ideas, check out this amazing Pumpkin Cream Cheese Bundt Cake Recipe.
Conclusion About Peanut Butter Pie
In summary, this no-bake peanut butter pie recipe is the perfect dessert for any occasion, offering a rich and creamy filling nestled in a crunchy chocolate crust. Its simplicity and incredible flavor make it a guaranteed success, even for those new to making desserts. By following the steps and tips outlined above, you can confidently create a pie that is both delicious and visually impressive. Ultimately, this recipe proves that you don’t need to be an expert baker to produce a truly memorable treat that everyone will love.
Frequently Asked Questions About Peanut Butter Pie
Can I make this peanut butter pie recipe ahead of time?
Absolutely! In fact, this pie is best when made at least one day in advance. This gives the filling ample time to set up completely, ensuring clean, beautiful slices. You can store it, covered, in the refrigerator for up to 4 days.
Can I use homemade whipped cream instead of frozen whipped topping?
Yes, you can. However, you will need to stabilize it first by adding a little gelatin or cornstarch to ensure it holds its shape within the pie filling. To replace an 8-ounce container of whipped topping, you will need about 3 cups of homemade whipped cream.
Can this pie be frozen?
Yes, this pie freezes exceptionally well. Simply wrap the pie tightly in plastic wrap and then a layer of aluminum foil. It can be stored in the freezer for up to 2 months. Let it thaw in the refrigerator for a few hours before serving for the best texture.