Welcome to the ultimate guide for creating the most delightful and visually stunning treats perfect for any spring celebration. Specifically, we are diving into the world of Pastel Sugar Cookie Sandwiches. These cookies are more than just a dessert; in fact, they are a beautiful expression of joy, perfect for Easter, baby showers, or simply to brighten up your day. This recipe features two incredibly soft, chewy sugar cookies that embrace a rich, creamy buttercream filling. Furthermore, the charming pastel colors make them an instant favorite for both kids and adults. Get ready to bake a batch of these unforgettable cookie sandwiches that taste just as good as they look.
Why You’ll Absolutely Adore These Pastel Sugar Cookie Sandwiches
There are countless reasons to fall in love with this recipe, but we’ve narrowed it down to a few key highlights. First and foremost, the taste and texture are simply divine. The cookies themselves are soft and buttery, with a classic vanilla flavor that provides the perfect base. Consequently, when paired with the sweet, fluffy buttercream filling, you get a wonderfully balanced and satisfying treat. You will undoubtedly find that one is never enough.
In addition to their amazing flavor, these Pastel Sugar Cookie Sandwiches are incredibly versatile and fun to customize. For instance, you can easily switch up the colors of the frosting to match any party theme or holiday. You can also experiment with different extracts, like almond or lemon, to create new flavor combinations. Moreover, the process of making them is a fantastic activity to do with family. Decorating the cookies offers a creative outlet for everyone involved. Ultimately, these cookies are a guaranteed crowd-pleaser that will bring smiles to everyone’s faces.
Print
Pastel Sugar Cookie Sandwiches
This recipe features two incredibly soft, chewy sugar cookies that embrace a rich, creamy buttercream filling. The charming pastel colors make them an instant favorite for both kids and adults, perfect for any spring celebration.
- Total Time: 1 hour 50 minutes
- Yield: 18 cookie sandwiches 1x
Ingredients
2 and 1/2 cups all-purpose flour
1/2 teaspoon baking soda
1/2 teaspoon baking powder
1/4 teaspoon salt
1 cup (2 sticks) unsalted butter, softened
1 cup granulated sugar
1 large egg, at room temperature
1 teaspoon pure vanilla extract
1 cup (2 sticks) unsalted butter, softened, for filling
3–4 cups powdered sugar, sifted
1 teaspoon pure vanilla extract, for filling
2–3 tablespoons heavy cream or milk
Pastel gel food coloring (pink, blue, yellow, green, purple)
Instructions
1. In a medium bowl, whisk together the flour, baking soda, baking powder, and salt.
2. In a large bowl, beat butter and granulated sugar until light and fluffy, then beat in the egg and vanilla extract.
3. Gradually add the dry mixture to the wet mixture on low speed until just combined.
4. Divide the dough in half, form into disks, wrap in plastic, and refrigerate for at least one hour.
5. Preheat oven to 375°F (190°C) and line baking sheets with parchment paper.
6. On a floured surface, roll chilled dough to 1/4-inch thickness and cut out 2-inch rounds.
7. Place cookies on prepared sheets and bake for 8-10 minutes, until edges are lightly golden.
8. Let cookies cool on the baking sheet for a few minutes before transferring to a wire rack to cool completely.
9. To make the filling, beat softened butter until creamy, then gradually mix in the powdered sugar.
10. Add vanilla and 2 tablespoons of cream and beat on medium-high until light and fluffy, adding more cream if needed.
11. Divide the buttercream into small bowls and stir in a drop of gel food coloring into each.
12. Spread or pipe frosting onto the flat side of one cookie and gently press another cookie on top to create a sandwich.
Notes
Use gel-based food coloring for vibrant pastel hues without thinning the frosting. Unassembled cookies can be stored at room temperature for several days. Assembled cookie sandwiches should be stored in an airtight container in the refrigerator for up to 3 days.
- Prep Time: 30 minutes
- Cook Time: 20 minutes
- Category: Dessert
- Method: Baking
- Cuisine: American
Nutrition
- Serving Size: 1 cookie sandwich
- Calories: 320
- Sugar: 28g
- Sodium: 85mg
- Fat: 15g
- Saturated Fat: 9g
- Unsaturated Fat: 6g
- Trans Fat: 0g
- Carbohydrates: 42g
- Fiber: 1g
- Protein: 3g
- Cholesterol: 45mg
Essential Ingredients and Tools
Before you begin, gathering all your ingredients and tools is a crucial first step for a smooth baking experience. As a result, you will have everything you need right at your fingertips. We have separated the lists for the cookies, the filling, and the necessary equipment to make it even easier.
For the Soft Sugar Cookies
The foundation of our cookie sandwiches is a classic, no-fail sugar cookie recipe. Therefore, using high-quality ingredients is key. For example, the type of flour you use can affect the final texture; a standard all-purpose flour works perfectly here, providing a soft and tender crumb. You can learn more about different baking ingredients and their nutritional profiles from trusted sources like Healthline.
- 2 and 1/2 cups all-purpose flour
- 1/2 teaspoon baking soda
- 1/2 teaspoon baking powder
- 1/4 teaspoon salt
- 1 cup (2 sticks) unsalted butter, softened
- 1 cup granulated sugar
- 1 large egg, at room temperature
- 1 teaspoon pure vanilla extract
For the Creamy Buttercream Filling
This simple American buttercream is light, fluffy, and perfectly sweet. It also serves as the perfect canvas for our beautiful pastel colors. Using gel food coloring is highly recommended, as it provides vibrant color without adding excess liquid, which could change the frosting’s consistency.
- 1 cup (2 sticks) unsalted butter, softened
- 3-4 cups powdered sugar, sifted
- 1 teaspoon pure vanilla extract
- 2-3 tablespoons heavy cream or milk
- Pastel gel food coloring (pink, blue, yellow, green, purple)
Necessary Baking Tools
Having the right tools makes the process much more efficient and enjoyable. Consequently, you will find that these items are staples in any baker’s kitchen.
- Electric stand mixer or hand mixer
- Large and medium mixing bowls
- Measuring cups and spoons
- Baking sheets
- Parchment paper or silicone baking mats
- Rolling pin
- 2-inch round cookie cutter
- Piping bag and a large round or star tip (optional, for assembly)
- Spatula
Step-by-Step Instructions for Making Pastel Sugar Cookie Sandwiches
Now, let’s get to the fun part: baking! Follow these detailed steps carefully to ensure your Pastel Sugar Cookie Sandwiches turn out perfectly every single time. The process is straightforward, even for beginner bakers.
Step 1: Prepare the Cookie Dough
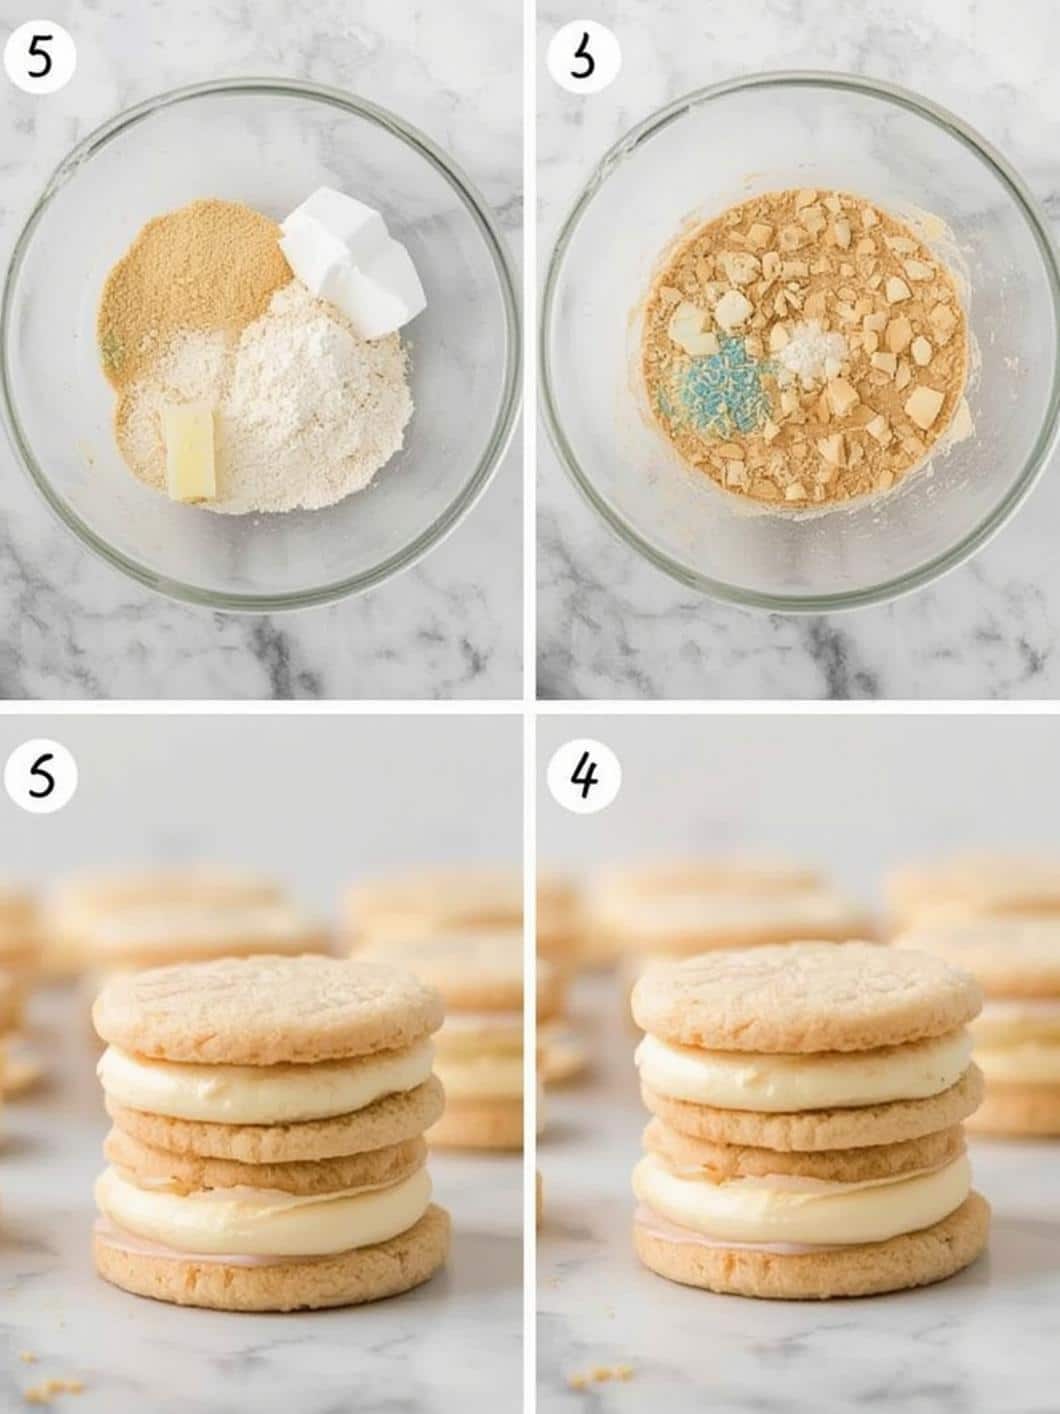
First, in a medium bowl, whisk together the all-purpose flour, baking soda, baking powder, and salt. Then, set this dry mixture aside. In a separate large bowl, using an electric mixer, beat the softened unsalted butter and granulated sugar together on medium-high speed until the mixture is light and fluffy, which usually takes about 2-3 minutes. Next, beat in the egg and vanilla extract until they are just combined, making sure to scrape down the sides of the bowl as needed.
Step 2: Combine and Chill the Dough
After that, gradually add the dry flour mixture to the wet ingredients, mixing on low speed until everything is just incorporated. Be careful not to overmix the dough, as this can result in tough cookies. Once combined, divide the dough in half, flatten each half into a disk, and wrap them tightly in plastic wrap. Chilling the dough is an essential step; therefore, refrigerate it for at least one hour, or until it is firm. This prevents the cookies from spreading too much while baking.
Step 3: Roll and Bake the Cookies
Once the dough is chilled, preheat your oven to 375°F (190°C). Then, line your baking sheets with parchment paper. On a lightly floured surface, roll out one disk of dough to about 1/4-inch thickness. Using a 2-inch round cookie cutter, cut out your cookies and place them about one inch apart on the prepared baking sheets. Next, bake for 8-10 minutes, or until the edges are lightly golden. Finally, let the cookies cool on the baking sheet for a few minutes before transferring them to a wire rack to cool completely.
Step 4: Make the Buttercream Filling
While the cookies are cooling, you can prepare the buttercream. In a large bowl, beat the softened butter with an electric mixer until it is creamy. Gradually add the sifted powdered sugar, one cup at a time, mixing on low speed until it’s incorporated. Then, add the vanilla extract and 2 tablespoons of heavy cream or milk. Now, beat on medium-high speed for 2-3 minutes until the frosting is light and fluffy. If the frosting is too thick, you can add another tablespoon of cream. For more information on food additives like coloring, you can consult reliable sources such as the Mayo Clinic.
Step 5: Color the Frosting and Assemble
To create the pastel colors, divide the buttercream evenly into separate small bowls, one for each color you want to make. Next, add a tiny drop of gel food coloring to each bowl and stir until the color is uniform. Remember, a little gel coloring goes a long way. Once your cookies are completely cool, it’s time to assemble the Pastel Sugar Cookie Sandwiches. You can spread the frosting on the flat side of one cookie with a small spatula or pipe it on using a piping bag. Afterwards, gently press another cookie on top to create a sandwich. And there you have it!
Tips and Tricks for Perfect Cookie Sandwiches
To help you achieve bakery-quality results, here are some expert tips and tricks. These small adjustments can make a big difference in the final outcome of your beautiful treats.
Achieving the Ideal Cookie Texture
The key to soft cookies is to avoid overworking the dough and overbaking them. For instance, mix the flour in until it just disappears. Additionally, pull the cookies from the oven when the edges are barely golden; they will continue to set on the hot baking sheet. A perfectly baked sugar cookie should be soft in the center.
Mastering Those Beautiful Pastel Hues
For soft, dreamy pastel colors, always use gel-based food coloring. Unlike liquid coloring, gel colors are highly concentrated and won’t thin out your frosting. Start with the smallest amount possible on the end of a toothpick and add more until you reach your desired shade. This method gives you much more control over the final color.
Make-Ahead and Storage Guide
You can certainly prepare parts of this recipe in advance. The cookie dough can be refrigerated for up to 3 days or frozen for up to 3 months. Similarly, the baked, unfilled cookies can be stored in an airtight container at room temperature for several days. However, once assembled, the Pastel Sugar Cookie Sandwiches are best enjoyed within 2-3 days and should be stored in an airtight container in the refrigerator.
Fun Variations and Customizations
While this classic recipe is fantastic as is, there are many ways to get creative. These variations can add a personal touch to your delicious cookie sandwiches.
Flavor Twists and Add-ins
Feel free to experiment with different flavors. For example, you can add 1/2 teaspoon of almond or lemon extract to the cookie dough or the buttercream for a delightful twist. For a tangier filling, a cream cheese frosting would also be a delicious substitute. You could also mix in mini chocolate chips or finely chopped nuts into the dough for added texture.
Decorative Touches
To make your cookies even more festive, you can roll the edges of the assembled sandwiches in colorful sprinkles or sparkling sanding sugar. This adds a beautiful crunch and an extra pop of color. In addition to round shapes, you can use other cookie cutters like flowers, eggs, or hearts to match a specific theme. If you love these festive treats, you will surely enjoy making other seasonal desserts like our Easter Egg Oreo Balls. For another beautiful pastel dessert, our Pastel Bunny Macarons are always a showstopper.
Conclusion

In conclusion, creating these beautiful Pastel Sugar Cookie Sandwiches is a rewarding and delicious baking project. With their soft, chewy texture and creamy, sweet filling, they are destined to become a new favorite recipe. Furthermore, their charming appearance makes them the perfect centerpiece for any dessert table, especially during spring festivities. By following our detailed guide and tips, you are well-equipped to bake a batch that will impress all your friends and family. Ultimately, baking is about creating joy, and these cookies deliver that in every single bite.
Frequently Asked Questions
Can I use store-bought cookie dough for this recipe?While homemade dough is recommended for the best flavor and texture, you can certainly use a roll of store-bought sugar cookie dough in a pinch to save time. Just be sure to follow the baking instructions on the package.
How long will these pastel sugar cookie sandwiches stay fresh?When stored in an airtight container in the refrigerator, these cookie sandwiches will stay fresh for up to 3 days. However, for the best texture, they are best enjoyed within the first 24 hours.
Why did my cookies spread too much in the oven?The most common reason for cookies spreading is that the dough was not chilled long enough. Chilling the dough solidifies the butter, which helps the cookies maintain their shape during baking. Also, ensure your oven is fully preheated before putting the cookies in.
Can I make this recipe gluten-free?Yes, you can adapt this recipe to be gluten-free. Simply substitute the all-purpose flour with a high-quality, 1-to-1 gluten-free baking flour blend. The results should be just as delicious.