Easter is a time for celebration, family gatherings, and of course, delightful treats that capture the essence of spring. While decorated eggs and chocolate bunnies are timeless classics, there’s always room for a new tradition on the dessert table. Consequently, if you’re searching for a simple, no-bake recipe that is as beautiful as it is delicious, look no further than these stunning Pastel Easter Egg Fudge Squares. This recipe creates a wonderfully creamy, sweet, and visually captivating treat that is certain to become a holiday favorite. Furthermore, its straightforward preparation makes it an ideal activity to share with kids, allowing everyone to get creative with colors and toppings.
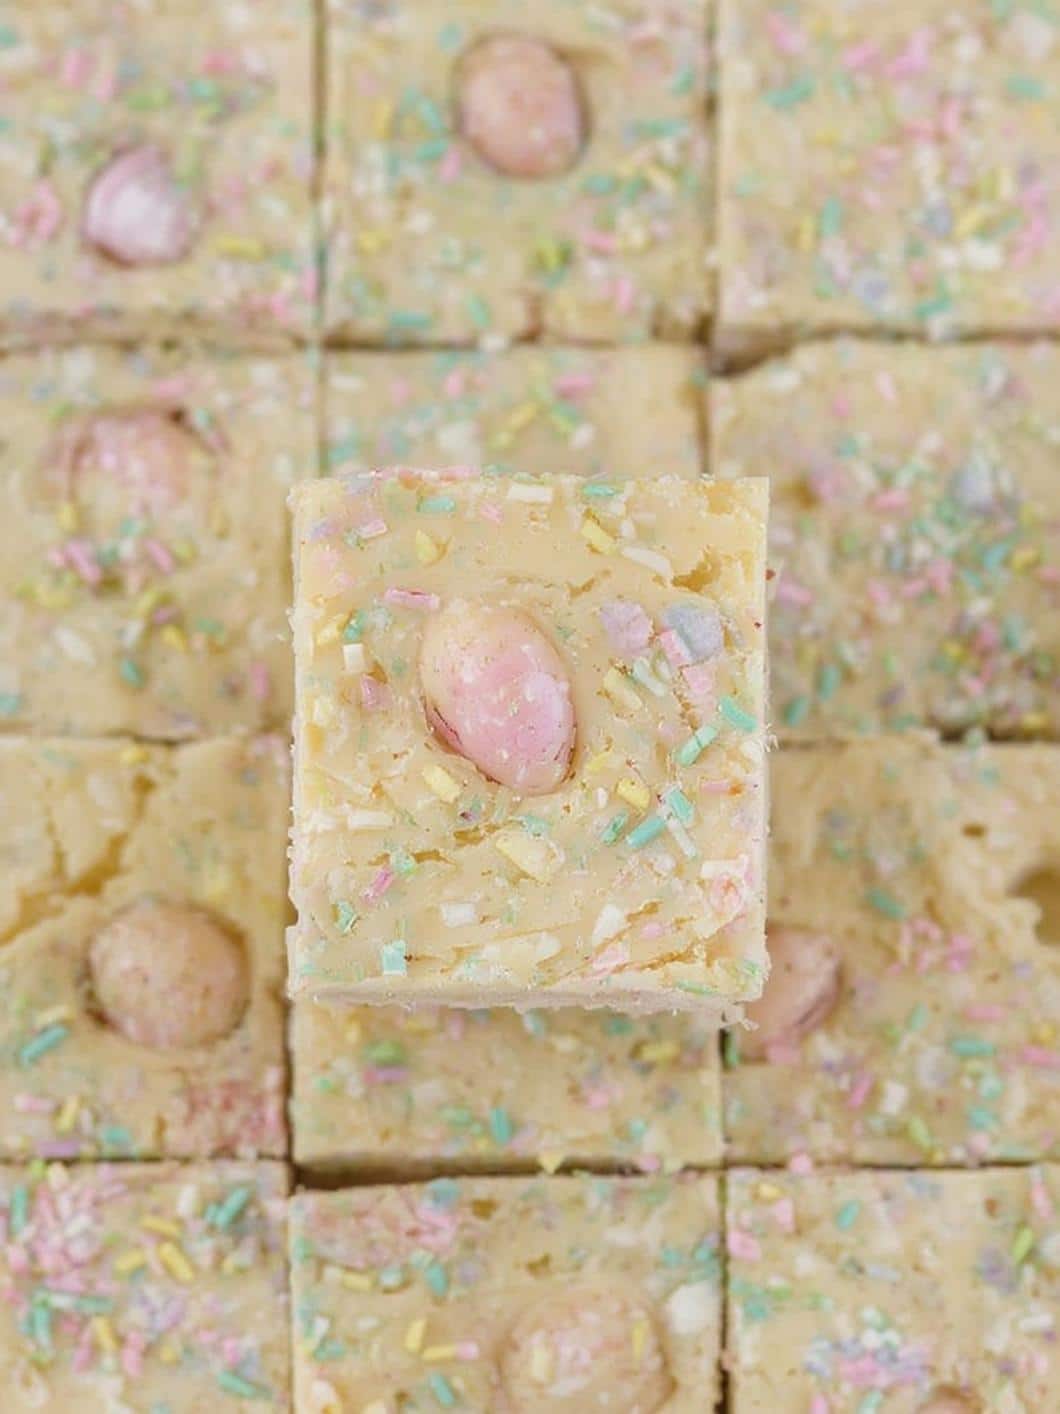
This fudge isn’t just another sweet; it’s an experience. The base is a rich, smooth white chocolate fudge that melts in your mouth, providing the perfect canvas for a swirl of soft pastel colors. Topped with festive sprinkles or mini chocolate eggs, these squares are the epitome of Easter charm. In addition, because this recipe requires no oven time, you can whip up a batch quickly, leaving more time for other holiday preparations. Get ready to impress your guests and delight your family with these irresistibly festive Pastel Easter Egg Fudge Squares.
What Makes These Pastel Easter Egg Fudge Squares So Special?
In a world of complex holiday baking, the simplicity of this recipe is truly a breath of fresh air. However, its ease of creation does not compromise its impact. The primary allure of these Pastel Easter Egg Fudge Squares lies in their stunning visual appeal. The gentle swirls of pink, blue, yellow, and green mimic the colors of hand-dyed Easter eggs, instantly bringing a festive and joyful mood to any setting. As a result, they serve not just as a dessert but also as a beautiful centerpiece for your Easter spread.
Beyond their appearance, the texture and flavor are truly exceptional. This fudge is incredibly smooth and creamy, a direct result of using sweetened condensed milk as its base. Unlike some traditional fudge recipes that can be grainy or difficult to master, this version is practically foolproof. The sweet, decadent flavor of white chocolate is perfectly balanced, making each bite a luxurious experience. For instance, a tiny pinch of salt cuts through the sweetness, ensuring the fudge is rich but not overwhelmingly sugary. Another key benefit is that this is a no-bake recipe, which means you can avoid turning on the oven, making it a perfect project for warmer spring days. It is an excellent choice for beginner bakers or for when you need a last-minute dessert that still looks and tastes gourmet.
Print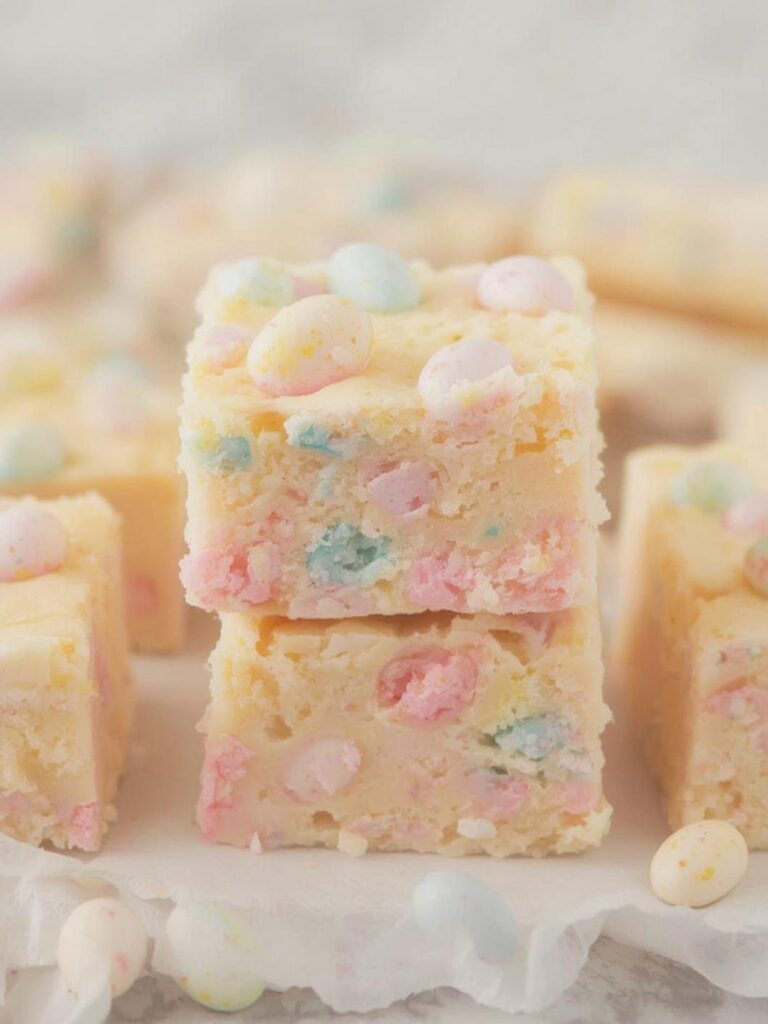
Pastel Easter Egg Fudge Squares
A simple, no-bake recipe for creamy, sweet, and visually captivating pastel fudge squares. This rich white chocolate fudge is swirled with soft pastel colors, making it a perfect and festive treat for Easter celebrations.
- Total Time: 2 hours 20 minutes
- Yield: 16 squares
Ingredients
High-Quality White Chocolate Chips
Sweetened Condensed Milk
Unsalted Butter
Pure Vanilla Extract
A Pinch of Salt
Pastel Gel Food Coloring (pink, blue, yellow, and green recommended)
Easter Sprinkles and/or Mini Chocolate Eggs
Instructions
1. Line an 8×8 inch baking pan with parchment paper, leaving an overhang on the sides.
2. Combine white chocolate chips, sweetened condensed milk, and butter in a microwave-safe bowl.
3. Microwave in 30-second intervals, stirring between each, until the mixture is completely melted and smooth.
4. Remove from microwave and stir in the vanilla extract and salt.
5. Working quickly, divide the hot fudge mixture evenly among four small bowls.
6. Add a different color of gel food coloring to each bowl and stir until uniform.
7. Drop alternating spoonfuls of the colored fudge mixtures randomly into the prepared pan.
8. Use a knife or skewer to gently swirl the colors together for a marbled effect, do not over-mix.
9. Immediately top with sprinkles and mini chocolate eggs, pressing gently.
10. Refrigerate for at least 2-3 hours, or until completely firm.
11. Lift the fudge from the pan using the parchment paper handles and slice into squares before serving.
Notes
Store the fudge in an airtight container in the refrigerator for up to two weeks. For clean, sharp cuts, dip a large knife in hot water and wipe it dry between each slice.
- Prep Time: 15 minutes
- Cook Time: 5 minutes
- Category: Dessert
- Method: No-Bake
- Cuisine: American
Nutrition
- Serving Size: 1 square
- Calories: 210 kcal
- Sugar: 26g
- Sodium: 50mg
- Fat: 10g
- Saturated Fat: 6g
- Unsaturated Fat: 4g
- Trans Fat: 0g
- Carbohydrates: 26g
- Fiber: 0g
- Protein: 3g
- Cholesterol: 20mg
Gathering Your Ingredients: The Key to Perfect Fudge
The success of any simple recipe hinges on the quality of its ingredients. Because there are only a few components, each one plays a crucial role in the final taste and texture. Before you begin, gather the following items to ensure your fudge-making process is smooth and successful.
- High-Quality White Chocolate Chips: This is the star of the show. Therefore, choose a good quality brand of white chocolate chips or a white chocolate baking bar for the best flavor and a silky-smooth melt. Poor quality white chocolate can sometimes be oily or fail to melt properly.
- Sweetened Condensed Milk: This ingredient is non-negotiable. It provides the essential sweetness and creamy structure of the fudge. Be sure you are using sweetened condensed milk, not evaporated milk, as they are not interchangeable.
- Unsalted Butter: Just a small amount of butter adds richness and helps create a tender, melt-in-your-mouth texture. Using unsalted butter allows you to control the overall saltiness of the recipe.
- Pure Vanilla Extract: Vanilla enhances the flavor of the white chocolate and adds a layer of aromatic warmth to the fudge.
- A Pinch of Salt: Salt is a flavor enhancer. In a sweet recipe like this, it balances the sugar from the condensed milk and white chocolate, preventing the fudge from being cloying.
- Pastel Gel Food Coloring: For vibrant yet soft colors, gel food coloring is highly recommended. It is more concentrated than liquid coloring, so you need less of it, and it won’t alter the consistency of your fudge. Choose classic Easter pastels like pink, blue, yellow, and green.
- Easter Sprinkles and Mini Chocolate Eggs: These are for decoration and add a delightful crunch and extra festive flair. Feel free to get creative with your choice of toppings!
While the ingredients are simple, it’s important to be mindful of your dietary choices. Enjoying holiday treats in moderation is key to a balanced lifestyle, a concept supported by many health experts at institutions like the Mayo Clinic. This recipe is a wonderful indulgence to be shared and savored.
Step-by-Step Instructions for Perfect Pastel Easter Egg Fudge Squares
Now that you have your ingredients assembled, it’s time for the fun part. This process is quick and enjoyable, so let’s create some beautiful fudge. First, prepare an 8×8 inch baking pan by lining it with parchment paper, leaving some overhang on the sides. This overhang will act as “handles,” making it easy to lift the fudge out of the pan later. Set the pan aside.
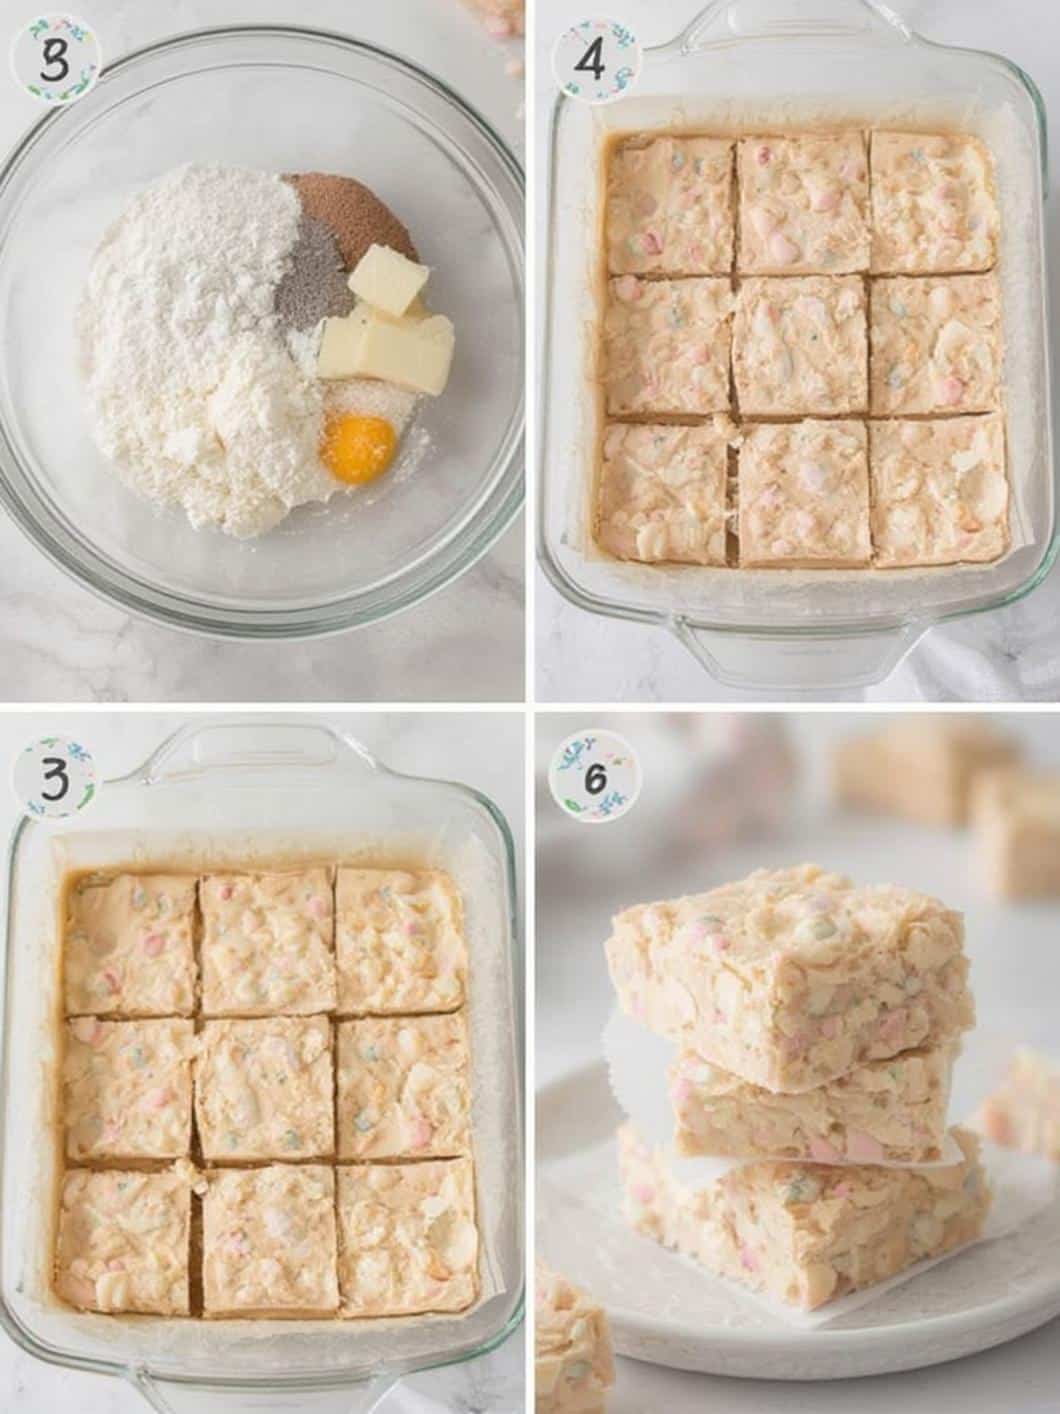
Next, in a medium-sized, microwave-safe bowl, combine the white chocolate chips, sweetened condensed milk, and butter. Microwave in 30-second intervals, stirring well after each one, until the chocolate is completely melted and the mixture is smooth. Be careful not to overheat the chocolate, as it can become seized and grainy. Alternatively, you can melt the ingredients in a double boiler over low heat. Once melted, immediately stir in the vanilla extract and salt until fully incorporated.
After that, you must work quickly before the fudge begins to set. Divide the hot fudge mixture evenly among four small bowls. Add a different color of gel food coloring to each bowl, starting with just a tiny drop. Stir each bowl thoroughly until the color is uniform. You can add more coloring if you desire a more vibrant shade, but remember that a little goes a long way with gel colors.
Subsequently, drop spoonfuls of the different colored fudge mixtures randomly into your prepared baking pan, alternating colors to create a patchwork effect. Once all the fudge is in the pan, you can either leave it as is for a color-blocked look or use a knife or skewer to gently swirl the colors together for a marbled design. Do not over-mix, or the colors will become muddy. Immediately sprinkle the top with your chosen Easter sprinkles or press mini chocolate eggs gently into the surface. Finally, place the pan in the refrigerator to chill for at least 2 to 3 hours, or until the fudge is completely firm.
Tips and Tricks for Fudge Success
Even though this recipe is straightforward, a few expert tips can help you achieve professional-looking results every time. These small details can elevate your Pastel Easter Egg Fudge Squares from good to absolutely perfect.
Getting the Colors Right
The key to beautiful pastel shades is to start with a minimal amount of food coloring. You can always add more, but you can’t take it away. Gel food coloring provides the most intense color without thinning the fudge mixture. To ensure the colors stay distinct when you swirl them, work gently and stop swirling as soon as you see a pattern you like. Over-swirling is the most common mistake that leads to a muddled appearance.
Cutting Clean Squares
For perfectly clean, sharp edges, the temperature of your knife is crucial. Once the fudge is completely firm, lift it out of the pan using the parchment paper handles and place it on a cutting board. Fill a tall glass with hot water. Dip a large, sharp knife into the hot water, then wipe it completely dry with a paper towel. The heated blade will slice through the fudge cleanly. You must wipe the knife clean and re-dip it in hot water between each cut to prevent smudging and dragging. This extra step is well worth the effort for a polished, professional look.
Storage Solutions
This fudge should be stored in the refrigerator to maintain its firm texture. Place the cut squares in an airtight container, separating layers with parchment or wax paper to prevent them from sticking together. Stored properly, the fudge will stay fresh for up to two weeks. You can also freeze the fudge for longer storage. Simply wrap the squares tightly in plastic wrap and then place them in a freezer-safe bag or container for up to three months.
Fun Variations and Customizations
One of the best things about this fudge recipe is its versatility. The white chocolate base is a blank slate for all sorts of creative additions and flavor profiles. For instance, you could add a teaspoon of a different extract along with the vanilla. Almond, lemon, or even peppermint extract could add a surprising and delicious twist. Another idea is to mix in other ingredients before chilling. Think chopped nuts, shredded coconut, or even crushed cookies for added texture and flavor.
If you’re a fan of no-bake Easter treats, you might also enjoy making our Easter Egg Oreo Balls, which are another family-friendly and delicious option. You can also change the toppings on your fudge squares. Instead of mini eggs, consider using chopped candy bars, different types of sprinkles, or a drizzle of melted dark or milk chocolate over the top once the fudge has set. You can adapt the colors for any holiday, making this a go-to recipe all year long. For another fun square treat, check out our nostalgic Cosmic Brownies Recipe.
It is worth noting that while white chocolate is delicious, its nutritional profile differs from dark chocolate. According to health resources like Healthline, it does not contain the cocoa solids that provide many of the antioxidant benefits found in darker varieties. Nonetheless, it remains a perfect ingredient for a creamy and celebratory dessert like this one.
Conclusion
In summary, these Pastel Easter Egg Fudge Squares are the perfect addition to your holiday celebration. They are not only incredibly easy to make but also offer a delightful, creamy texture and a festive appearance that everyone will love. This no-bake recipe saves you time and stress, allowing you to create a beautiful and delicious dessert without ever turning on the oven. By following the simple steps and tips provided, you can craft a treat that is sure to become a cherished part of your Easter traditions. Ultimately, making these fudge squares is a fun activity for the whole family, resulting in a sweet reward you can all enjoy together.
Frequently Asked Questions
Can I use a different type of chocolate?
Yes, you can substitute milk chocolate or semi-sweet chocolate chips. However, the pastel colors will not show up in darker chocolate. If you use a different chocolate, the fudge will still be delicious but will have a classic brown color.
How long does this fudge last in the refrigerator?
When stored in an airtight container in the refrigerator, these fudge squares will stay fresh and delicious for up to two weeks.
Is this recipe gluten-free?
Yes, as long as you use gluten-free white chocolate chips, vanilla extract, and toppings, this recipe is naturally gluten-free. Always double-check the labels on your ingredients to be certain.
Can I make this fudge ahead of time?
Absolutely! This is a great make-ahead dessert. You can prepare it up to a week in advance and keep it stored in the refrigerator until you are ready to serve. This makes holiday planning much easier.