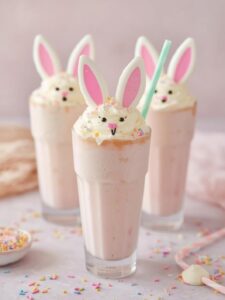
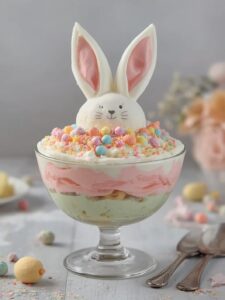
Spring is a time for cheerful colors, sweet treats, and joyful gatherings. Consequently, finding the perfect dessert that captures the spirit of the season can make any celebration extra special. If you’re looking for a delightful, eye-catching treat for your Easter brunch or spring party, then look no further. These Pastel Bunny Milkshake Shooters are not only incredibly adorable but also surprisingly simple to create. Furthermore, they combine the creamy goodness of a classic milkshake with the whimsical charm of Easter, all served in a perfectly portioned shooter glass. This recipe is guaranteed to bring smiles to the faces of both kids and adults, making it an instant holiday favorite.
Why These Shooters Are a Perfect Party Treat
When planning a party menu, hosts often search for recipes that are both delicious and visually appealing. In this regard, Pastel Bunny Milkshake Shooters check every box. First and foremost, their appearance is undeniably festive. The soft pastel layers immediately evoke thoughts of painted Easter eggs and blooming spring flowers. To put it differently, they are a decoration in and of themselves, adding a pop of color and charm to any dessert table. The tiny bunny toppers are the finishing touch that makes them truly irresistible.
Moreover, the individual shooter-sized portions offer incredible convenience. Unlike a large cake that needs slicing and plating, these mini milkshakes are a simple grab-and-go option for guests. This makes them ideal for mingling, as people can easily enjoy their treat without needing a table and fork. In addition, serving them in shooter glasses helps with portion control, allowing everyone to indulge in a sweet treat without feeling overly full. It’s a small burst of flavor that satisfies a sweet tooth perfectly. For another perfectly portioned dessert idea, you might also love these Bunny Tail Hot Cocoa Mousse Cups.
Finally, making these Pastel Bunny Milkshake Shooters can be a wonderful family activity. The steps are simple enough for children to help with, from scooping ice cream to adding drops of food coloring. As a result, you can create lasting memories in the kitchen while preparing for your celebration. It’s a fun, interactive recipe that brings everyone together before the party even begins.
Print
Pastel Bunny Milkshake Shooters
These Pastel Bunny Milkshake Shooters are a delightful, eye-catching treat for any spring celebration, combining a creamy milkshake with whimsical bunny toppings in perfectly portioned shooter glasses.
- Total Time: 15 minutes
- Yield: 10–12 shooters 1x
Ingredients
4 cups high-quality vanilla ice cream
1 cup whole milk
1 teaspoon vanilla extract
Pink, blue, yellow, and green gel food coloring
Corn syrup or honey, for rimming glasses
Pastel-colored sprinkles
Whipped cream, for topping
Bunny decorations (e.g., Marshmallow Peeps, candy bunnies)
Instructions
1. Prepare shooter glasses by dipping the rims in corn syrup, then into a plate of sprinkles.
2. Blend vanilla ice cream, whole milk, and vanilla extract in a blender until smooth and thick.
3. Divide the milkshake base evenly into three or four separate bowls.
4. Add a small drop of a different gel food color to each bowl and stir gently to create pastel shades.
5. Carefully spoon the colored mixtures into the prepared glasses, alternating colors to create layers.
6. Top each shooter with a swirl of whipped cream.
7. Garnish with a bunny decoration and a few more sprinkles.
8. Serve immediately.
Notes
For clean layers, ensure the milkshake is thick and spoon it gently into pre-chilled glasses. For flavor variations, add strawberries for pink or mint extract for green. Dairy-free versions can be made using plant-based ice cream and milk.
- Prep Time: 10 minutes
- Cook Time: 5 minutes
- Category: Dessert, Drink
- Method: Blending
- Cuisine: American
Nutrition
- Serving Size: 1 shooter
- Calories: 185 kcal
- Sugar: 22g
- Sodium: 60mg
- Fat: 9g
- Saturated Fat: 5g
- Unsaturated Fat: 4g
- Trans Fat: 0g
- Carbohydrates: 24g
- Fiber: 0g
- Protein: 3g
- Cholesterol: 30mg
Essential Ingredients for Your Pastel Bunny Milkshake Shooters
The beauty of this recipe lies in its simplicity. You don’t need a long list of complicated ingredients to create these stunning treats. In fact, you probably have most of what you need in your kitchen already. For best results, however, using high-quality ingredients will make a noticeable difference in the final taste and texture.
The Milkshake Base
The foundation of any great milkshake is, of course, the ice cream and milk. A classic, creamy texture is key to making these shooters a success.
- Vanilla Ice Cream: Choose a high-quality vanilla bean ice cream. Its rich, creamy flavor provides the perfect canvas for the pastel colors and allows other flavors to shine through.
- Whole Milk: For the creamiest consistency, whole milk is the best choice. It thins the ice cream just enough without making it watery. The balance of fat in whole milk is important for a smooth texture, a topic often discussed in nutritional guides on sites like Healthline.
- Vanilla Extract: A small splash of pure vanilla extract enhances the overall flavor, adding a layer of warmth and depth to the milkshake base.
Achieving the Perfect Pastel Colors
The visual magic of these shooters comes from their soft, layered colors. Therefore, choosing the right food coloring is essential.
- Gel Food Coloring: Gel food coloring is highly recommended over liquid varieties. Gels are more concentrated, so you only need a tiny amount to achieve vibrant colors. Importantly, this means you won’t be adding excess liquid to your milkshake, which could alter its consistency. You will want pink, blue, yellow, and green for a classic spring palette.
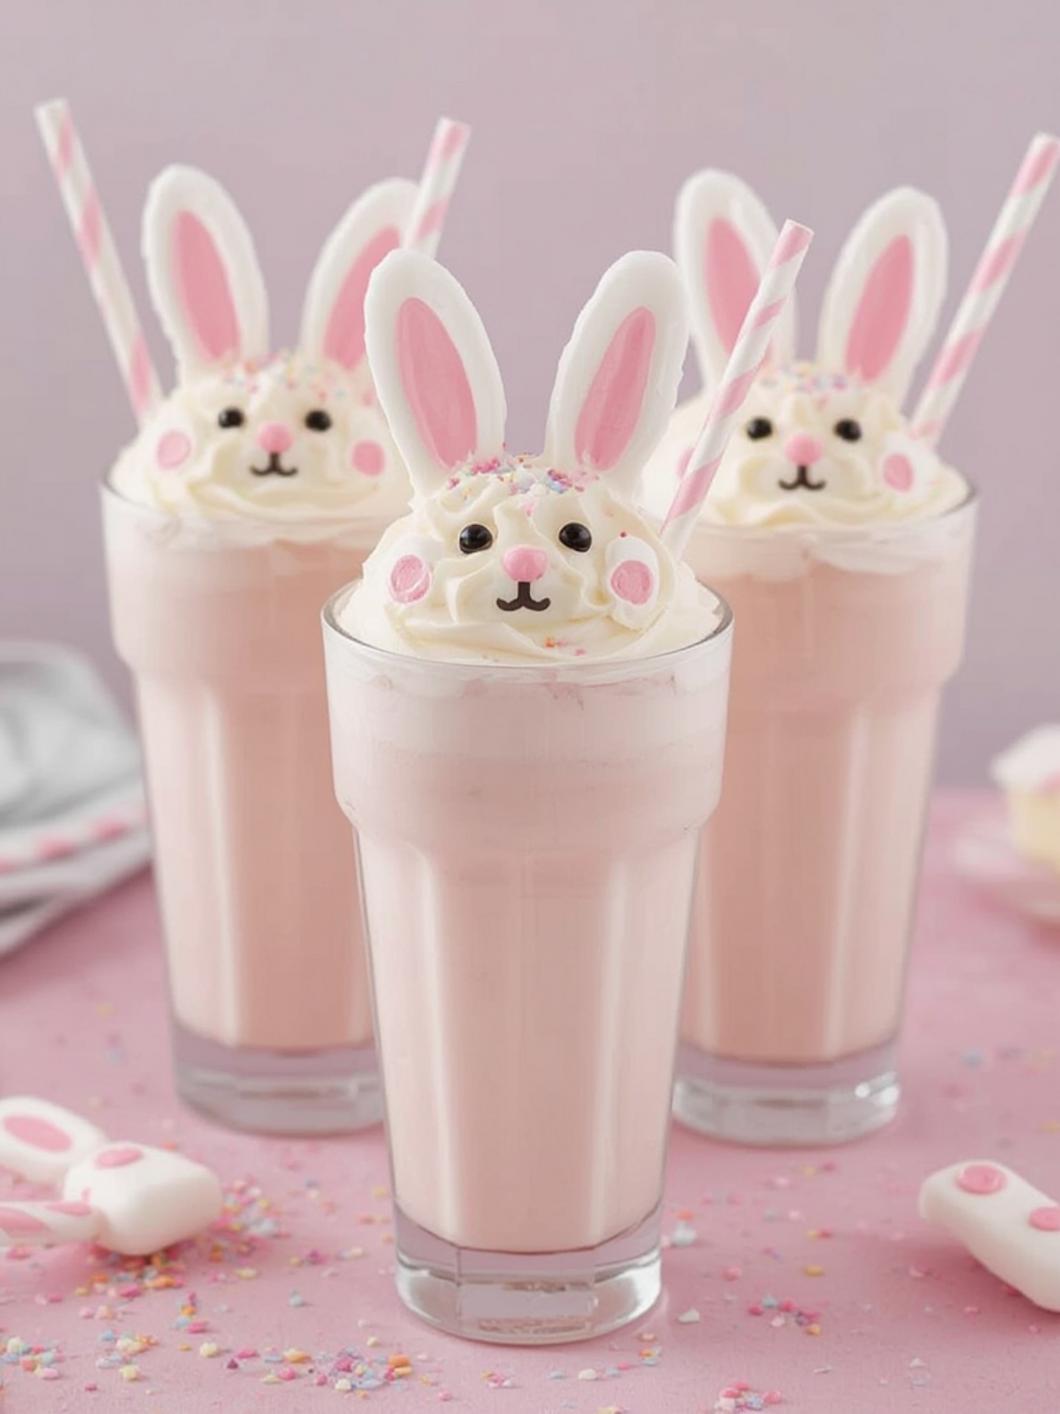
The Whimsical Bunny Toppings
The toppings are what transform a simple pastel milkshake into an adorable Easter-themed dessert. This is where you can get truly creative.
- Whipped Cream: A swirl of whipped cream on top creates a fluffy “cloud” for your bunny to sit on. You can use canned whipped cream for convenience or make your own for a richer taste.
- Bunny Decorations: Marshmallow bunny Peeps are a classic and easy choice. Alternatively, you can find bunny-shaped sprinkles, candy ears, or small chocolate bunnies at most grocery or craft stores during the spring season.
- Sprinkles: Use a mix of pastel-colored sprinkles, jimmies, or nonpareils. These are perfect for decorating the rim of the shooter glass and for scattering on top of the whipped cream.
Step-by-Step Instructions
Now that you have all your ingredients, it’s time for the fun part. Creating these Pastel Bunny Milkshake Shooters is a straightforward process. Just follow these steps, and you’ll have a tray of adorable treats ready in no time. Remember to work relatively quickly to prevent the milkshake from melting too much.
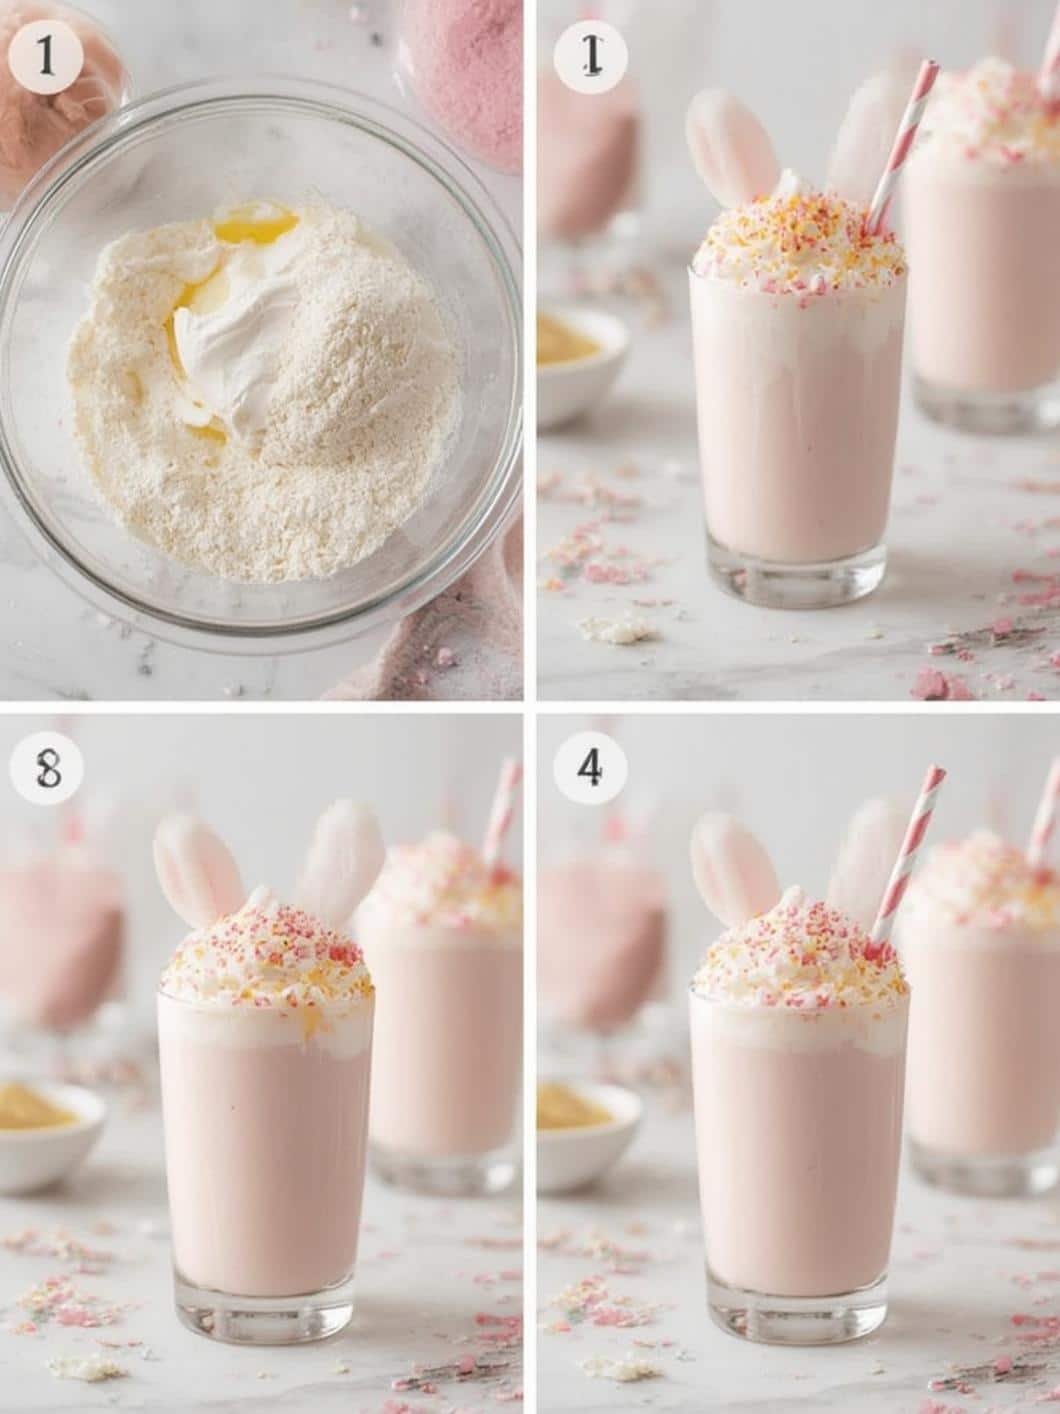
- Prepare Your Glasses: Before you begin, prepare your shooter glasses. Pour a thin layer of sprinkles onto a small plate. Then, pour a small amount of corn syrup or honey onto another plate. Dip the rim of each glass first into the corn syrup and then into the sprinkles, rotating to coat it evenly. Set the prepared glasses aside.
- Blend the Milkshake Base: In a blender, combine 4 cups of vanilla ice cream, 1 cup of whole milk, and 1 teaspoon of vanilla extract. Blend until the mixture is smooth and creamy but still thick. If it’s too thick, add another splash of milk; if it’s too thin, add another scoop of ice cream.
- Divide and Color the Mixture: Next, pour the milkshake base evenly into three or four separate bowls. Add a very small drop of a different gel food color to each bowl (e.g., one pink, one blue, one yellow). Stir each bowl gently until the color is fully incorporated and you have a soft pastel shade. Be careful not to overmix.
- Layer the Colors: Carefully spoon the colored milkshake mixtures into your prepared shooter glasses. You can alternate colors to create distinct layers. For a swirl effect, you can gently use a thin skewer to pull the colors together along the inside of the glass. Fill each glass about three-quarters full.
- Add the Toppings: Immediately top each milkshake shooter with a generous swirl of whipped cream. Then, gently place a bunny candy decoration on top. For the final touch, add a few more pastel sprinkles over the whipped cream.
- Serve Immediately: Because these are frozen treats, they are best served right after they are assembled. Arrange them on a platter and watch them disappear!
Creative Variations and Pro Tips
While the classic vanilla recipe is a guaranteed crowd-pleaser, there are many ways to customize your Pastel Bunny Milkshake Shooters. Consequently, you can tailor them to specific tastes or dietary needs. Here are a few ideas to inspire you.
Fun Flavor Twists
Instead of relying solely on food coloring, you can infuse your milkshakes with complementary flavors. For the pink layer, for instance, blend in a few fresh or frozen strawberries. For a pale green, a drop of mint extract can add a refreshing twist. A little lemon zest could also be added to the yellow portion for a bright, citrusy note. Experimenting with flavors adds another layer of enjoyment to these festive treats.
Dairy-Free and Healthier Options
Catering to different dietary needs is easier than ever. For a dairy-free version, simply substitute the traditional ice cream and milk with your favorite alternatives. For example, vanilla-flavored coconut, almond, or oat milk-based ice cream works beautifully. Similarly, use a matching plant-based milk to blend. According to the Mayo Clinic, many people have dietary restrictions, so providing options is always a thoughtful gesture. For toppings, you can find dairy-free whipped creams made from coconut or oat milk in most supermarkets.
Make-Ahead Pro Tips
While the shooters are best assembled right before serving, you can certainly prepare some components ahead of time to make party day less stressful. For example, you can rim all of your shooter glasses with sprinkles and store them in the pantry. You can also prepare any homemade toppings in advance. If you’re feeling ambitious and want to serve another stunning dessert, consider making a Pastel Swirl Easter Egg Roll Cake, which can be baked a day ahead.
Conclusion
In short, these Pastel Bunny Milkshake Shooters are the ultimate spring dessert that combines delightful flavors with picture-perfect presentation. Their creamy texture, soft pastel hues, and adorable bunny toppers make them a memorable addition to any Easter or spring celebration. Moreover, the recipe is incredibly versatile, allowing for creative flavor and dietary adjustments. By following these simple steps, you can easily create a treat that will impress your guests and bring a touch of whimsical fun to your event. Ultimately, making and sharing these delightful Pastel Bunny Milkshake Shooters is a wonderful way to celebrate the sweetness of the season.
Frequently Asked Questions
Can I make these Pastel Bunny Milkshake Shooters ahead of time?
These are best served immediately after preparation to maintain their ideal texture. However, you can prepare the glasses by rimming them with sprinkles a day in advance. If you absolutely must make them ahead, you can pour the layered milkshakes into the glasses and place them in the freezer on a tray. Just be sure to add the whipped cream and toppings right before serving, as those won’t hold up well in the freezer.
What are some good non-dairy alternatives for this recipe?
For a delicious dairy-free version, use a vanilla-flavored ice cream made from almond, coconut, soy, or oat milk. Pair it with the corresponding non-dairy milk for blending. Many brands also offer dairy-free whipped toppings, which are typically found in the freezer aisle. The process remains the same, and the result is just as tasty. For more information on dairy alternatives, you can check reliable sources like WebMD.
How do I prevent the colors from mixing together?
To get clean layers, make sure your milkshake base is nice and thick. Spoon each color in gently on top of the previous one. Chilling the glasses in the freezer for about 15 minutes before you start can also help the layers set faster and prevent them from bleeding into each other.