Spring is in the air, and that means it’s time for bright, cheerful desserts that capture the spirit of the season. If you’re searching for the perfect treat for your Easter celebration or just a delightful springtime dessert, look no further than these adorable Lemon Chick Meringue Nests. This dessert is a showstopper, combining the airy, crisp texture of meringue with a rich, tangy lemon curd filling. Consequently, each bite is a perfect balance of sweet and tart. While they look like they came straight from a gourmet bakery, you’ll be surprised at how straightforward they are to create right in your own kitchen. This guide will walk you through everything you need to know to make these nests a new family favorite.
What Makes These Lemon Chick Meringue Nests So Special?
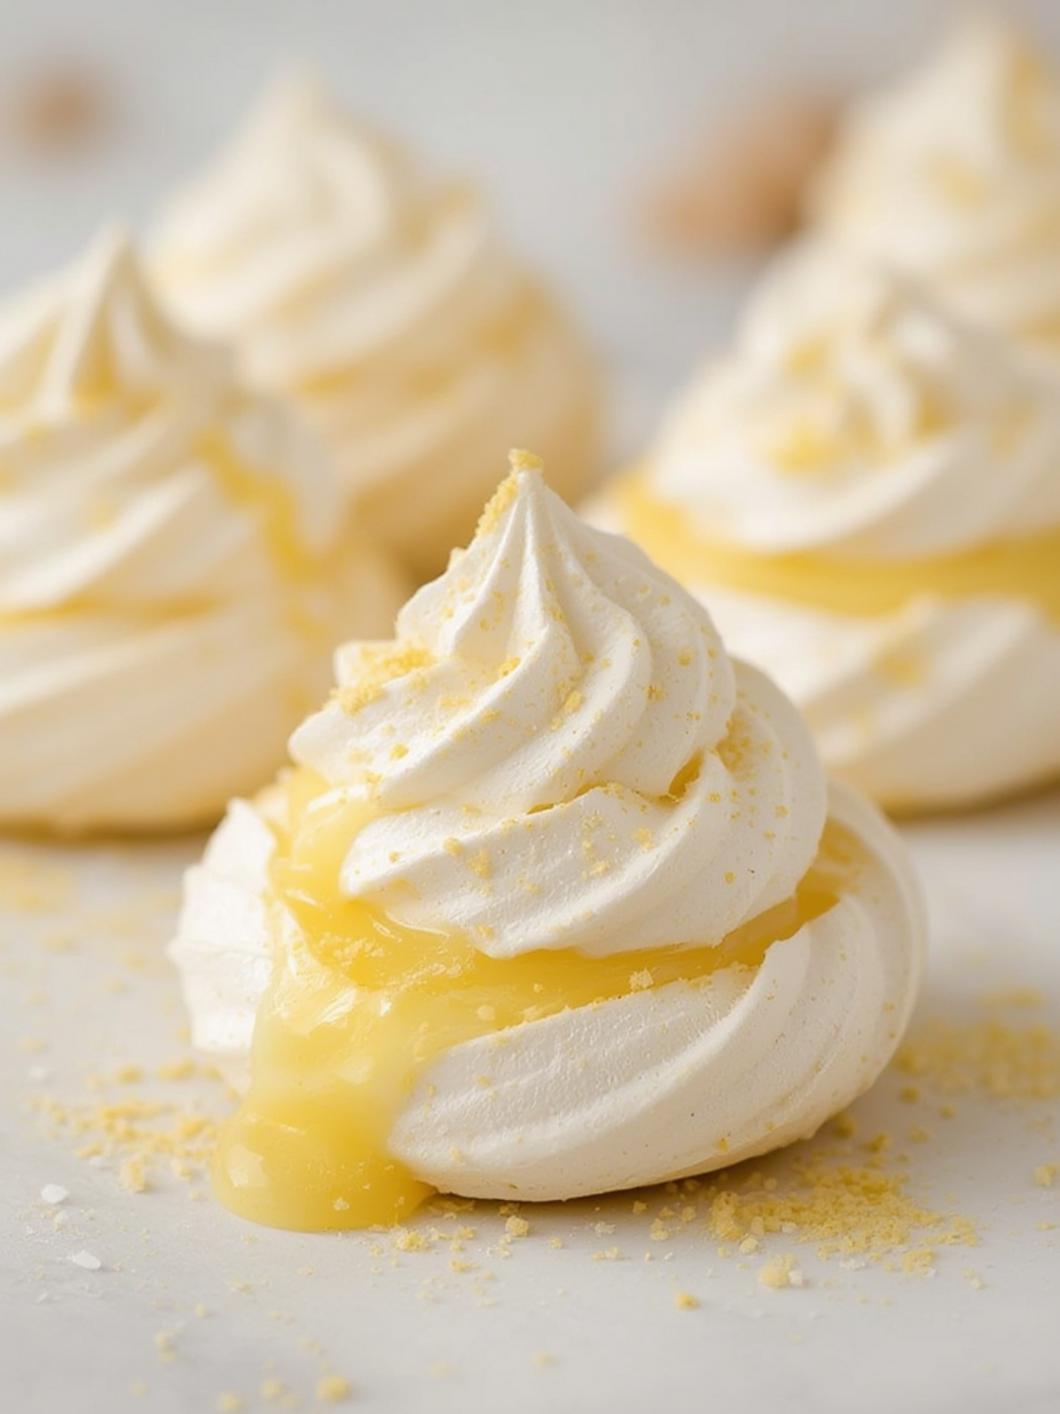
There are countless desserts out there, but these Lemon Chick Meringue Nests truly stand out for several reasons. First and foremost, the combination of textures is simply divine. You have the delicate, crisp-on-the-outside, chewy-on-the-inside meringue shell, which provides a satisfying crunch. In contrast, this is immediately followed by the silky, smooth, and incredibly luscious lemon curd. The contrast is what makes this dessert so memorable and keeps you coming back for another bite.
Furthermore, the flavor profile is perfectly balanced. The sweetness of the meringue is expertly cut by the bright, zesty tang of the lemon curd. This prevents the dessert from being overly sugary, resulting in a refreshingly light treat that’s perfect after a big holiday meal. In addition to the taste, the visual appeal is undeniable. The little yellow “chicks” nestled in their white meringue homes are irresistibly cute, making them an instant hit with both kids and adults. They are the centerpiece of any dessert table, especially for spring holidays like Easter. If you’re looking for other festive treats, you might also love these Easter Egg Oreo Balls.
Finally, a major advantage of this recipe is that it’s naturally gluten-free. Since the nests are made from egg whites and sugar, they are a wonderful option for guests with gluten sensitivities. This allows you to serve a spectacular dessert that everyone can enjoy without worry. For instance, you can be confident that you are providing a safe and delicious option for all your guests.
Print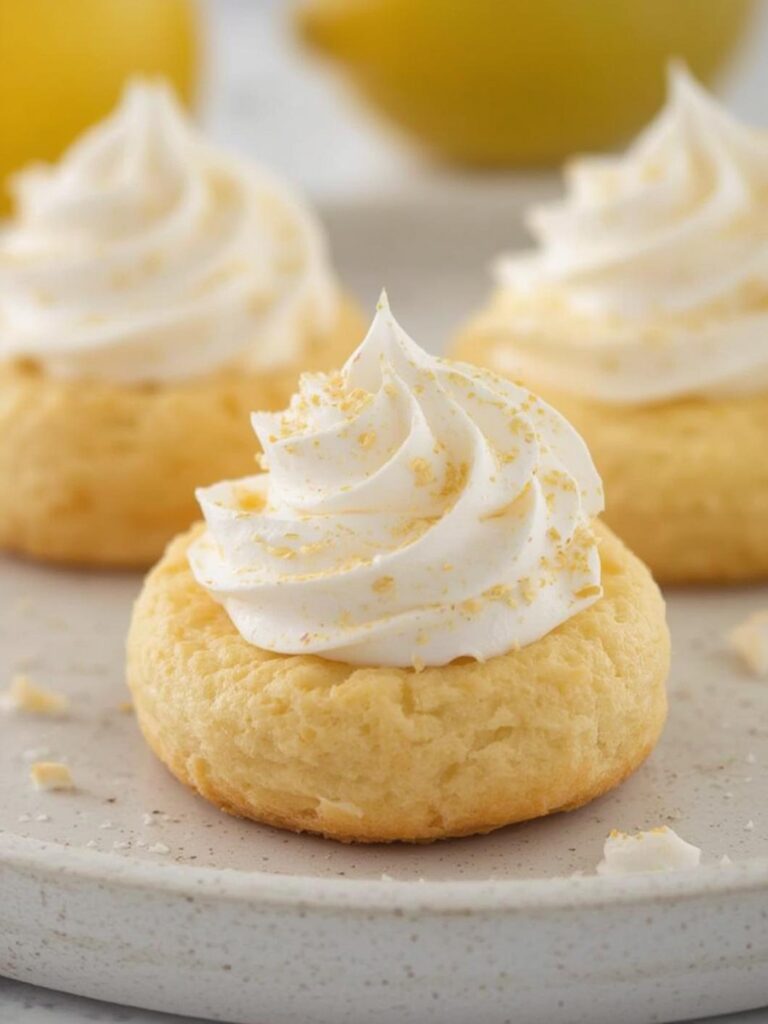
Lemon Chick Meringue Nests
An adorable and delicious dessert featuring crisp meringue nests filled with a tangy, smooth lemon curd, decorated to look like little spring chicks. This treat offers a perfect balance of sweet and tart flavors, making it a showstopper for Easter or any spring celebration.
- Total Time: 3 hours 45 minutes
- Yield: 10–12 nests 1x
Ingredients
4 large egg whites, room temperature
1 cup superfine (caster) sugar
1/2 tsp cream of tartar
1 tsp vanilla extract
4 large egg yolks
3/4 cup granulated sugar
1/2 cup fresh lemon juice
1 tbsp lemon zest
1/2 cup unsalted butter, cubed
Yellow food coloring
Candy eyes
Orange sprinkles (for beaks)
Instructions
1. Preheat oven to 225°F (110°C) and line two baking sheets with parchment paper.
2. In a clean bowl, beat room temperature egg whites and cream of tartar on medium speed until soft peaks form.
3. Slowly add the superfine sugar, one tablespoon at a time, while mixing continuously.
4. Increase mixer speed to high and beat until the meringue is thick, glossy, and holds stiff peaks, then fold in the vanilla extract.
5. Transfer meringue to a piping bag with a star tip and pipe 3-inch nests (a flat base with two layers of walls) onto the prepared baking sheets.
6. Bake for 60-75 minutes until dry and crisp, then turn off the oven and let the meringues cool completely inside with the door slightly ajar.
7. To make the curd, whisk egg yolks, granulated sugar, lemon juice, and zest in a saucepan over medium-low heat.
8. Cook, whisking constantly, for 8-10 minutes until the mixture thickens to coat the back of a spoon; do not boil.
9. Remove from heat, stir in butter until melted, then strain through a fine-mesh sieve into a bowl.
10. Press plastic wrap directly onto the curd’s surface and refrigerate for at least 2 hours until chilled.
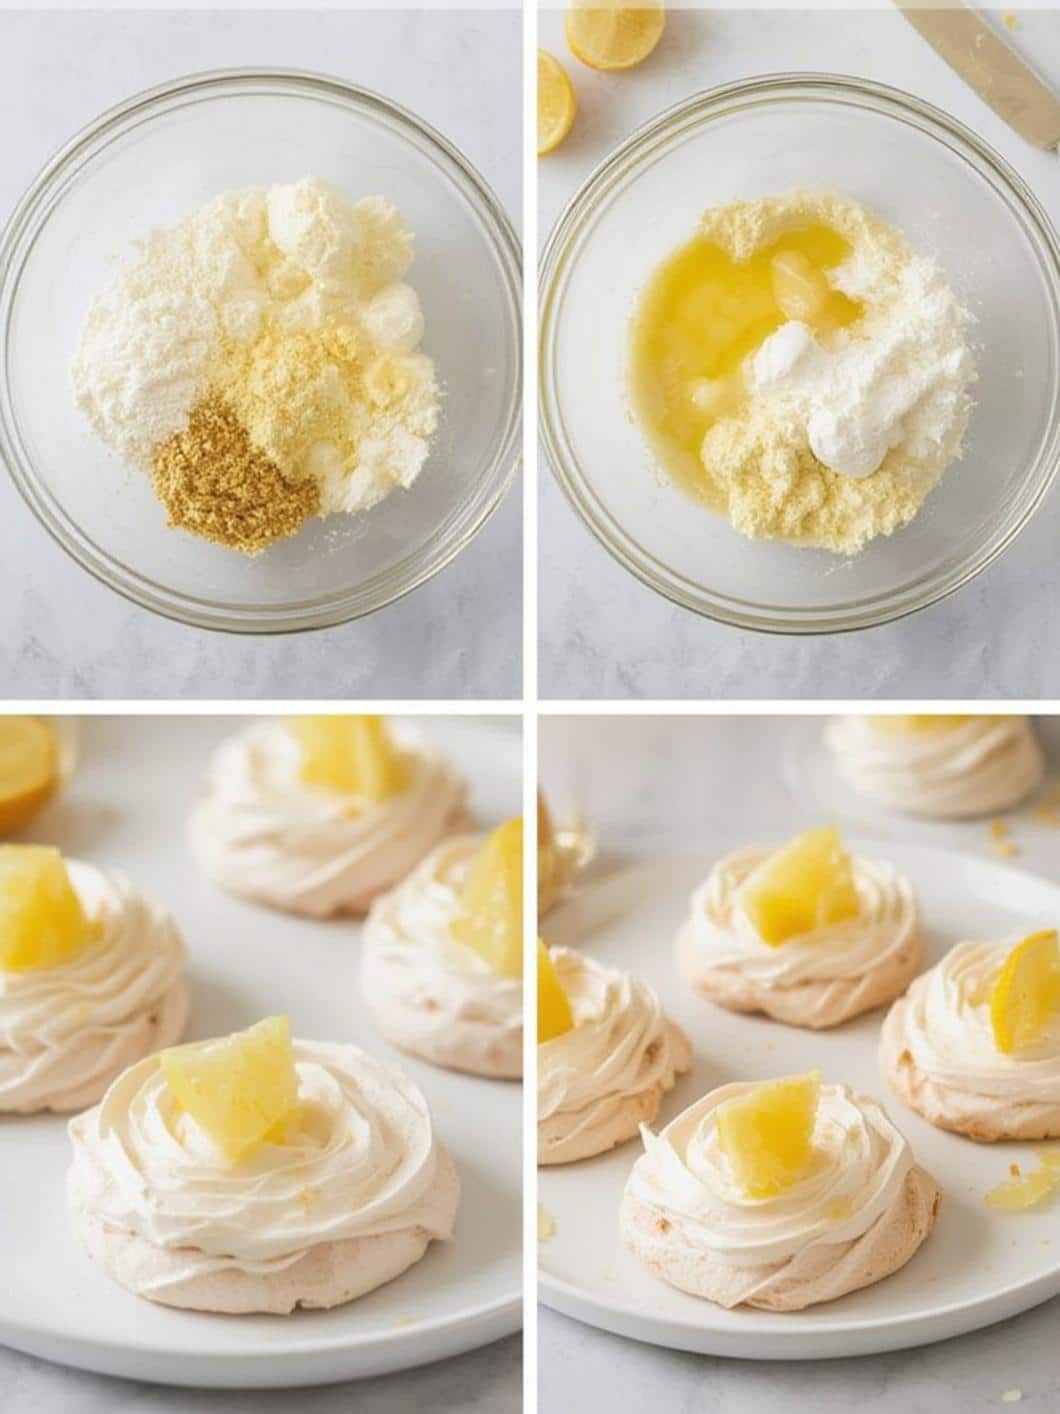
11. To assemble, mix a small portion of curd with yellow food coloring.
12. Fill each cooled meringue nest with the plain lemon curd.
13. Top with a dollop of the yellow curd to form a chick’s body, then decorate with candy eyes and an orange sprinkle for a beak.
14. Serve immediately for best texture.
Notes
Ensure your mixing bowl and beaters are completely clean and free of grease for the best meringue volume. Store unfilled nests and curd separately. Assemble just before serving to prevent the nests from becoming soft.
- Prep Time: 30 minutes
- Cook Time: 1 hour 15 minutes
- Category: Dessert
- Method: Baking
- Cuisine: American
Nutrition
- Serving Size: 1 nest
- Calories: 235 kcal
- Sugar: 28g
- Sodium: 45mg
- Fat: 11g
- Saturated Fat: 6g
- Unsaturated Fat: 4g
- Trans Fat: 0g
- Carbohydrates: 32g
- Fiber: 0g
- Protein: 3g
- Cholesterol: 105mg
Essential Ingredients and Tools
To achieve dessert perfection, gathering the right ingredients and tools is the first essential step. Fortunately, this recipe uses pantry staples that are easy to find. For the best results, however, it’s important to use high-quality ingredients, especially when it comes to the lemons.
For the Meringue Nests
The foundation of this dessert is a classic French meringue. It’s simple but requires precision for that perfect light and airy texture.
- Egg Whites: You will need large egg whites, preferably at room temperature. Room temperature egg whites whip up to a greater volume, which is crucial for light, fluffy meringue. According to the Mayo Clinic, eggs are a great source of protein.
- Superfine Sugar: Also known as caster sugar, this dissolves more easily into the egg whites than regular granulated sugar, preventing a gritty texture. If you don’t have it, you can pulse granulated sugar in a food processor for a few seconds.
- Cream of Tartar: This acidic powder is a key stabilizer. It helps the egg whites hold their shape and prevents the meringue from collapsing.
- Vanilla Extract: A splash of pure vanilla extract adds a lovely depth of flavor to the sweet meringue.
For the Luscious Lemon Curd Filling
A homemade lemon curd is far superior to store-bought versions. Its vibrant flavor is the star of the show. If you’re a fan of lemon desserts, you should also check out this amazing Lemon Blueberry Cake.
- Egg Yolks: This recipe cleverly uses the yolks left over from the meringue, ensuring no food waste.
- Fresh Lemons: You will need both the juice and the zest from fresh lemons. The zest contains essential oils that provide an intense lemon flavor that you can’t get from bottled juice.
- Granulated Sugar: This sweetens the curd and balances the tartness of the lemons.
- Unsalted Butter: Added at the end, butter gives the curd a rich, smooth, and glossy finish.
Necessary Kitchen Tools
Having the right equipment will make the process much smoother. You likely have most of these items already.
- Stand Mixer or Electric Hand Mixer: While it’s possible to make meringue by hand, a mixer makes the job infinitely easier and yields better results.
- Piping Bag and Star Tip: This is essential for creating the classic nest shape. A large open star tip works best.
- Baking Sheets and Parchment Paper: Parchment paper is non-negotiable, as it prevents the delicate meringues from sticking.
- Saucepan and Whisk: For making the lemon curd on the stovetop.
- Fine-Mesh Sieve: Straining the curd ensures it is perfectly smooth.
Step-by-Step Instructions for Perfect Lemon Chick Meringue Nests
Now that you have your ingredients and tools, it’s time to start creating. Follow these steps carefully, and you’ll be rewarded with beautiful and delicious treats. Remember to take your time, as meringue can be sensitive to rushing.
Making the Meringue Nests
The key to a great nest is a stable, glossy meringue. Therefore, pay close attention during this stage.
- Prep Your Station: First, preheat your oven to 225°F (110°C) and line two baking sheets with parchment paper. It is also vital to ensure your mixing bowl and beater are completely clean and free of any grease.
- Whip the Egg Whites: In your clean bowl, beat the room temperature egg whites and cream of tartar on medium speed until they become foamy and soft peaks form.
- Add Sugar Slowly: With the mixer still running, begin adding the superfine sugar one tablespoon at a time. Wait about 30 seconds between additions. This slow process is critical for a stable meringue.
- Whip to Stiff Peaks: After all the sugar is incorporated, increase the speed to high and beat until the meringue is thick, glossy, and holds stiff peaks. Subsequently, when you lift the beater, the peak should stand straight up without curling over. Then, gently fold in the vanilla extract.
- Pipe the Nests: Transfer the meringue to a piping bag fitted with a large star tip. On the parchment paper, pipe 3-inch circles for the base. Then, pipe two more layers around the edge of the circle to build up the “walls” of the nest.
- Bake Low and Slow: Bake for 60-75 minutes, or until the meringues are dry and crisp to the touch. Afterward, turn off the oven and let the meringues cool completely inside the oven with the door slightly ajar. This prevents them from cracking.
Preparing the Luscious Lemon Curd
While the meringues are baking and cooling, you can prepare the zesty filling. Making curd is a rewarding process that fills your kitchen with a wonderful aroma.
- Combine Ingredients: In a medium saucepan, whisk together the egg yolks, granulated sugar, fresh lemon juice, and lemon zest.
- Cook Gently: Place the saucepan over medium-low heat and cook, whisking constantly. It is very important to not walk away, as the mixture can curdle easily.
- Thicken the Curd: Continue whisking until the mixture thickens enough to coat the back of a spoon, which usually takes about 8-10 minutes. Do not let it boil.
- Add Butter and Strain: Remove the pan from the heat and stir in the cubes of butter until they are fully melted and incorporated. For an ultra-smooth texture, pour the curd through a fine-mesh sieve into a clean bowl.
- Chill: Press a piece of plastic wrap directly onto the surface of the curd to prevent a skin from forming. Subsequently, refrigerate for at least 2 hours, or until completely chilled and set.
Assembling Your Adorable Chicks
This is the fun part where your creation truly comes to life. It’s best to assemble the nests just before you plan to serve them to maintain the crispness of the meringue.
- Color the Curd: Take about a quarter of your chilled lemon curd and place it in a separate small bowl. Add a drop or two of yellow food coloring and mix until you have a vibrant chick-yellow color.
- Fill the Nests: Carefully spoon the plain (uncolored) lemon curd into the center of each cooled meringue nest.
- Create the Chick: Using a small spoon or a piping bag, place a dollop of the yellow-colored curd on top of the curd in the nest. This will form the chick’s body.
- Add the Details: Gently press two candy eyes onto the yellow dollop. Finally, use an orange sprinkle or a tiny piece of candied orange peel to create the beak. Your adorable Lemon Chick Meringue Nests are now ready to be admired and enjoyed!
Expert Tips for Meringue Mastery
Making meringue can sometimes feel intimidating, but a few key tips can ensure your success every time. Following this advice will help you avoid common pitfalls like sticky, weepy, or cracked meringues.
First, always start with an impeccably clean bowl. Any trace of fat or grease, even from your fingertips or a speck of egg yolk, can ruin your meringue by preventing the egg whites from whipping to their full volume. Therefore, it’s a good practice to wipe your bowl and beaters with a little white vinegar before you begin. Secondly, use room temperature egg whites. They are more relaxed and will whip up much faster and create more volume than cold eggs straight from the fridge. In addition, if you’re ever concerned about foodborne illness, the WebMD guide to raw eggs can provide useful information, though the meringue in this recipe is fully cooked.
Moreover, be mindful of the weather. Meringue is notoriously sensitive to humidity. On a very humid or rainy day, the sugar in the meringue can absorb moisture from the air, which can make it sticky and soft. Consequently, it’s best to make meringue on a dry day for the crispiest results. Lastly, the baking process is crucial. The “low and slow” method is not just a suggestion; it is essential for drying out the meringues properly without browning them too much. And remember to cool them in the turned-off oven. This gradual temperature change helps prevent cracking, ensuring your nests are as beautiful as they are delicious.
Variations and Proper Storage
While the classic lemon version is a clear winner, this recipe is wonderfully versatile. You can easily adapt it to different flavors or occasions. Additionally, knowing how to store the components correctly is key to enjoying these treats at their best.
Fun Flavor Variations
Don’t be afraid to experiment with different citrus flavors. For example, lime or blood orange curd would be equally delicious and would offer a beautiful color variation. Similarly, you could infuse the meringue with different extracts, such as almond or peppermint, for a unique twist. For a completely different dessert experience, you could fill the plain meringue nests with sweetened whipped cream and top them with fresh berries like strawberries, raspberries, and blueberries. This creates a lighter, fruit-forward dessert that is perfect for summer. You could even drizzle them with melted chocolate for an extra touch of decadence. Another delightful holiday option is our Easter Swirl Pie.
How to Store Your Meringue Nests
The most important rule for storage is to keep the components separate until you are ready to serve. Meringue is like a sponge for moisture, and the wet curd will cause it to soften and lose its crispness almost immediately. Store the completely cooled, unfilled meringue nests in an airtight container at room temperature for up to two weeks. Do not refrigerate them, as the cold, moist air will make them sticky. The lemon curd, on the other hand, must be stored in the refrigerator. Keep it in an airtight container with plastic wrap pressed against the surface for up to one week. When it’s time to serve, simply fill the nests and decorate your chicks for a dessert that tastes as fresh as if you just made it.
Conclusion
Creating these beautiful Lemon Chick Meringue Nests is a truly rewarding baking project that is perfect for any spring gathering. By following the steps and tips outlined in this guide, you can confidently produce a dessert that is as delicious as it is charming. The delightful contrast between the crisp, sweet meringue and the tangy, smooth lemon curd is a combination that is sure to impress your family and friends. Ultimately, this recipe is more than just a sweet treat; it’s an opportunity to create a festive and memorable centerpiece for your celebration. We encourage you to embrace the process and have fun bringing these adorable little chicks to life in your own kitchen.
Frequently Asked Questions
Can I make the components ahead of time?
Yes, absolutely! This is one of the best features of this recipe. You can make the meringue nests up to two weeks in advance and store them in an airtight container at room temperature. The lemon curd can be made up to a week ahead and kept in an airtight container in the refrigerator. Then, simply assemble them right before serving.
Why is my meringue weepy or chewy?
A weepy or chewy meringue is typically caused by one of two things: undissolved sugar or humidity. To prevent it, make sure you add the sugar very slowly to the egg whites, giving it time to dissolve completely. Additionally, try to make meringue on a day with low humidity. If your meringue is still a bit chewy on the inside, it might just mean it needed a little more time drying in the oven.
Can I use store-bought lemon curd?
Of course! If you’re short on time, using a high-quality store-bought lemon curd is a perfectly acceptable shortcut. While homemade curd offers a fresher, more vibrant flavor, a good quality store-bought version will still result in a delicious dessert. The assembly process remains exactly the same.