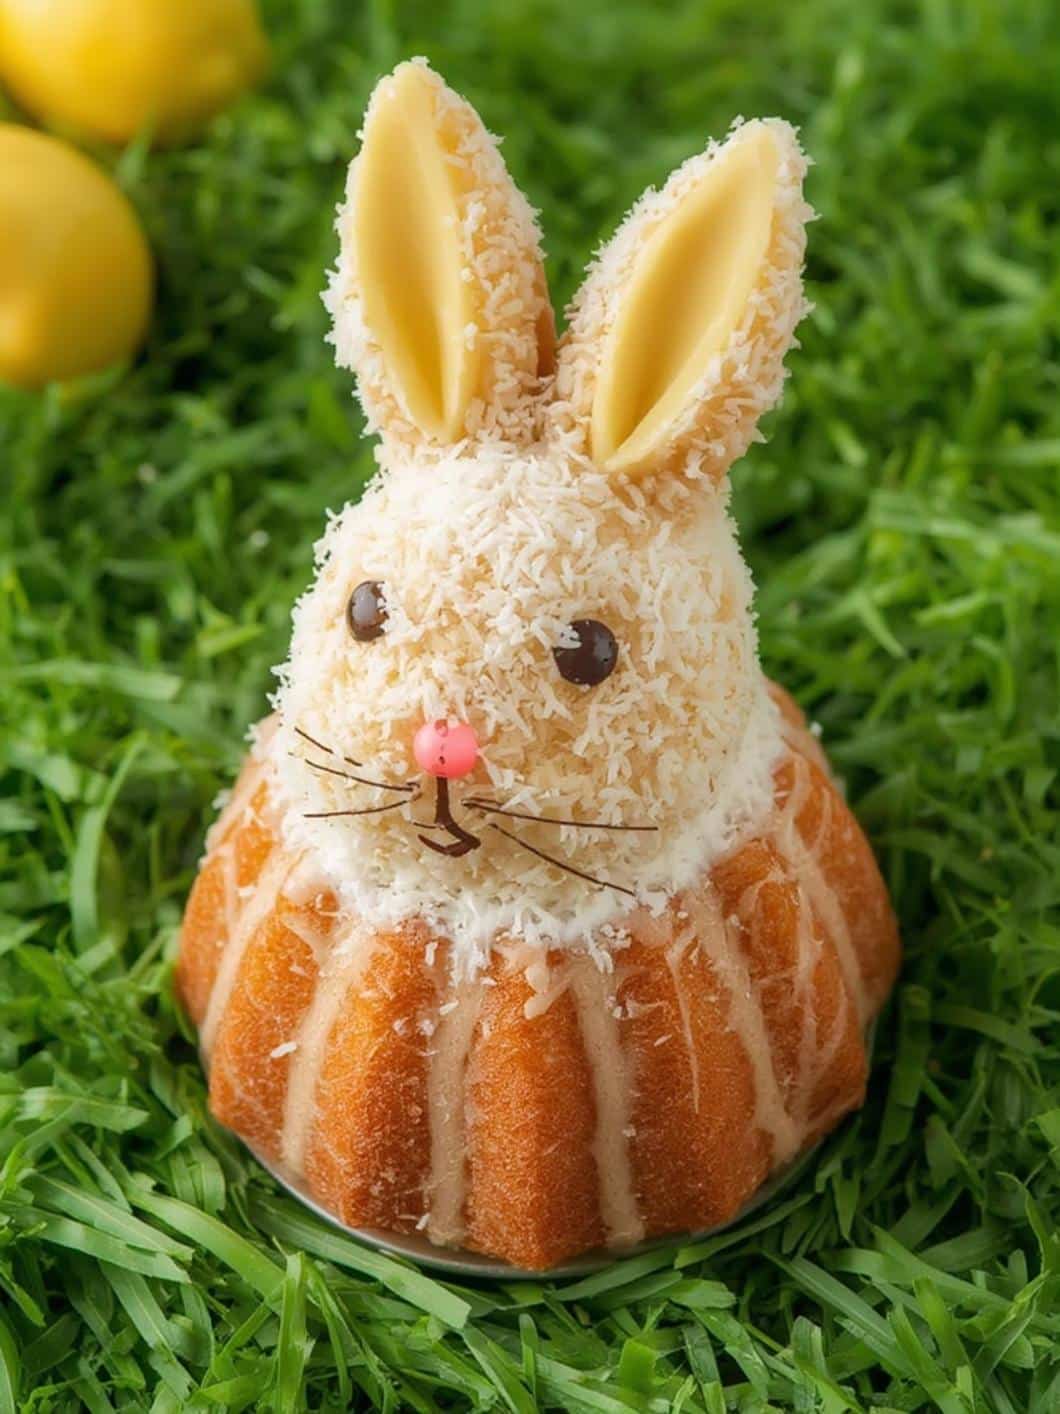
Spring is in the air, which means warmer weather, blooming flowers, and the perfect excuse to bake something truly special for your Easter celebration. If you’re looking for a dessert that is as delightful to look at as it is to eat, then you have found the perfect recipe. This Lemon Bunny Bundt Cake with Coconut Grass is a showstopper that combines the bright, zesty flavor of lemon with a whimsical design that will charm both kids and adults. Furthermore, it’s a wonderfully moist and tender cake that serves as the ideal centerpiece for any spring gathering. As a result, you get a dessert that tastes like sunshine and looks like a playful scene straight from a storybook.
Why This Lemon Bunny Bundt Cake Is the Perfect Easter Centerpiece
When planning a holiday meal, the dessert often becomes the grand finale, and this cake is designed to impress. First and foremost, its visual appeal is undeniable. The classic shape of a bundt cake provides a beautiful canvas for the adorable bunny figurine nestled in a bed of sweet, green coconut grass. Consequently, it immediately sets a festive and cheerful tone for your dessert table. Unlike a standard layer cake, this Lemon Bunny Bundt Cake with Coconut Grass offers a unique and charming presentation that feels both elegant and fun.
Beyond its looks, the flavor profile is perfectly suited for a spring holiday. After the richer, heavier foods of winter, a bright and tangy lemon dessert is incredibly refreshing. This cake is bursting with citrus flavor, from the lemon zest in the batter to the sweet-tart glaze drizzled over the top. In addition, the light and fluffy texture of the cake itself provides a satisfying yet not overly heavy conclusion to your meal. It’s a flavor that universally signals the arrival of a new season. If you’re looking for other charming Easter ideas, you might also adore these Bunny Ear Chocolate Tartlets, which offer another creative way to celebrate.
Finally, this dessert is perfect for sharing. A bundt cake is easy to slice and serve to a crowd, making it an excellent choice for family dinners, potlucks, or any Easter gathering. The process of creating the coconut grass and placing the bunny can also be a fun activity to do with children, therefore adding a memorable experience to your holiday preparations. Ultimately, this cake isn’t just a dessert; it’s a conversation starter and a joyful addition to your celebration.
Print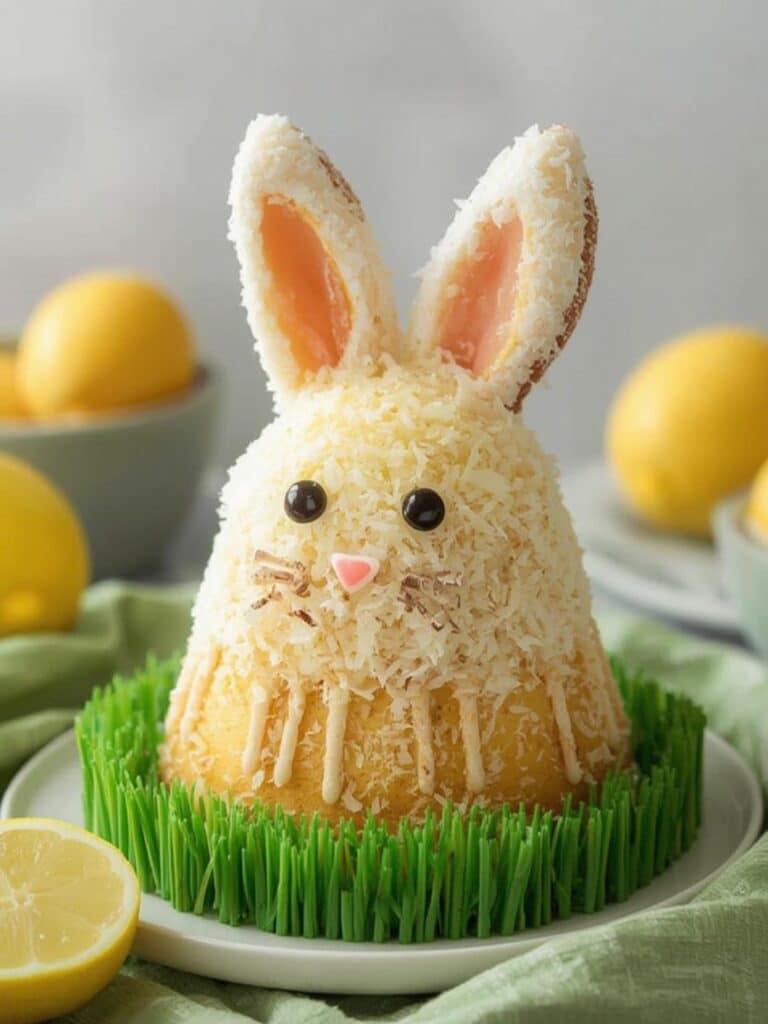
Lemon Bunny Bundt Cake with Coconut Grass
A showstopper lemon bundt cake that combines bright, zesty citrus flavor with a whimsical design featuring coconut grass and a bunny figurine, perfect for Easter or any spring gathering.
- Total Time: 1 hour 45 minutes
- Yield: 12–16 servings 1x
Ingredients
3 cups all-purpose flour
1 teaspoon baking powder
1/2 teaspoon baking soda
1 teaspoon salt
1 cup unsalted butter, softened
2 cups granulated sugar
4 large eggs, at room temperature
1 cup buttermilk, at room temperature
1/2 cup fresh lemon juice
2 tablespoons finely grated lemon zest
1 teaspoon vanilla extract
2 cups powdered sugar, sifted
3-4 tablespoons fresh lemon juice
1 teaspoon lemon zest (optional)
2 cups shredded sweetened coconut
Green food coloring
A small ceramic or edible bunny figurine
Small candy eggs (optional)
Instructions
1. Preheat oven to 350°F (175°C) and generously grease and flour a 10 or 12-cup bundt pan.
2. In a large bowl, whisk together the flour, baking powder, baking soda, and salt.
3. In a separate bowl using a mixer, cream the softened butter and granulated sugar until light and fluffy, about 3-5 minutes.
4. Add the eggs one at a time, beating well after each, then beat in the lemon juice, lemon zest, and vanilla extract.
5. With the mixer on low, add the flour mixture in three parts, alternating with the buttermilk, beginning and ending with the dry ingredients.
6. Pour the batter into the prepared pan, smooth the top, and bake for 50-60 minutes, or until a skewer inserted into the center comes out clean.
7. Let the cake cool in the pan for 15 minutes, then invert onto a wire rack to cool completely.
8. For the glaze, whisk powdered sugar with 3-4 tablespoons of lemon juice until a drizzling consistency is reached.
9. In a separate bowl or bag, toss the shredded coconut with a few drops of green food coloring until evenly colored.
10. Once the cake is cool, drizzle the glaze over the top, fill the center hole with the green coconut grass, and place the bunny figurine in the middle.
Notes
To ensure a moist cake, avoid overbaking. You can make a buttermilk substitute by adding one tablespoon of lemon juice to one cup of milk and letting it sit for five minutes. The cake can be made a day in advance and stored in an airtight container at room temperature.
- Prep Time: 20 minutes
- Cook Time: 60 minutes
- Category: Dessert
- Method: Baking
- Cuisine: American
Nutrition
- Serving Size: 1 slice
- Calories: 480
- Sugar: 45g
- Sodium: 250mg
- Fat: 22g
- Saturated Fat: 13g
- Unsaturated Fat: 9g
- Trans Fat: 0g
- Carbohydrates: 83g
- Fiber: 1g
- Protein: 6g
- Cholesterol: 82mg
Gathering Your Ingredients: The Key to a Flawless Cake
Before you begin your baking adventure, it’s essential to gather all your ingredients. Having everything measured and ready to go makes the process much smoother and more enjoyable. For this recipe, we’ll separate the ingredients into two main groups: the cake itself and the delicious decorations.
For the Lemon Bundt Cake
A truly great cake starts with high-quality ingredients. For instance, using fresh lemon juice and zest will make a significant difference in the final flavor. Here is what you will need:
- 3 cups all-purpose flour
- 1 teaspoon baking powder
- 1/2 teaspoon baking soda
- 1 teaspoon salt
- 1 cup unsalted butter, softened to room temperature
- 2 cups granulated sugar
- 4 large eggs, at room temperature
- 1 cup buttermilk, at room temperature
- 1/2 cup fresh lemon juice (from about 2-3 lemons)
- 2 tablespoons finely grated lemon zest (from about 2-3 lemons)
- 1 teaspoon vanilla extract
It’s important to use room temperature ingredients like butter, eggs, and buttermilk. As a result, they will combine more easily and create a smoother, more uniform batter, which leads to a lighter cake texture. Additionally, lemons are not only for flavor; according to Healthline, they are a great source of Vitamin C and antioxidants.
For the Lemon Glaze and Coconut Grass
The decorations are what truly bring this Lemon Bunny Bundt Cake with Coconut Grass to life. Here’s what you’ll need to complete the look:
- 2 cups powdered sugar, sifted
- 3-4 tablespoons fresh lemon juice
- 1 teaspoon lemon zest (optional, for extra flavor)
- 2 cups shredded sweetened coconut
- Green food coloring (gel or liquid)
- A small ceramic or edible bunny figurine
- Optional: Small candy eggs (like jelly beans or chocolate eggs)
Essential Equipment for Your Baking Adventure
Having the right tools on hand is just as important as having the right ingredients. Fortunately, you likely have most of what you need in your kitchen already. Here’s a quick checklist of the essential equipment for this recipe:
- A 10 or 12-cup bundt pan
- Large mixing bowl for dry ingredients
- A stand mixer with a paddle attachment or a hand mixer with a large bowl
- A small bowl for the glaze
- A medium bowl for the coconut grass
- Measuring cups and spoons
- A microplane or zester for the lemon zest
– A juicer for the lemons
- A wire cooling rack
- A spatula
The most crucial piece of equipment is, of course, the bundt pan. Be sure to grease and flour it thoroughly to prevent the cake from sticking. A good non-stick pan is a great investment, but even with one, proper preparation is key to a clean release every time.
Step-by-Step Instructions
Now that you have your ingredients and equipment ready, it’s time for the fun part! Follow these simple steps to create your beautiful lemon bundt cake.
Step 1: Prepare Your Pan and Oven
First, preheat your oven to 350°F (175°C). Next, you must prepare your bundt pan meticulously. Generously grease the inside of the pan with butter or shortening, making sure to get into every crevice. After that, dust the inside with flour, rotating the pan to coat it completely. Finally, tap out any excess flour. This two-step process is the secret to ensuring your cake comes out perfectly.
Step 2: Combine the Dry Ingredients
In a large bowl, whisk together the 3 cups of all-purpose flour, 1 teaspoon of baking powder, 1/2 teaspoon of baking soda, and 1 teaspoon of salt. Whisking helps to aerate the flour and distribute the leavening agents evenly, which consequently leads to a better rise.
Step 3: Cream the Butter and Sugar
In the bowl of your stand mixer or in a large bowl with a hand mixer, beat the 1 cup of softened butter and 2 cups of granulated sugar on medium-high speed until the mixture is light and fluffy. This process usually takes about 3-5 minutes. This step incorporates air into the batter, which is crucial for a light texture.
Step 4: Add Eggs and Flavorings
Next, add the 4 room-temperature eggs one at a time, beating well after each addition. Be sure to scrape down the sides of the bowl periodically. After the eggs are incorporated, beat in the 1/2 cup of lemon juice, 2 tablespoons of lemon zest, and 1 teaspoon of vanilla extract.
Step 5: Alternate Wet and Dry Ingredients
With the mixer on low speed, add the flour mixture in three parts, alternating with the 1 cup of buttermilk. Begin and end with the dry ingredients. For example, add one-third of the flour, then half of the buttermilk, then another third of flour, the remaining buttermilk, and finally the last of the flour. Mix only until just combined; overmixing can develop the gluten and result in a tough cake.
Step 6: Bake and Cool the Cake
Carefully pour the batter into your prepared bundt pan and smooth the top with a spatula. Bake for 50-60 minutes, or until a wooden skewer inserted into the center of the cake comes out clean. Let the cake cool in the pan on a wire rack for about 15 minutes. Afterward, carefully invert the pan onto the wire rack to release the cake, and let it cool completely before glazing.
Step 7: Prepare the Glaze and Coconut Grass
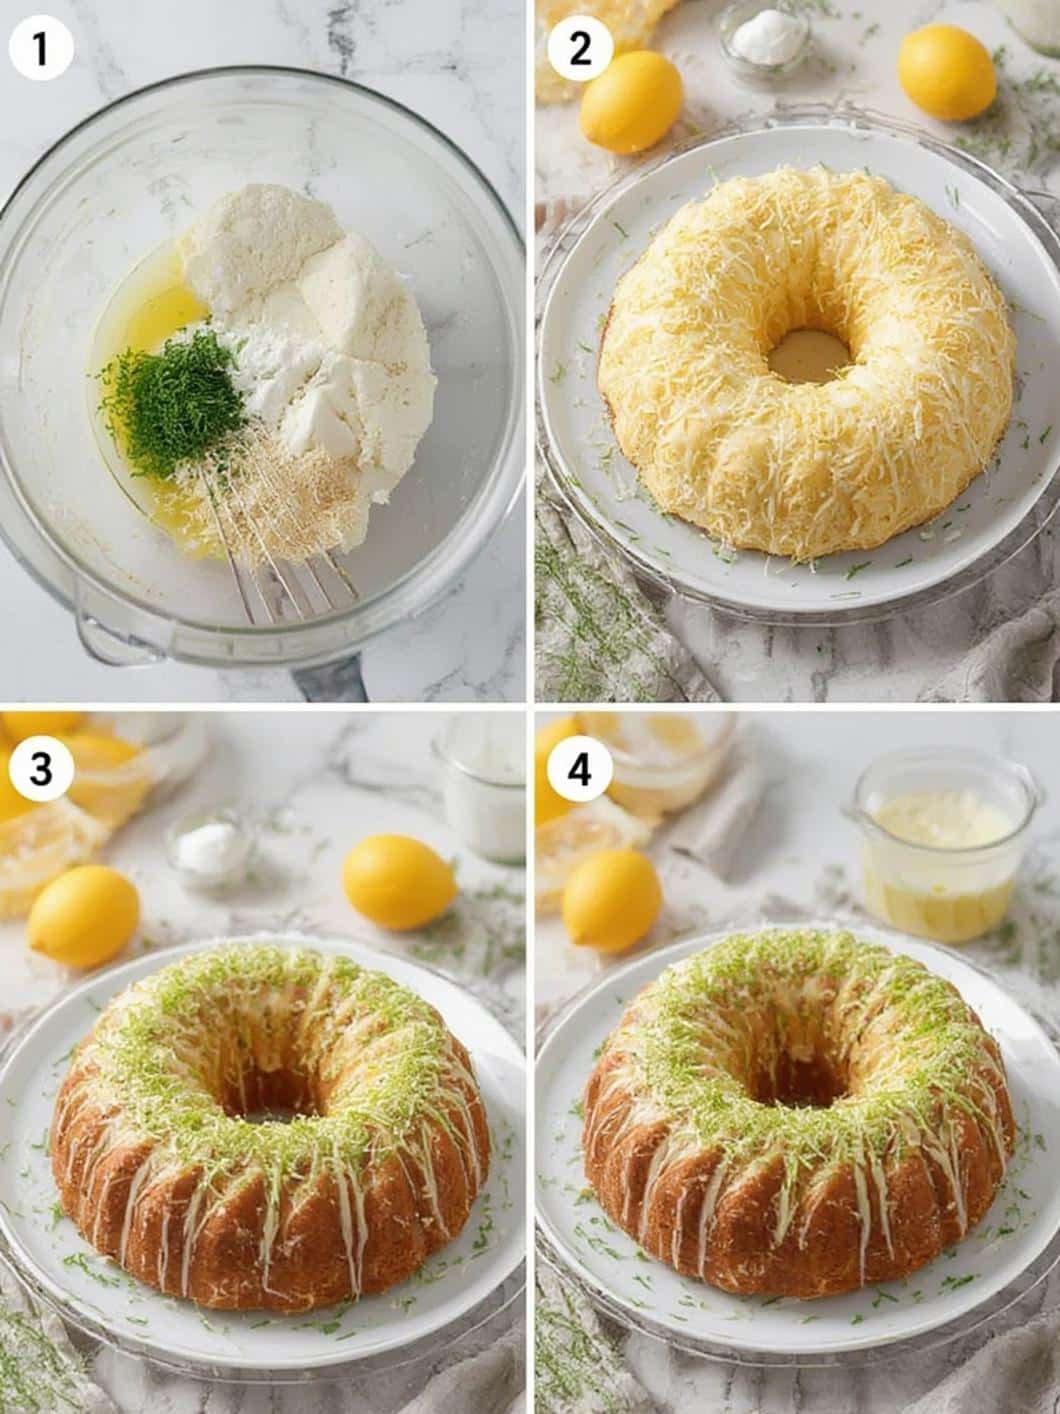
While the cake cools, you can prepare the decorations. To make the glaze, whisk the 2 cups of sifted powdered sugar with 3 tablespoons of lemon juice. Add more lemon juice, one teaspoon at a time, until you reach your desired drizzling consistency. For the coconut grass, place the 2 cups of shredded coconut in a medium bowl or a resealable plastic bag. Add a few drops of green food coloring and mix or shake until the coconut is evenly colored.
Step 8: Assemble Your Masterpiece
Once the cake is completely cool, drizzle the lemon glaze over the top, letting it drip down the sides. Immediately sprinkle the green coconut grass into the center hole of the bundt cake, creating a little “pasture.” Finally, place your bunny figurine in the middle of the grass. You can also add some candy eggs around the bunny for extra decoration.
Pro Tips for Baking and Decorating Success
Even seasoned bakers can appreciate a few extra tips. Here are some pointers to ensure your Lemon Bunny Bundt Cake with Coconut Grass is an absolute triumph.
Achieving a Moist and Tender Crumb
The key to a moist cake is not to overbake it. Start checking for doneness a few minutes before the recipe suggests. Additionally, buttermilk is a fantastic ingredient for tenderness due to its acidity. If you don’t have buttermilk, you can make a substitute by adding one tablespoon of lemon juice or white vinegar to one cup of regular milk and letting it sit for five minutes.
Perfecting Your Coconut Grass
For a more natural-looking grass, use varying amounts of food coloring to create different shades of green, or leave some of the coconut white. Gel food coloring provides a more vibrant color than liquid. If your coconut seems too dry, you can add a tiny bit of water (about 1/2 teaspoon) to the bag with the food coloring to help it distribute more evenly.
Storage and Make-Ahead Tips
This cake can be made a day in advance. You should store it in an airtight container at room temperature. For longer storage, you can wrap the un-glazed cake tightly in plastic wrap and store it in the refrigerator for up to four days. According to the Mayo Clinic, proper food storage is crucial for preventing foodborne illness. If you want another great make-ahead option for your celebration, consider these delightful Pastel Easter Egg Fudge Squares. They can be prepared well in advance, saving you time on the holiday itself. And for more bunny-themed fun, these Fluffy Bunny Butt Cupcakes are always a huge hit.
Conclusion
In summary, baking a Lemon Bunny Bundt Cake with Coconut Grass is a rewarding experience that results in a truly spectacular dessert. This cake perfectly captures the essence of spring with its bright, zesty lemon flavor and adorable, festive design. By following the detailed steps and tips provided, you can confidently create a beautiful and delicious centerpiece for your Easter table. Ultimately, this recipe is more than just a cake; it’s an opportunity to create sweet memories with your loved ones. We hope you enjoy every moment of baking and, of course, every single bite of your stunning creation.
Frequently Asked Questions (FAQ)
Can I use a different citrus fruit instead of lemon?
Absolutely! This cake would be equally delicious with oranges or limes. Simply substitute the lemon juice and zest with an equal amount of your chosen citrus. For instance, an orange version would be slightly sweeter, while a lime version would have a sharper tang.
What if I don’t have a bundt pan?
If you don’t own a bundt pan, you can still make this cake. You can use two 9-inch round cake pans or a 9×13-inch rectangular pan. However, you will need to adjust the baking time. Start checking for doneness around 30-35 minutes for the round pans and 35-45 minutes for the rectangular pan.
How do I prevent my cake from sticking to the pan?
The best method is to be very thorough when preparing your pan. Use softened butter or solid vegetable shortening and a pastry brush to coat every single nook and cranny. Afterwards, add a few tablespoons of flour and tilt and tap the pan until the entire inside is coated with a thin layer of flour. This grease-and-flour barrier is the most reliable way to ensure a clean release.