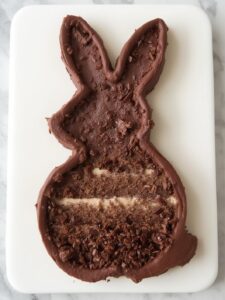
There is something undeniably special about a homemade treat. In fact, the love and care baked into a dessert can often mean more than the most expensive gift. When you want to show someone you care, few things are as sweet and delightful as rich, fudgy brownies. Consequently, by taking one simple extra step, you can transform this classic dessert into a beautiful and heartfelt gesture. We are, of course, talking about making heart shaped brownies. These adorable treats are perfect for Valentine’s Day, anniversaries, birthdays, or any day you want to share a little extra love. This guide will walk you through everything you need to know, from the perfect fudgy recipe to flawless cutting techniques, ensuring your brownies are as beautiful as they are delicious.
Why Choose Heart Shaped Brownies?
First and foremost, choosing to make heart shaped brownies is about the message they send. Unlike a standard square, the heart shape immediately conveys love, affection, and thoughtfulness. It shows you went the extra mile. Furthermore, they are surprisingly simple to create, requiring only one additional tool: a cookie cutter. You don’t need expert-level baking skills to pull off this impressive dessert. Instead, you just need a great brownie recipe and a little bit of patience.
In addition, these brownies are incredibly versatile. You can dress them up with elaborate decorations for a special occasion like Valentine’s Day or simply dust them with powdered sugar for a sweet after-school snack. They are a wonderful project to do with kids, allowing them to help with mixing and, most excitingly, cutting out the shapes. As a result, you are not just baking a dessert; you are creating a cherished memory.
Print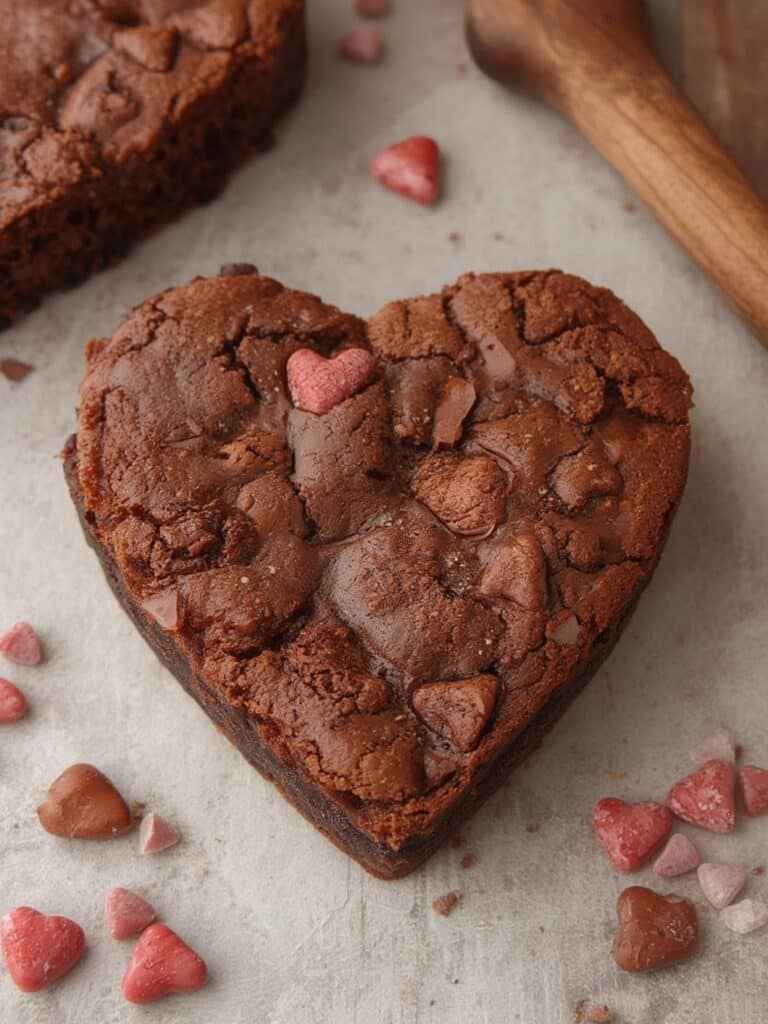
Heart Shaped Brownies: The 15 Ultimate Steps for the Perfect Valentine’s Treat
Rich, fudgy brownies cut into adorable heart shapes—perfect for Valentine’s Day or any time you want to share a sweet homemade treat.
- Total Time: 2 hours 30 minutes
- Yield: 10–12 heart brownies 1x
Ingredients
1 cup (2 sticks) unsalted butter, melted
2 cups granulated sugar
4 large eggs, at room temperature
1 teaspoon vanilla extract
3/4 cup unsweetened cocoa powder
1 cup all-purpose flour
1/2 teaspoon baking powder
1/4 teaspoon salt
1 cup semi-sweet chocolate chips (optional)
Instructions
1. Preheat oven to 350°F (175°C) and line a 9×13 inch baking pan with parchment paper, leaving overhang.
2. In a large bowl, whisk together melted butter and sugar until well combined.
3. Add eggs one at a time, whisking after each addition, then stir in vanilla extract.
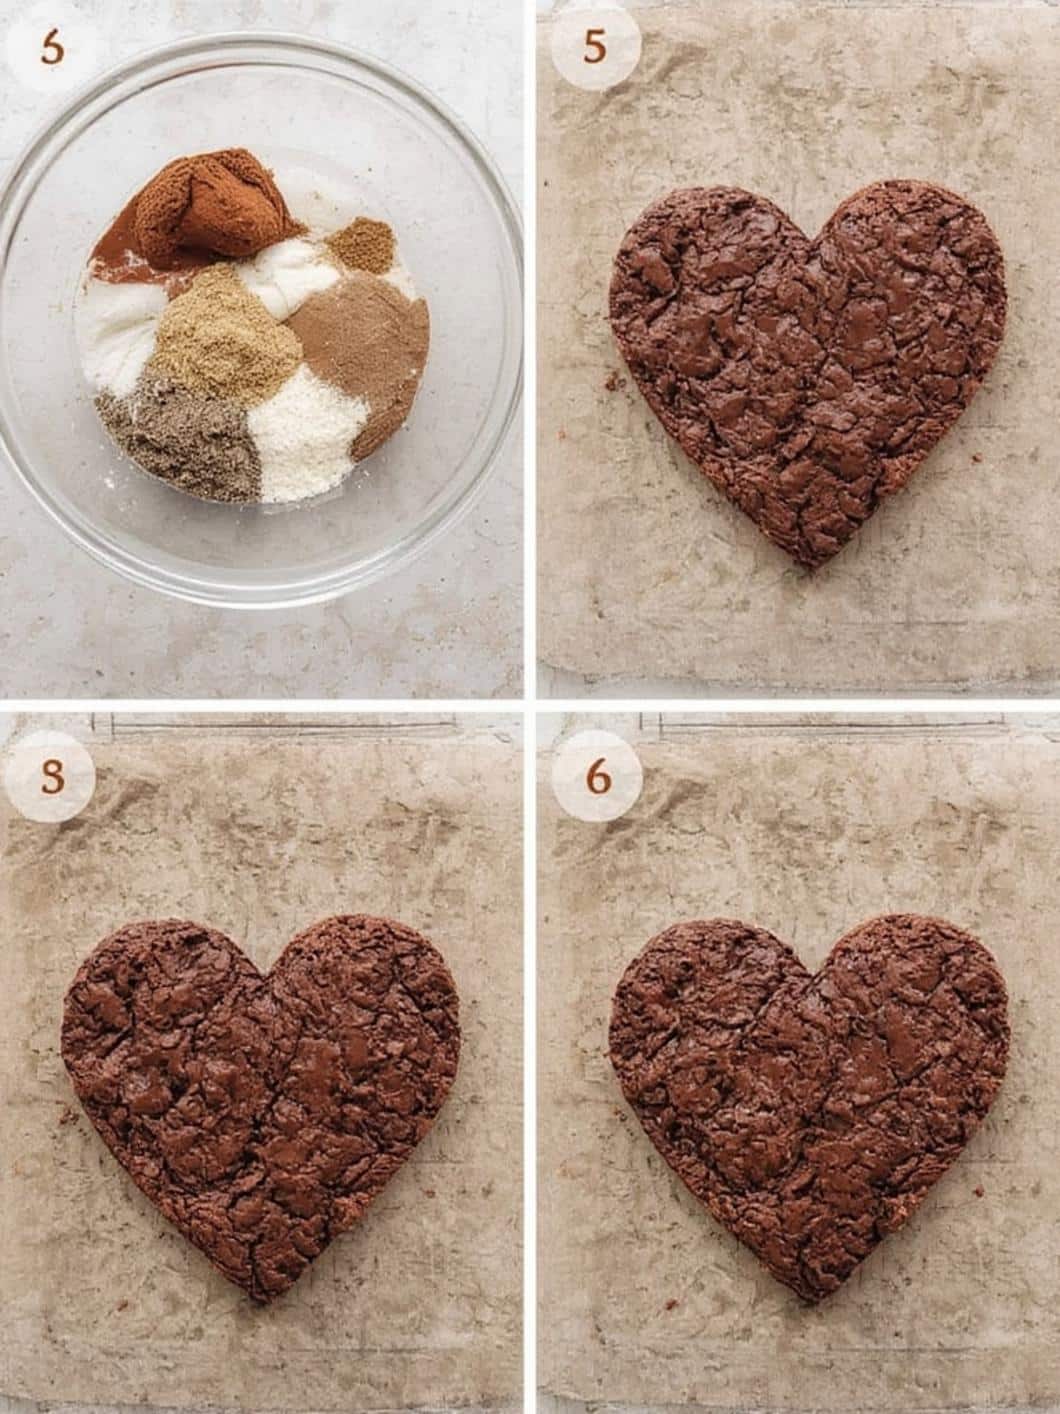
4. In a medium bowl, whisk together cocoa powder, flour, baking powder, and salt.
5. Gradually fold dry ingredients into wet mixture with a rubber spatula until just combined.
6. Fold in chocolate chips if using.
7. Pour batter into prepared pan and spread evenly.
8. Bake for 25–30 minutes, or until a toothpick inserted comes out with moist crumbs.
9. Let brownies cool in the pan on a wire rack for 30 minutes.
10. Use parchment overhang to lift brownies out and cool completely on rack for 1–2 hours.
11. Optionally chill brownies in the fridge for 30 minutes for cleaner cuts.
12. Press a heart-shaped cookie cutter firmly into cooled brownies and lift out.
13. Repeat cutting across the slab; save the scraps for snacking.
14. Dip cookie cutter in hot water and wipe dry between cuts for sharp edges.
15. Optionally decorate with powdered sugar, melted chocolate, or festive sprinkles.
Notes
For clean cuts, ensure brownies are fully cooled or chilled before cutting.
Using melted butter creates a fudgier texture than creamed butter.
Dipping the cookie cutter in hot water helps cut smoothly.
Decorate with glaze, ganache, fruit, or edible glitter for extra flair.
Store brownie hearts in an airtight container at room temperature for up to 4 days.
- Prep Time: 20 minutes
- Cook Time: 30 minutes
- Category: Dessert
- Method: Baking
- Cuisine: American
- Diet: Vegetarian
Nutrition
- Serving Size: 1 heart brownie
- Calories: 280
- Sugar: 24g
- Sodium: 80mg
- Fat: 15g
- Saturated Fat: 9g
- Unsaturated Fat: 5g
- Trans Fat: 0g
- Carbohydrates: 33g
- Fiber: 2g
- Protein: 3g
- Cholesterol: 60mg
Gathering Your Ingredients and Tools
Before you can begin baking, it is essential to gather all your necessary supplies. Having everything ready beforehand makes the process smooth and enjoyable. Therefore, take a moment to measure out your ingredients and collect your tools.
For the Brownies:
- 1 cup (2 sticks) unsalted butter, melted
- 2 cups granulated sugar
- 4 large eggs, at room temperature
- 1 teaspoon vanilla extract
- 3/4 cup unsweetened cocoa powder
- 1 cup all-purpose flour
- 1/2 teaspoon baking powder
- 1/4 teaspoon salt
- 1 cup semi-sweet chocolate chips (optional)
Essential Tools:
- 9×13 inch baking pan
- Parchment paper
- Large mixing bowl
- Medium mixing bowl
- Whisk and rubber spatula
- Heart-shaped cookie cutter (around 3 inches is a good size)
- Wire cooling rack
Step-by-Step Instructions for Perfect Heart Shaped Brownies
Now that you have your ingredients and tools, you are ready to create these delightful treats. Follow these steps carefully for the best results.
1. Preparation: First, preheat your oven to 350°F (175°C). Next, line a 9×13 inch baking pan with parchment paper, leaving some overhang on the sides. This overhang will act as a handle, making it easy to lift the entire batch of brownies out of the pan later.
2. Combine Wet Ingredients: In a large mixing bowl, whisk together the melted butter and granulated sugar until well combined. Subsequently, add the eggs one at a time, whisking well after each addition. Finally, stir in the vanilla extract.
3. Combine Dry Ingredients: In a separate medium bowl, whisk together the all-purpose flour, unsweetened cocoa powder, baking powder, and salt. This step ensures that the leavening agent and salt are evenly distributed, which is crucial for a consistent texture.
4. Mix Batter: Gradually pour the dry ingredient mixture into the wet ingredients. Then, use a rubber spatula to fold them together until just combined. It is very important not to overmix the batter, as this can lead to tough, cakey brownies rather than soft, fudgy ones.
5. Add Chocolate Chips: If you are using them, gently fold in the semi-sweet chocolate chips. They will add extra pockets of gooey, melted chocolate to your finished heart shaped brownies.
6. Bake: Pour the batter into your prepared baking pan and use the spatula to spread it evenly. Bake for 25-30 minutes, or until a toothpick inserted into the center comes out with moist crumbs attached, but not wet batter.
7. Cool Completely: This is arguably the most important step for getting clean shapes. Once the brownies are out of the oven, let them cool in the pan on a wire rack for about 30 minutes. Then, use the parchment paper handles to lift them out of the pan and let them cool completely on the rack, which could take another 1-2 hours. For even cleaner cuts, you can chill the cooled slab of brownies in the refrigerator for 30 minutes before cutting.
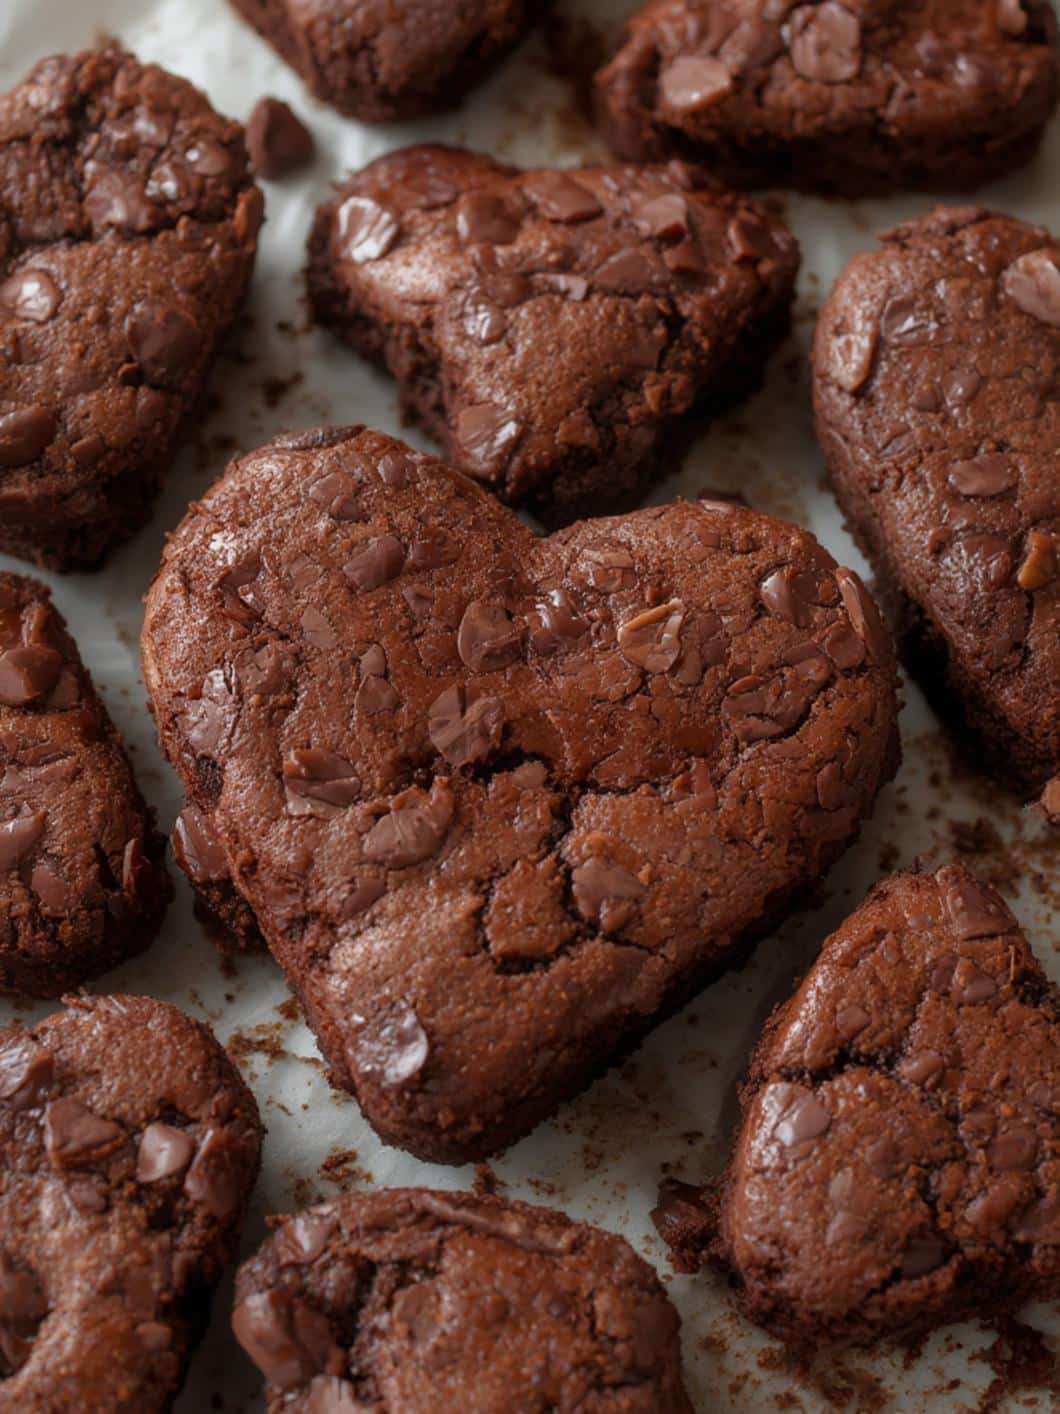
8. Cut the Hearts: Press your heart-shaped cookie cutter firmly into the cooled brownies. Wiggle it slightly to ensure a clean cut, then lift it out. Repeat this process across the entire slab. You can gather the scraps for a delicious baker’s treat!
Pro Tips for Flawless Heart Shaped Brownies
Making good brownies is easy, but making great brownies involves a few key details. For instance, the texture is paramount. For a richer, fudgier result, using melted butter is key. This method coats the flour with fat, inhibiting gluten development and creating a denser crumb. In contrast, creaming butter with sugar incorporates air, leading to a more cake-like texture.
Moreover, getting clean, sharp edges on your heart shaped brownies is the goal. As mentioned, cooling is essential. Another great trick is to dip your metal cookie cutter in hot water and wipe it dry between each cut. The slight heat helps it glide through the brownie without dragging. If you are still having trouble, a light spray of non-stick cooking oil on the cutter can also work wonders.
Finally, to avoid the dreaded dry brownie, be careful not to overbake. Brownies continue to cook from residual heat after you remove them from the oven. For that reason, it is better to err on the side of slightly underdone. The toothpick test is your best friend here. Remember, moist crumbs are perfect, but wet batter means it needs a few more minutes.
Creative Decoration Ideas
Once your heart shaped brownies are cut, the real fun begins! Decorating adds a personal touch and makes them even more special. The simplest option is a light dusting of powdered sugar, which creates a beautiful contrast against the dark chocolate. For a bit more flair, you can melt some white, milk, or dark chocolate and drizzle it over the tops.
Alternatively, you could whip up a simple glaze or a rich chocolate ganache to spread on top. Add some festive sprinkles, nonpareils, or edible glitter for a pop of color. Fresh fruit, like a single raspberry or a slice of strawberry placed in the center, also adds an elegant and fresh touch. If you want to get even more creative, you can explore other Valentine’s Day dessert ideas like these Mini Valentine Day Cheesecake Bites for inspiration. The possibilities are truly endless, so let your creativity shine!
For a complete dessert experience, consider serving these brownies with a refreshing beverage. A glass of cold milk is classic, but a special drink like a homemade Cherry Limeade Recipe can elevate the treat into a full-fledged celebration.
Health and Nutrition Notes
It is important to remember that brownies are a treat, best enjoyed in moderation as part of a balanced diet. According to experts at Healthline, a healthy eating plan focuses on fruits, vegetables, whole grains, and lean proteins, but also leaves room for occasional indulgences. The use of dark cocoa powder in this recipe does offer some benefits, as dark chocolate is rich in antioxidants. In fact, as noted by WebMD, flavonoids in cocoa can have positive effects on heart health.
Furthermore, be mindful of potential food allergies. This recipe contains common allergens like wheat, eggs, and dairy. For those with sensitivities, you can often find successful substitutions. For example, a gluten-free all-purpose flour blend can be used in place of regular flour, and dairy-free butter and chocolate chips are widely available. Always check with your guests about any dietary restrictions, a practice recommended by institutions like the Mayo Clinic to ensure everyone can enjoy treats safely.
Conclusion About Heart Shaped Brownies
In summary, creating beautiful and delicious heart shaped brownies is a wonderfully simple way to show your affection. By following a reliable recipe and paying close attention to the cooling process, you can achieve perfect, clean-cut hearts every time. The real joy, however, comes from personalizing them with your favorite decorations, turning a simple dessert into a memorable gift. Whether for a special occasion or just because, these brownies are sure to bring a smile to anyone’s face. So, go ahead and bake a batch of these heart shaped brownies to share a little sweetness with the ones you love.
Frequently Asked Questions (FAQ) About Heart Shaped Brownies
Can I use a boxed brownie mix?
Absolutely! A boxed mix is a great time-saver. Just prepare and bake the brownies according to the package directions. The most important part is to let them cool completely before you attempt to use the cookie cutter.
What if I don’t have a heart-shaped cookie cutter?
No problem! You can easily make a stencil. Simply draw a heart on a piece of parchment paper or thin cardboard and cut it out. Place the stencil on the slab of brownies and use a small, sharp knife to carefully trace and cut out the shape.
Why are my brownie hearts crumbling when I cut them?
This is almost always because the brownies are still too warm. The structure of a brownie is very soft and delicate when warm, so it needs to be completely cool to become firm enough to cut cleanly. For best results, chill the brownies in the fridge for about 30 minutes before cutting.