As spring blossoms and the Easter holiday approaches, families gather to celebrate with festive meals and delightful traditions. Consequently, the search for the perfect dessert to grace the holiday table begins. If you are looking for a showstopper that is as beautiful as it is delicious, then look no further. This recipe for the ultimate Easter Swirl Pie is your answer. With its creamy, no-bake filling, buttery graham cracker crust, and mesmerizing pastel swirls, this pie captures the joyful spirit of the season. Furthermore, it’s surprisingly simple to make, ensuring you can impress your guests without spending hours in the kitchen. This guide will walk you through every step, guaranteeing a perfect Easter Swirl Pie every time.
What Makes the Perfect Easter Swirl Pie?
The magic of a truly memorable Easter Swirl Pie lies in the harmonious balance of its three core components: the crust, the filling, and the iconic swirl. Firstly, the foundation of this dessert is a classic graham cracker crust. Its buttery, slightly salty crunch provides a wonderful textural contrast to the smooth filling. While store-bought crusts work in a pinch, a homemade version offers superior flavor and sturdiness, and as a result, it elevates the entire dessert experience.
Secondly, the filling is the heart of the pie. A great Easter Swirl Pie features a no-bake cheesecake-style filling that is both rich and light. The key to this is using full-fat cream cheese, which provides a luxurious texture, and sweetened condensed milk for a smooth, sweet base. A touch of lemon juice is also crucial, as it cuts through the richness and adds a subtle tang that brightens the overall flavor profile. Ultimately, the filling should be creamy, decadent, and hold its shape perfectly once chilled.
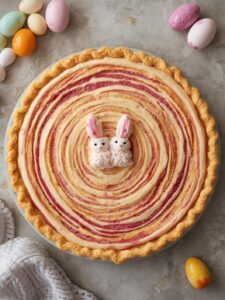
Finally, the visual appeal comes from the beautiful pastel swirls. This is achieved by dividing the creamy white filling into separate bowls and tinting each with a different food coloring. For instance, soft pinks, blues, yellows, and greens are classic Easter choices. When these colored fillings are layered and gently swirled together, they create a stunning marbled effect that looks like a work of art. Therefore, this dessert is not just a treat for the palate but also a feast for the eyes.
Print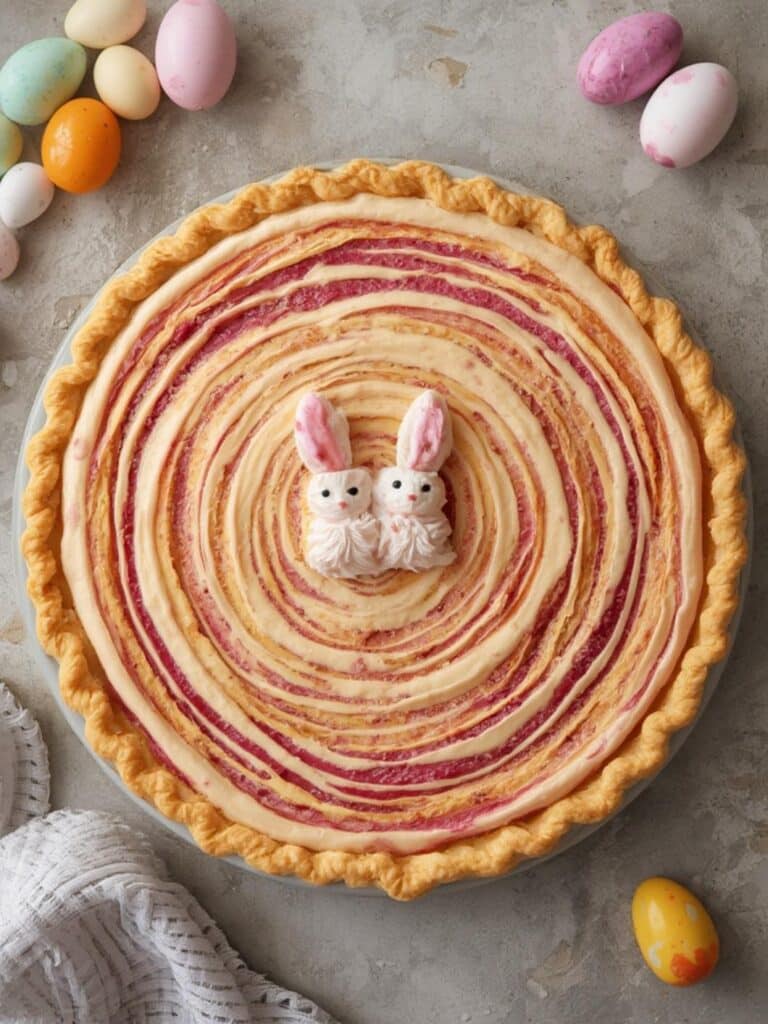
Easter Swirl Pie
A showstopping no-bake Easter dessert with a creamy cheesecake-style filling, a buttery graham cracker crust, and mesmerizing pastel swirls.
- Total Time: 6 hours 20 minutes
- Yield: 8 servings 1x
Ingredients
1 1/2 cups graham cracker crumbs
1/4 cup granulated sugar
6 tablespoons unsalted butter, melted
16 ounces cream cheese, softened
1 (14-ounce) can sweetened condensed milk
1/2 cup lemon juice
1 teaspoon vanilla extract
Pastel gel food colorings (pink, blue, yellow, green)
Whipped cream and sprinkles for topping (optional)
Instructions
1. Combine graham cracker crumbs, sugar, and melted butter, then press the mixture into a 9-inch pie plate and chill for at least 30 minutes.
2. Beat softened cream cheese until smooth, then mix in sweetened condensed milk, lemon juice, and vanilla extract until just combined.
3. Divide the filling evenly into separate bowls and stir a different gel food coloring into each.
4. Drop alternating spoonfuls of the colored fillings into the chilled crust.
5. Gently drag a knife or toothpick through the filling in a few motions to create a marbled swirl effect.
6. Cover the pie and refrigerate for at least 6 hours, or overnight, until the filling is firm.
7. Garnish with optional whipped cream and sprinkles before serving.
Notes
For a smooth, lump-free filling, ensure your cream cheese is at room temperature. Use gel food coloring for vibrant colors that won’t thin the filling. The pie can be made 1-2 days in advance and stored in the refrigerator.
- Prep Time: 20 minutes
- Cook Time: 0 minutes
- Category: Dessert
- Method: No-Bake
- Cuisine: American
Nutrition
- Serving Size: 1 slice
- Calories: 520 kcal
- Sugar: 45 g
- Sodium: 300 mg
- Fat: 30 g
- Saturated Fat: 18 g
- Unsaturated Fat: 10 g
- Trans Fat: 0 g
- Carbohydrates: 55 g
- Fiber: 1 g
- Protein: 7 g
- Cholesterol: 90 mg
Gathering Your Ingredients
Before you begin, it’s essential to gather all your ingredients to ensure a smooth and efficient process. Having everything measured and ready to go makes the experience much more enjoyable. For this reason, we’ve broken the list down into what you’ll need for the crust and the filling.
For the Graham Cracker Crust:
- 1 1/2 cups of graham cracker crumbs (about 10 full sheets)
- 1/4 cup of granulated sugar
- 6 tablespoons of unsalted butter, melted
For the Creamy Swirl Filling:
- 16 ounces of cream cheese, softened to room temperature
- 1 (14-ounce) can of sweetened condensed milk
- 1/2 cup of lemon juice, freshly squeezed is best
- 1 teaspoon of vanilla extract
- Pastel gel food colorings (such as pink, blue, yellow, and green)
- Whipped cream and sprinkles for topping (optional)
A quick tip for success: using room temperature cream cheese is non-negotiable. If it’s too cold, your filling will be lumpy. In contrast, softened cream cheese will whip into a perfectly smooth and creamy consistency. This simple step makes a significant difference in the final texture of your Easter Swirl Pie.
Essential Tools for Your Baking Adventure
You don’t need any highly specialized equipment to create this beautiful pie, which is great news for home bakers. However, having the right tools on hand will certainly make the process easier and more efficient. Before you start mixing, make sure you have the following items ready:
- A 9-inch pie plate (glass or ceramic works well)
- An electric hand mixer or a stand mixer with a paddle attachment
- Several small bowls for dividing and coloring the filling (at least 4)
- A large mixing bowl
- Measuring cups and spoons
- A rubber spatula for scraping the bowl
- A small spoon or toothpick for creating the swirls
- Plastic wrap for chilling
An electric mixer is particularly helpful for getting the cream cheese filling perfectly smooth and lump-free. While you can mix it by hand, using a mixer ensures a consistent, airy texture that is difficult to achieve with just a whisk and some elbow grease. Consequently, it’s the recommended tool for the job.
Step-by-Step Instructions for the Perfect Easter Swirl Pie
Now that your ingredients are gathered and your tools are ready, it’s time to create your masterpiece. Follow these instructions carefully for a flawless result. This process is straightforward and fun, making it a great recipe to try with kids.
Step 1: Prepare the Crust
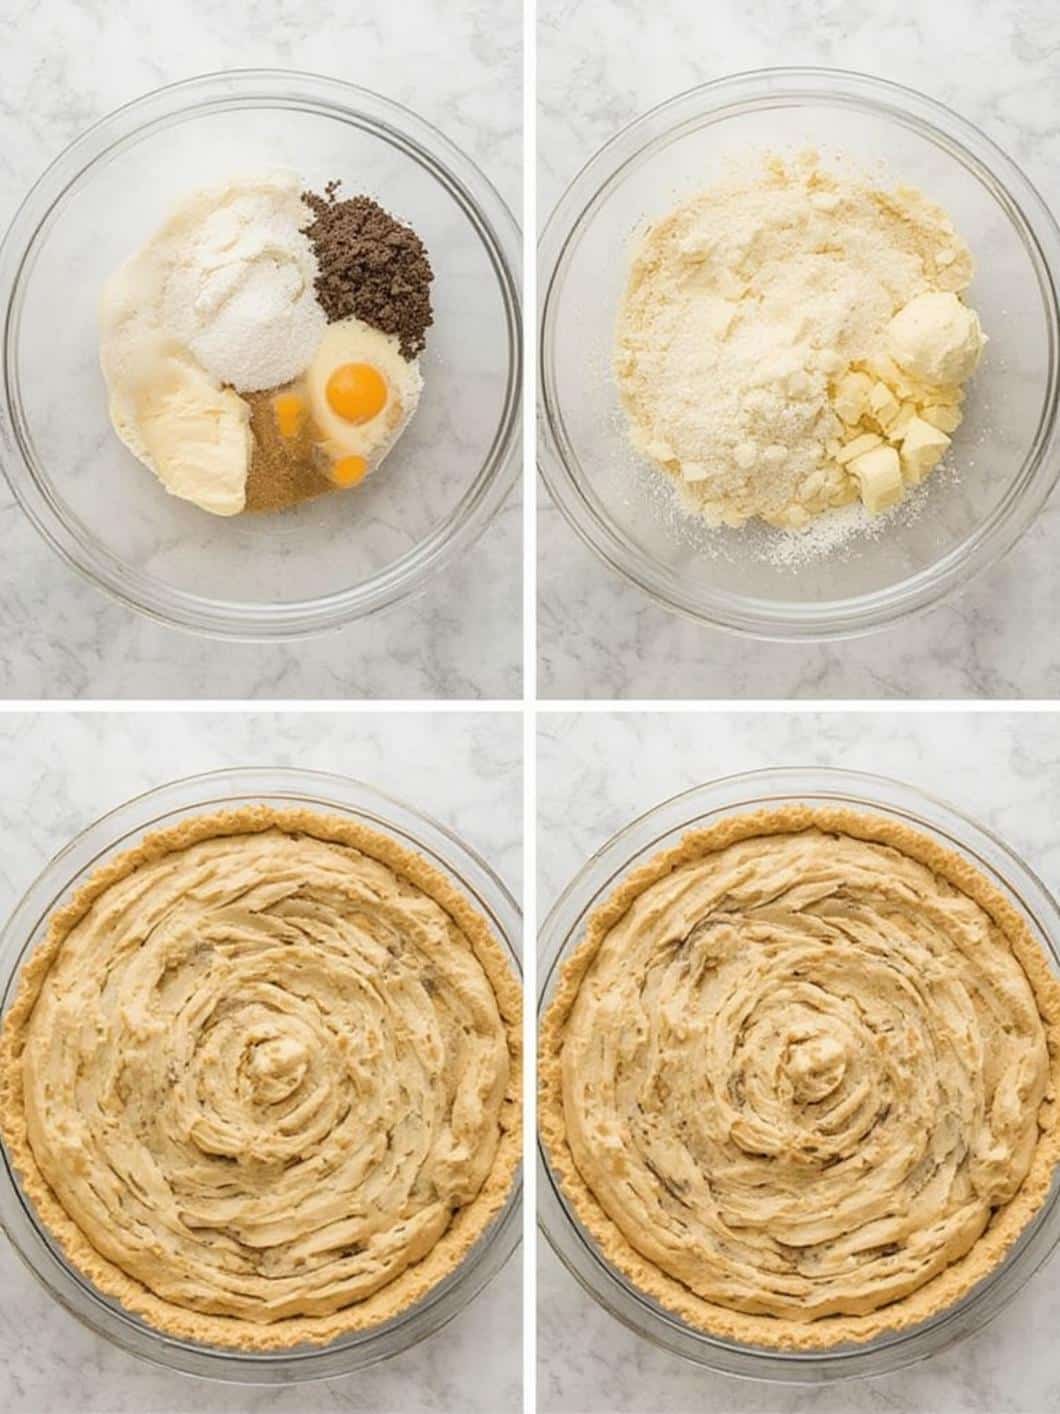
First, begin by creating the crust. In a medium bowl, combine the graham cracker crumbs and granulated sugar. Next, pour in the melted butter and stir with a fork until all the crumbs are evenly moistened. The mixture should resemble wet sand. After that, press the crumb mixture firmly and evenly into the bottom and up the sides of your 9-inch pie plate. You can use the bottom of a measuring cup to help pack it down tightly. Place the crust in the refrigerator to chill for at least 30 minutes while you prepare the filling.
Step 2: Make the Creamy Filling
In a large mixing bowl, beat the softened cream cheese with an electric mixer on medium speed until it is completely smooth and free of lumps. This usually takes about 2-3 minutes. Then, gradually pour in the sweetened condensed milk and continue to beat until the mixture is well combined. Finally, add the lemon juice and vanilla extract, mixing on low speed until just incorporated. Be careful not to overmix at this stage.
Step 3: Color the Filling
Now for the fun part. Divide the filling evenly among four or five small bowls. Add a drop or two of a different gel food coloring to each bowl. Gently fold the color into the filling with a spatula until it’s evenly distributed and you’ve achieved your desired pastel shade. Remember that a little gel coloring goes a long way, so it’s best to start with a small amount and add more if needed.
Step 4: Create the Swirl Effect
Remove your chilled crust from the refrigerator. Begin dropping spoonfuls of the different colored fillings randomly into the pie crust, alternating colors as you go. Continue this process until all the filling has been used. To create the swirl, gently drag a butter knife or a toothpick through the dollops of filling in a figure-eight or S-shaped motion. Don’t overdo it; just a few passes are all you need to create a beautiful marbled design. Over-swirling can cause the colors to become muddy.
Step 5: Chill to Perfection
Once you are happy with your swirl, cover the pie loosely with plastic wrap. Be sure the wrap doesn’t touch the surface of the filling. Refrigerate the Easter Swirl Pie for at least 6 hours, or preferably overnight. This chilling time is absolutely essential, as it allows the no-bake filling to set up properly. The pie will not be sliceable until it is fully firm.
Tips and Tricks for a Flawless Pie
While this recipe is quite simple, a few extra tips can help you perfect your pie-making skills and customize your dessert. These suggestions will ensure your Easter dessert is the talk of the table.
Achieving the Perfect Swirl
The key to a beautiful swirl is restraint. It’s tempting to keep swirling, but this can blend the colors too much. For distinct marbling, make just three to four gentle passes through the filling with your knife or toothpick. This creates elegant ribbons of color rather than a muddled mix.
Color Customization and Safety
Don’t feel limited to traditional Easter pastels. You could create a pie with ombre shades of a single color or even use a vibrant rainbow palette. Always opt for gel food colorings over liquid ones, as they are more concentrated and won’t thin out your filling. When it comes to food additives like dyes, using them in moderation is key. For those with concerns about food colorings, authoritative sources like the Mayo Clinic provide information on food dyes and health, helping you make informed choices for your family.
Make-Ahead Magic
One of the best features of this Easter Swirl Pie is that it needs to be made ahead of time. This frees up your Easter morning for other activities. You can prepare the pie completely one to two days in advance. In fact, its flavor often deepens and improves after a day in the refrigerator. If you enjoy no-bake treats that save you time, you might also love this simple Oreo Dirt Cake recipe, another perfect make-ahead dessert.
Fun Topping Ideas
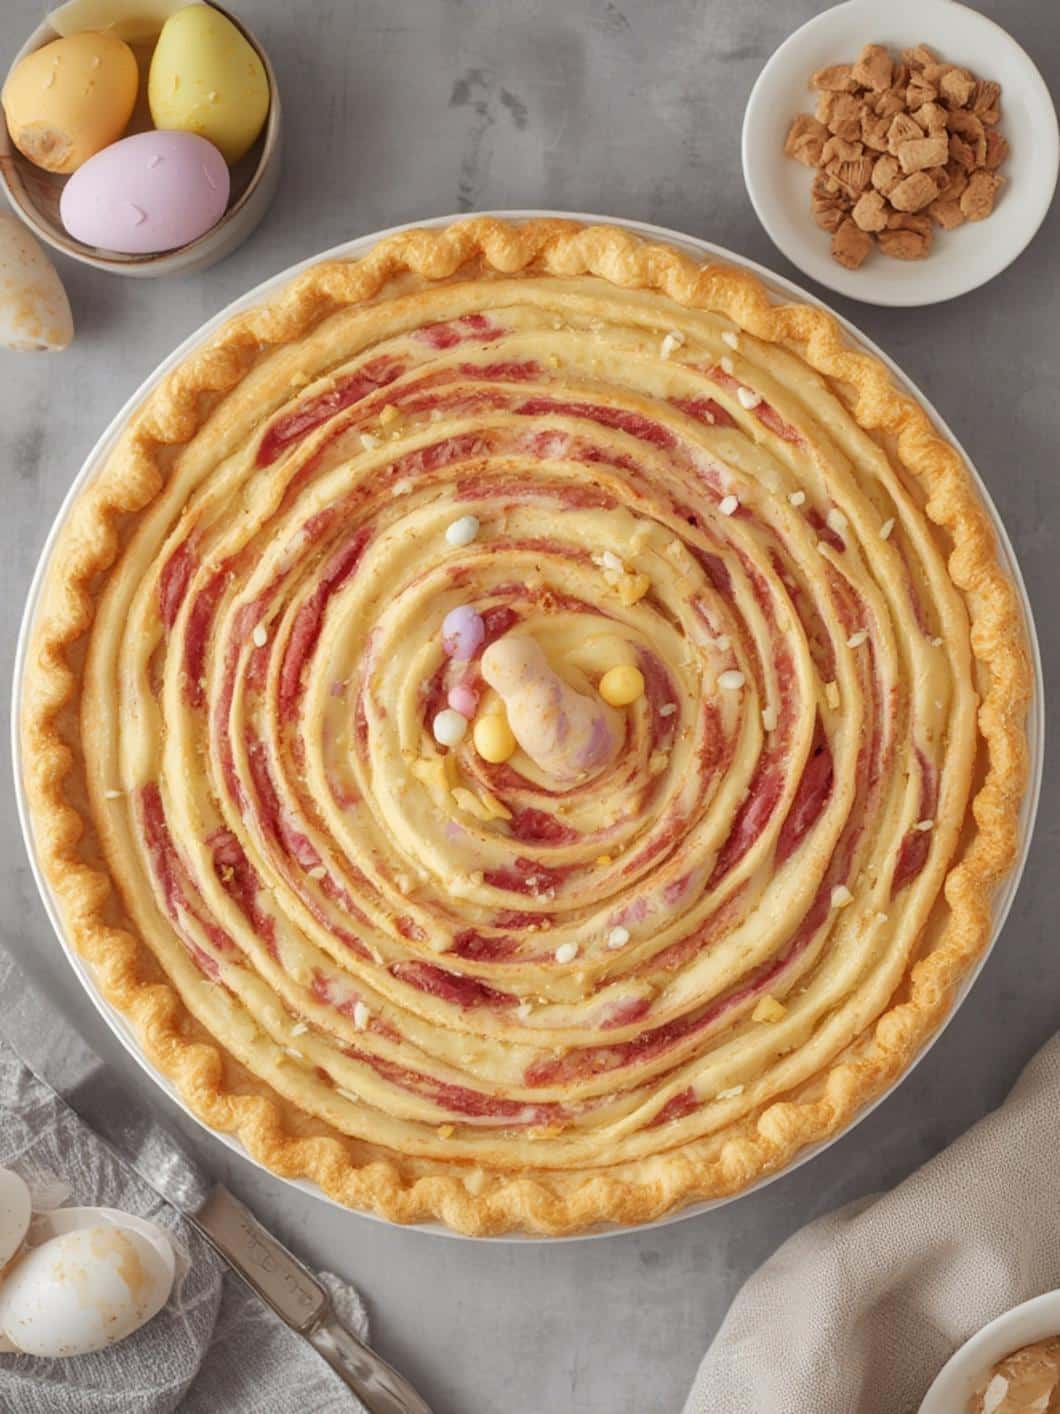
While the pie is stunning on its own, toppings add an extra layer of fun and flavor. A border of whipped cream piped around the edge looks classic and elegant. You can also add a festive touch with Easter-themed sprinkles, pastel nonpareils, or even a few small chocolate eggs placed in the center. For more holiday baking inspiration, these Springtime Crinkle Cookies also bring a wonderful pop of color to the dessert table.
Conclusion
In summary, this Easter Swirl Pie is the perfect dessert to celebrate the spring holiday with style and flavor. Its creamy, tangy filling and crisp, buttery crust create a truly irresistible combination. Furthermore, the beautiful pastel swirls make it a visual centerpiece for your Easter feast that is sure to draw oohs and aahs from your guests. Because this recipe is no-bake and can be made in advance, it is an ideal, stress-free option for any host. We hope you enjoy making and sharing this delightful Easter Swirl Pie with your loved ones this season.
FAQ
Can I use a different type of crust?
Absolutely! While a graham cracker crust is classic, this pie is also delicious with a shortbread cookie crust, a vanilla wafer crust, or even a crust made from crushed pretzels for a sweet and salty twist. You can easily substitute the graham crackers with an equal amount of your chosen cookie crumbs.
Is it possible to make this Easter Swirl Pie gluten-free?
Yes, making a gluten-free version is very simple. The filling is naturally gluten-free, so you only need to adjust the crust. Just use your favorite brand of gluten-free graham crackers or cookies to make the crust, and the rest of the recipe remains the same.
Can I freeze this pie?
This pie freezes beautifully, which makes it a fantastic option for planning ahead. To freeze, let the pie set completely in the refrigerator first. Then, wrap it tightly in a layer of plastic wrap followed by a layer of aluminum foil. It can be frozen for up to one month. To serve, simply thaw it in the refrigerator overnight.
What is the best way to get vibrant pastel colors?
For the best and brightest colors, use gel-based food coloring instead of liquid. Gel coloring is much more concentrated, so you only need a tiny amount to achieve a rich pastel hue without altering the consistency of the pie filling. Add a little at a time until you reach your desired shade.