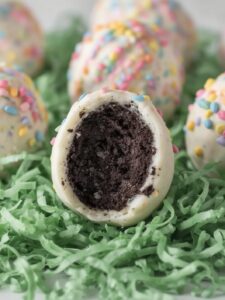
Spring is in the air, and that means Easter is just around the corner, bringing with it a wonderful opportunity for festive baking and family fun. If you’re searching for a simple, no-bake dessert that is both stunningly beautiful and incredibly delicious, then look no further. These Easter Egg Oreo Balls are the perfect treat to brighten up your holiday table. Combining the classic, beloved flavor of Oreos with creamy cheese and a colorful candy shell, this recipe is a guaranteed crowd-pleaser. Furthermore, it’s an incredibly fun activity to do with kids, allowing everyone to get creative with decorations. In this guide, we will walk you through everything you need to know to create these delightful confections from scratch.
Why You’ll Absolutely Love This Recipe
There are countless reasons why these festive truffles will become your new go-to holiday dessert. They are not only simple to make but also offer a delightful combination of texture and flavor that appeals to all ages. Consequently, you’ll find yourself making them year after year for every spring celebration.
Completely No-Bake and Effortless
One of the best features of this Easter Egg Oreo Balls recipe is that it requires absolutely no oven time. This makes it an ideal choice for warmer spring days or for when your oven is already occupied with the main course. Because the process involves simple mixing, shaping, and dipping, even novice bakers can achieve professional-looking results. In addition, the minimal cleanup and straightforward steps mean less stress and more enjoyment in the kitchen.
Perfectly Festive and Customizable
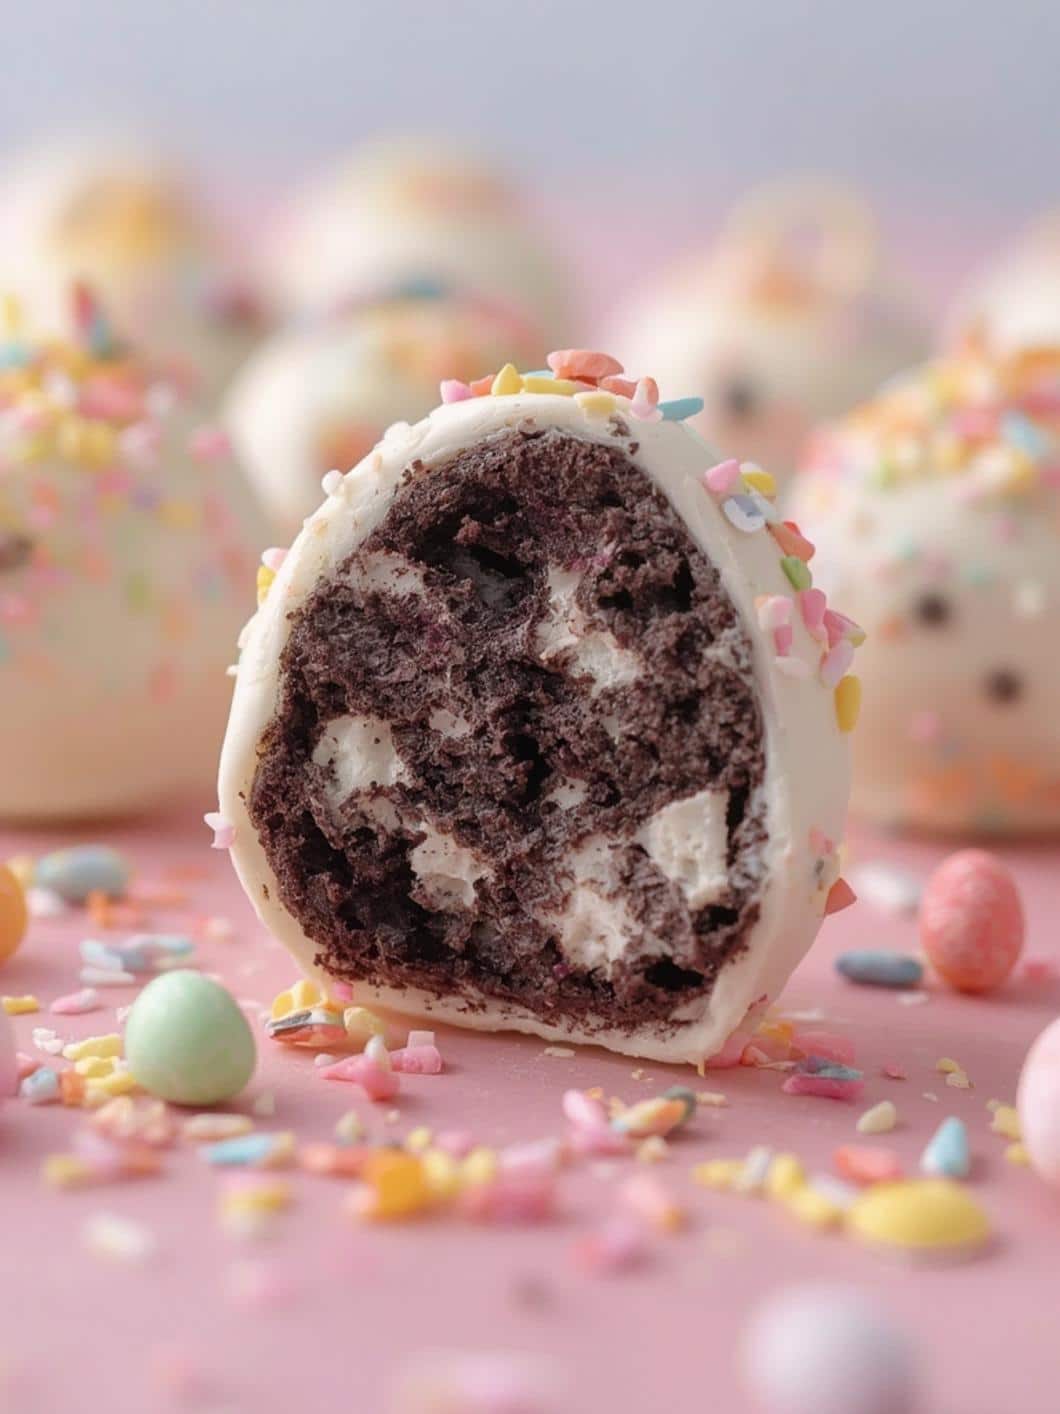
The egg shape and vibrant pastel colors immediately evoke the spirit of Easter. However, the fun doesn’t stop there. These treats are a blank canvas for your creativity. You can use a variety of candy melt colors, from soft pinks and blues to sunny yellows and mint greens. Moreover, you can decorate them with an endless assortment of sprinkles, edible glitter, or contrasting chocolate drizzles. This customization makes each batch unique and allows you to match them to your specific party theme.
A Guaranteed Crowd-Pleasing Flavor
At its heart, this recipe combines two universally loved ingredients: Oreo cookies and cream cheese. The result is a rich, decadent, and slightly tangy flavor profile that is simply irresistible. The sweet, crunchy candy coating provides a perfect textural contrast to the soft, fudgy interior. As a result, these little Easter egg truffles are often the first dessert to disappear from the holiday spread. For another amazing no-bake treat that uses Oreos, be sure to check out our Oreo Dirt Cake Recipe.
Print
Easter Egg Oreo Balls
These no-bake Easter Egg Oreo Balls are a simple, festive dessert combining Oreo cookies and cream cheese, coated in a colorful candy shell. They are a fun and customizable treat perfect for holiday celebrations.
- Total Time: 1 hour 5 minutes
- Yield: 3 dozen truffles 1x
Ingredients
1 (14.3-ounce) package regular Oreo cookies
1 (8-ounce) block full-fat cream cheese, softened
16–24 ounces candy melts, in various pastel colors
Easter-themed sprinkles or other decorations
1 teaspoon coconut oil or vegetable shortening (optional)
Instructions
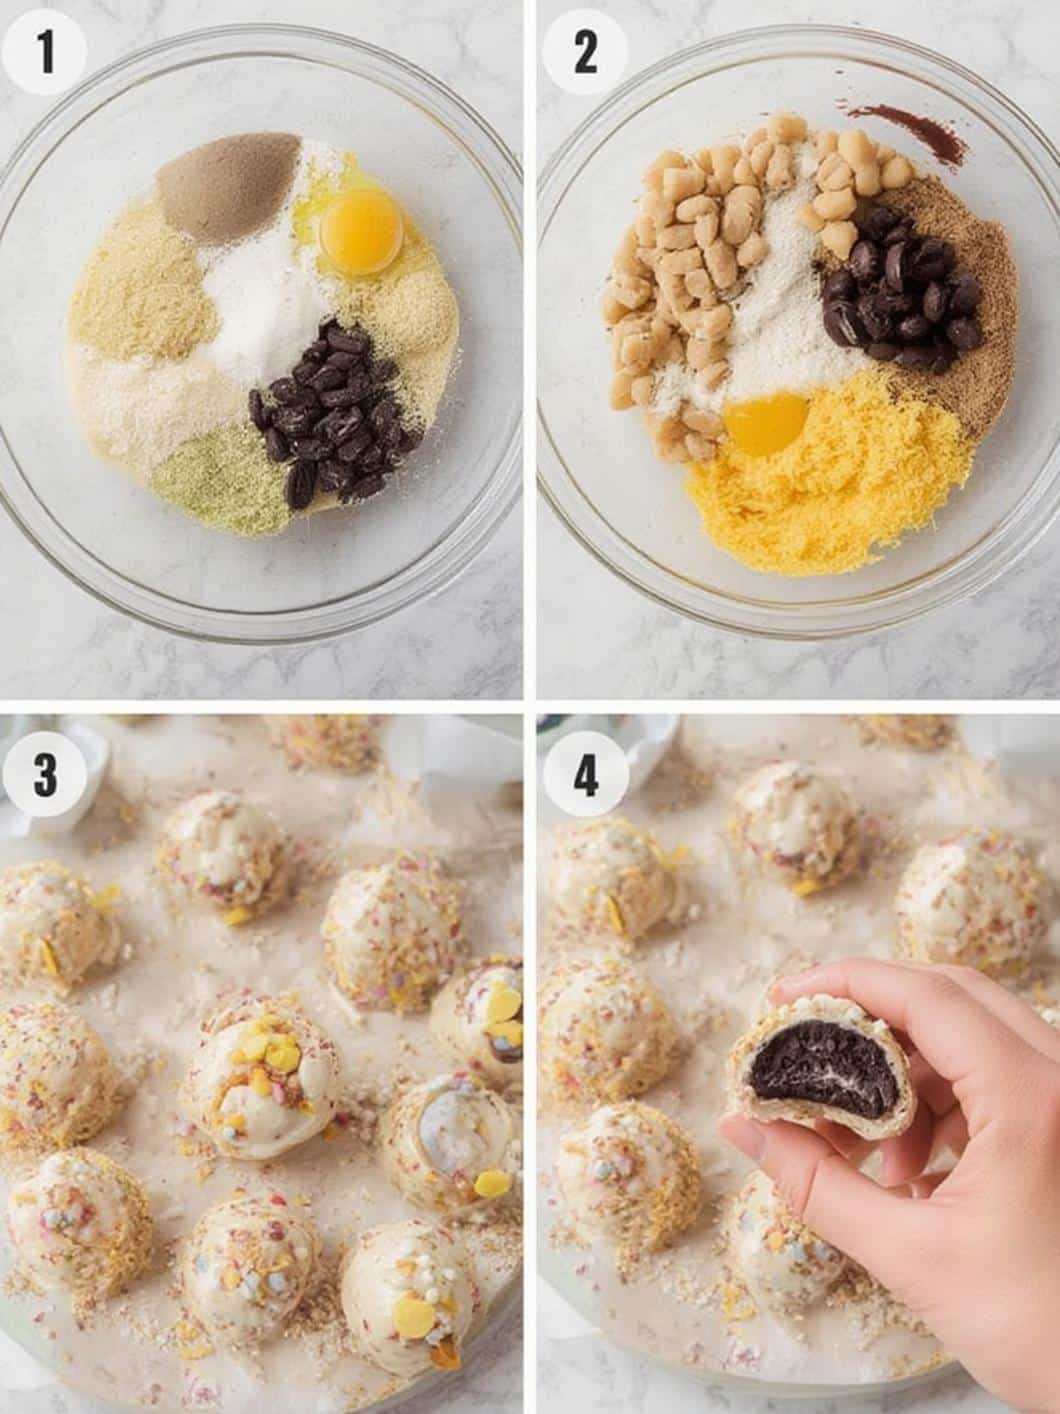
1. Crush the entire package of Oreos into fine crumbs using a food processor or a rolling pin.
2. In a large bowl, mix the Oreo crumbs and softened cream cheese until a thick, dough-like consistency forms.
3. Scoop about 1.5 tablespoons of the mixture, roll into a ball, and taper one end to create an egg shape.
4. Place the shaped eggs on a parchment-lined baking sheet and freeze for 20-30 minutes until firm.
5. Melt the candy melts in separate bowls in the microwave in 30-second intervals, stirring until smooth.
6. If the melted candy is too thick, stir in a teaspoon of coconut oil.
7. Dip each chilled Oreo egg into the melted candy to coat it completely.
8. Place the coated egg back on the parchment paper and immediately add sprinkles.
9. Let the eggs set at room temperature for about an hour or in the refrigerator for 15-20 minutes until the shell is hard.
Notes
Ensure cream cheese is fully softened for smooth mixing. Chilling the shaped eggs before dipping is crucial to prevent them from crumbling. Store finished Oreo balls in an airtight container in the refrigerator for up to one week.
- Prep Time: 25 minutes
- Cook Time: 0 minutes
- Category: Dessert
- Method: No-Bake
- Cuisine: American
Nutrition
- Serving Size: 1 oreo ball
- Calories: 145 kcal
- Sugar: 15 g
- Sodium: 80 mg
- Fat: 8 g
- Saturated Fat: 4 g
- Carbohydrates: 18 g
- Fiber: 0.5 g
- Protein: 1 g
- Cholesterol: 10 mg
The Simple Ingredients You’ll Need
The beauty of this recipe lies in its simplicity, which extends to its short and accessible ingredient list. You only need a handful of items, most of which you may already have in your pantry. Let’s break down what you’ll need to create these amazing Easter Egg Oreo Balls.
- Oreo Cookies: You will need one standard 14.3-ounce package of regular Oreos. It’s important to use the entire cookie, including the creme filling, as this is crucial for the texture and flavor. While classic Oreos are recommended, you could experiment with Golden Oreos for a vanilla-flavored truffle.
- Cream Cheese: An 8-ounce block of full-fat cream cheese is essential. Be sure to let it soften to room temperature before using it. This allows it to blend smoothly with the cookie crumbs, creating a uniform, easy-to-shape dough.
- Candy Melts: You will need about 16-24 ounces of candy melts in various pastel colors. These are specifically designed for melting and dipping, providing a smooth, hard shell once they set. You can find them in the baking aisle of most craft or grocery stores.
- Sprinkles or Decorations: This is where you can get creative! Grab some festive Easter-themed sprinkles, nonpareils, or colored sugars to decorate your eggs.
- Optional Coconut Oil or Shortening: Sometimes, candy melts can be a bit thick after melting. Adding a teaspoon of coconut oil or vegetable shortening can help thin it out, making the dipping process much smoother.
Essential Tools for the Job
While you don’t need any fancy or specialized equipment, a few basic kitchen tools will make the process of creating your Easter Egg Oreo Balls much easier and more efficient. Having these items ready before you begin will ensure a smooth workflow from start to finish.
- Food Processor: This is the quickest and most effective way to crush the Oreos into fine crumbs. If you don’t have one, you can place the cookies in a large, sealed plastic bag and crush them with a rolling pin.
- Large Mixing Bowl: You’ll need a spacious bowl to combine the cookie crumbs and softened cream cheese thoroughly.
- Baking Sheets: Two baking sheets lined with parchment paper or wax paper are necessary. One will be for chilling the shaped eggs, and the other will be for letting them set after dipping.
–
- Microwave-Safe Bowls: Use small, deep bowls for melting the different colors of candy melts.
- Dipping Tools or Forks: A candy dipping tool set is helpful, but two forks work just as well for lowering the Oreo eggs into the melted candy and lifting them out.
- Spatula: A rubber spatula is great for scraping the bowl and ensuring all the ingredients are well combined.
Step-by-Step Instructions for Perfect Easter Egg Oreo Balls
Now that you have your ingredients and tools, it’s time for the fun part. Follow these detailed steps to create your delicious and festive treats. Remember to take your time and enjoy the process.
First, you need to prepare the Oreo mixture. Place the entire package of Oreo cookies into a food processor and pulse until they become fine, consistent crumbs. If you don’t have a food processor, use the plastic bag and rolling pin method. Subsequently, transfer the crumbs to a large mixing bowl. Add the softened block of cream cheese to the crumbs. Then, using a hand mixer or a sturdy spatula, mix until the two ingredients are completely combined into a thick, dough-like consistency.
Next, it’s time to shape the eggs. Scoop out about one and a half tablespoons of the Oreo mixture at a time. Roll the mixture between your palms to form a smooth ball, and then gently taper one end to create an egg shape. Place the shaped egg onto a baking sheet lined with parchment paper. Repeat this process with the remaining mixture. Once all the eggs are shaped, place the baking sheet in the freezer for at least 20-30 minutes to allow them to firm up. This step is crucial, as it prevents them from falling apart during the dipping process.
After the Oreo eggs have chilled, you can prepare the candy coating. Place your different colored candy melts into separate microwave-safe bowls. Microwave one color at a time in 30-second intervals, stirring well between each interval until the candy is completely melted and smooth. Be careful not to overheat it. If the consistency is too thick, stir in a teaspoon of coconut oil to thin it out.
Now, for the dipping. Using two forks or a dipping tool, carefully dip one chilled Oreo egg into the melted candy, ensuring it is fully coated. Lift it out and gently tap the fork on the side of the bowl to allow any excess coating to drip off. Immediately place the coated egg back on the parchment-lined baking sheet. Before the coating sets, add your desired sprinkles or decorations. Repeat this process with the remaining eggs, using different colors as you wish. For more holiday treat inspiration, you can also look at these fun St. Patrick’s Day Oreo Balls.
Finally, let the Easter Egg Oreo Balls set completely. You can leave them at room temperature for about an hour or place them in the refrigerator for 15-20 minutes to speed up the process. Once the candy shell is hard, they are ready to be served and enjoyed!
Tips and Tricks for Success
To ensure your Easter Egg Oreo Balls turn out perfectly every time, here are a few expert tips and tricks. These small adjustments can make a big difference in the final result.
Getting the Right Consistency
The key to perfect Oreo balls is the right ratio of cookie crumbs to cream cheese. Therefore, make sure your cream cheese is fully softened to room temperature for easy blending. Chilling the shaped eggs thoroughly before dipping is non-negotiable; otherwise, they may crumble in the warm candy coating. While these treats are delicious, remember to enjoy them in moderation as part of a balanced diet, a principle often emphasized by health resources like Healthline.
Perfectly Melted Candy Coating
Patience is key when melting candy melts. Microwaving them in short bursts and stirring frequently prevents scorching. If the candy seizes or becomes too thick, do not add water. Instead, a small amount of coconut oil or vegetable shortening will smooth it out beautifully, creating the ideal consistency for dipping.
Creative Decoration Ideas
Don’t be afraid to get creative with your decorations. After the base coat has set, you can melt a contrasting color of candy melts, place it in a small piping bag or zip-top bag with the corner snipped off, and drizzle stripes or zig-zags over the eggs. This adds a beautiful, professional touch to your finished Easter Egg Oreo Balls.
Storing Your Oreo Ball Creations
Proper storage is essential to keep your treats fresh and delicious. Because they contain cream cheese, these Easter Egg Oreo Balls must be stored in the refrigerator. Place them in a single layer in an airtight container to prevent them from absorbing any other fridge odors. They will stay fresh for up to one week.
If you want to make them further in advance, they also freeze exceptionally well. Arrange them in a single layer in a freezer-safe container, with parchment paper between layers if you need to stack them. They can be frozen for up to two months. When you’re ready to enjoy them, simply let them thaw in the refrigerator for a few hours. For additional information on safe food handling and storage, you can refer to authoritative sources such as Mayo Clinic.
Conclusion
In conclusion, making Easter Egg Oreo Balls is a wonderfully simple and enjoyable way to celebrate the spring season. With just a few basic ingredients and no oven required, you can create a festive and delicious treat that is sure to impress your friends and family. This recipe offers the perfect combination of rich chocolate flavor and creamy texture, all wrapped up in a beautiful, customizable package. Furthermore, it provides a fantastic opportunity to get creative in the kitchen, making it a perfect activity for all ages. Therefore, be sure to add these delightful Easter Egg Oreo Balls to your holiday baking list for a sweet and memorable celebration.
Frequently Asked Questions
Can I use a different type of cookie for this recipe?
Yes, you certainly can experiment with other cookies. Golden Oreos work well for a vanilla version. Nutter Butters could create a delicious peanut butter truffle, or shortbread cookies could offer a buttery alternative. However, you may need to adjust the amount of cream cheese depending on the cookie’s texture and filling content.
My candy coating is too thick for dipping. What did I do wrong?
This is a common issue that is easy to fix! Candy melts can sometimes be thick, or they may have been slightly overheated. The solution is to stir in about one teaspoon of coconut oil or vegetable shortening into the melted candy. This will thin it out to a much smoother, more manageable consistency for dipping.
How far in advance can I make these Easter Egg Oreo Balls?
You can make them up to one week in advance if you store them properly in an airtight container in the refrigerator. For longer storage, you can freeze them for up to two months. This makes them a great make-ahead dessert for busy holiday schedules.