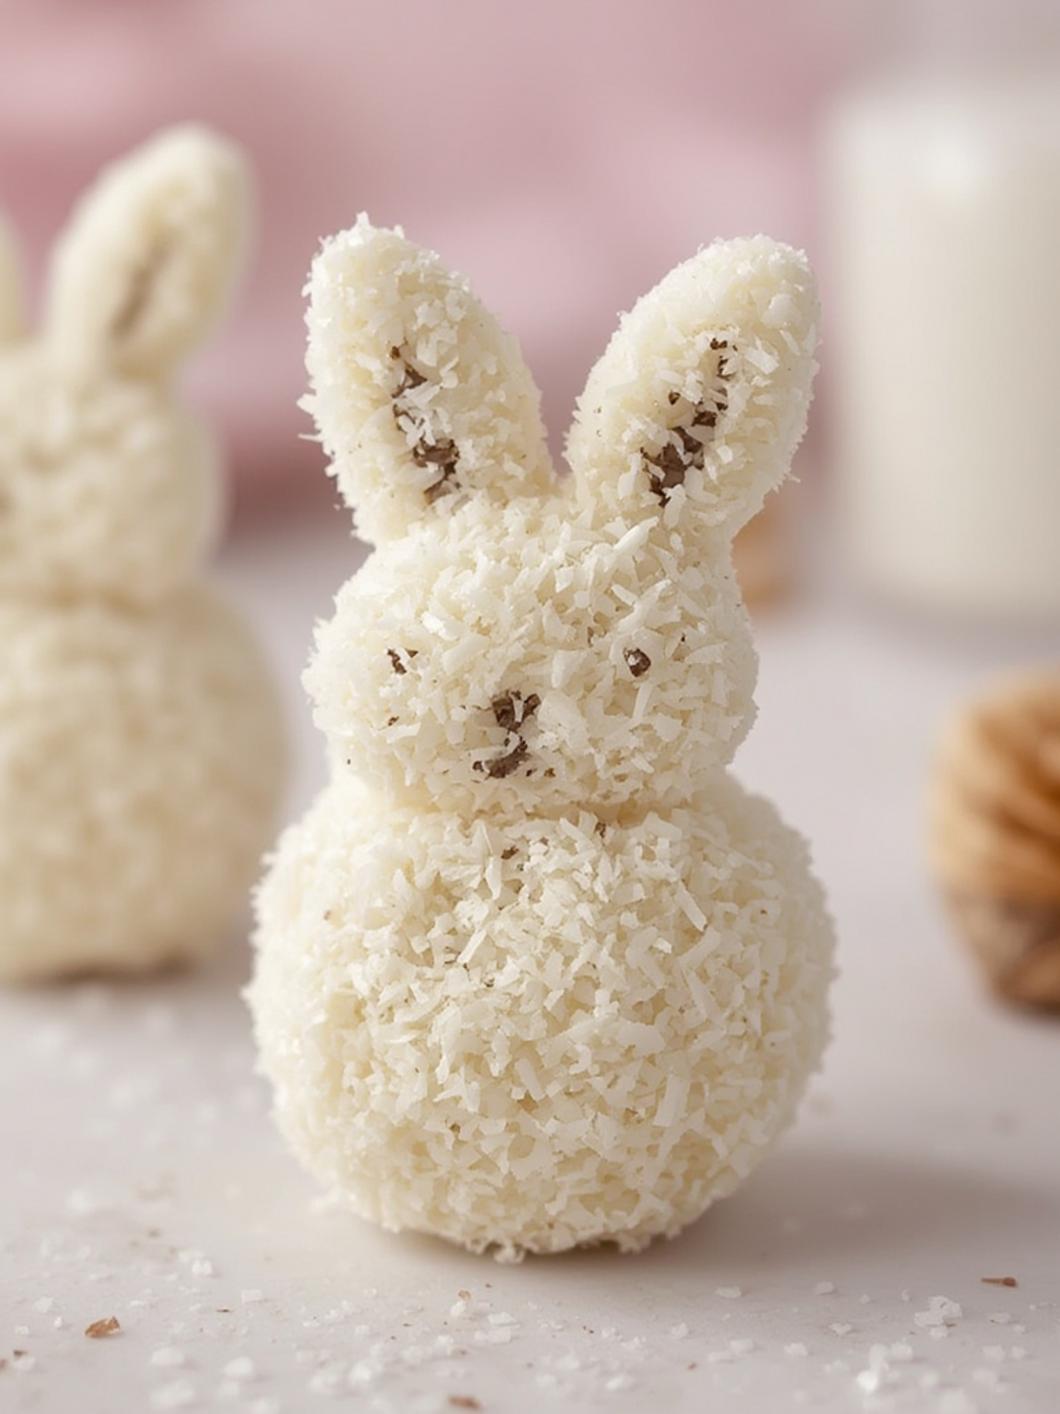
When spring rolls around, especially as Easter approaches, our kitchens begin to buzz with the promise of sweet, festive treats. Amidst the sea of chocolate eggs and pastel-colored everything, there’s a simple, no-bake delight that perfectly captures the whimsical spirit of the season: Coconut Bunny Tail Truffles. These adorable little bites are not only incredibly delicious but also surprisingly easy to make. In fact, they consist of a rich, creamy coconut center, which is then dipped in smooth white chocolate and rolled in a final flurry of shredded coconut. Consequently, they look just like fluffy little bunny tails, making them a guaranteed hit at any family gathering or spring celebration. This guide will walk you through everything you need to know to create these perfect little treats.
What Makes These Coconut Bunny Tail Truffles an Easter Favorite?
There are several reasons why these Coconut Bunny Tail Truffles have become a must-have for spring festivities. First and foremost, their taste and texture are simply divine. The center is a soft, chewy blend of cream cheese, sweetened condensed milk, and coconut, providing a rich flavor that is sweet but not overpowering. Furthermore, this creamy core is enrobed in a layer of high-quality white chocolate, which adds a delightful snap and its own unique sweetness. The final coating of shredded coconut not only completes the “bunny tail” look but also adds an extra layer of chewy texture that coconut lovers will adore.
Beyond their amazing flavor, a major appeal of this recipe is its simplicity. Because this is a no-bake dessert, you won’t need to turn on your oven or worry about precise baking times. This makes it an excellent recipe for bakers of all skill levels, including children who want to help in the kitchen. The process is straightforward, primarily involving mixing, chilling, and dipping. As a result, you can create an impressive-looking dessert with minimal stress. Their charming appearance is, of course, a huge draw. They are a festive and fun addition to any dessert table, and their cute design is sure to bring a smile to everyone’s face. If you enjoy making themed treats, these are just as fun as our popular Easter Egg Oreo Balls.
Print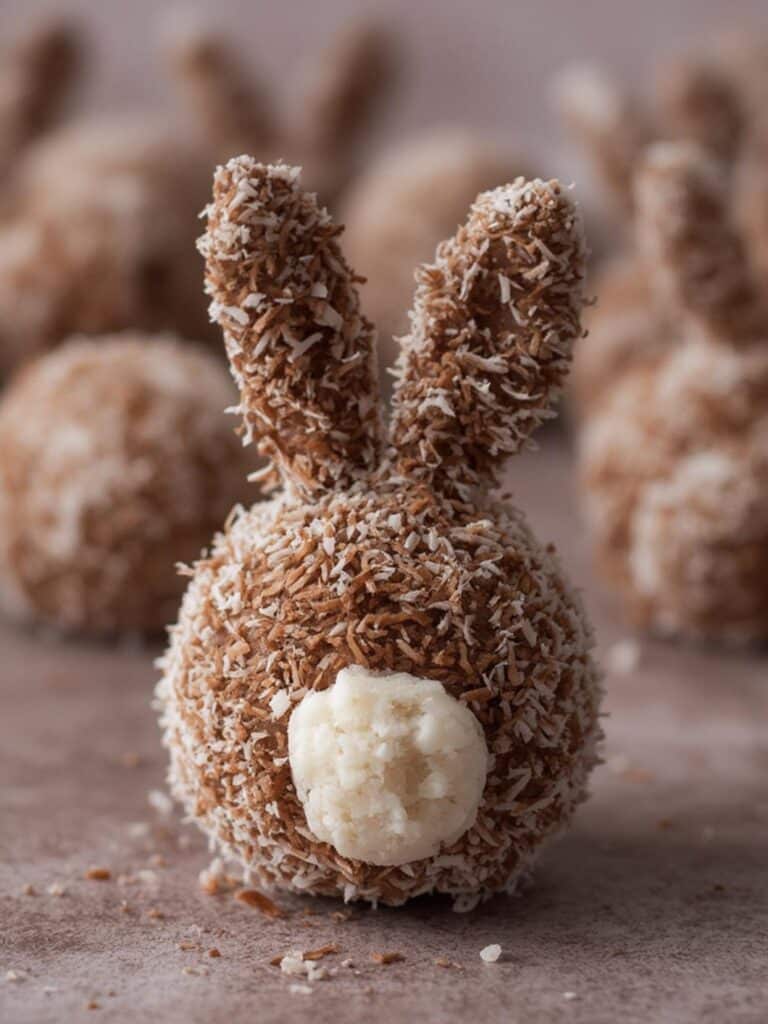
Coconut Bunny Tail Truffles
Adorable and easy no-bake treats with a creamy coconut center, dipped in white chocolate and rolled in shredded coconut to resemble fluffy bunny tails. Perfect for Easter and spring celebrations.
- Total Time: 2 hours 50 minutes
- Yield: 16 servings 1x
Ingredients
1 (8-ounce) block full-fat cream cheese, softened
1 (14-ounce) can sweetened condensed milk
3 cups sweetened shredded coconut, divided
1 teaspoon pure vanilla extract
12 ounces white chocolate melting wafers or almond bark
Instructions
1. In a large bowl, beat the softened cream cheese until smooth, then beat in the sweetened condensed milk.
2. Using a spatula, fold in 2 cups of the shredded coconut and the vanilla extract.
3. Cover the bowl and refrigerate the mixture for at least 2 hours, or until firm.
4. Scoop 1-tablespoon portions of the mixture and roll between your hands to form smooth balls.
5. Place the rolled truffles on a parchment-lined baking sheet and freeze for at least 30 minutes until very firm.
6. Melt the white chocolate wafers in a microwave-safe bowl in 30-second intervals, stirring in between, until smooth.
7. Dip each frozen truffle into the melted white chocolate to coat completely, allowing any excess to drip off.
8. Immediately roll the chocolate-covered truffle in the remaining 1 cup of shredded coconut.
9. Place the finished truffles back on the baking sheet and let them set until the chocolate has hardened, about 15-20 minutes.
Notes
For best results, use full-fat block cream cheese and white chocolate melting wafers. Do not skip the chilling and freezing steps, as they are crucial for a firm, easy-to-handle mixture. A small cookie scoop helps create uniform truffles.
- Prep Time: 20 minutes
- Cook Time: 0 minutes
- Category: Dessert
- Method: No-Bake
- Cuisine: American
Nutrition
- Serving Size: 2-3 truffles
- Calories: 330
- Sugar: 32g
- Sodium: 85mg
- Fat: 20g
- Saturated Fat: 14g
- Unsaturated Fat: 6g
- Trans Fat: 0g
- Carbohydrates: 36g
- Fiber: 1g
- Protein: 5g
- Cholesterol: 28mg
Gathering Your Simple Ingredients
One of the best parts about this recipe is its short and accessible ingredient list. You likely have many of these items in your pantry already. For instance, quality is key here, so using fresh, good-quality ingredients will yield the best-tasting Coconut Bunny Tail Truffles. Here’s what you’ll need to get started.
- Cream Cheese: You will need one 8-ounce block of full-fat cream cheese. It is crucial to let it soften to room temperature to ensure it mixes smoothly without any lumps.
- Sweetened Condensed Milk: This ingredient provides both sweetness and the signature creamy, dense texture of the truffle filling. One standard 14-ounce can is perfect.
- Sweetened Shredded Coconut: Coconut is the star of the show. You will need it for both the filling and the outer coating. Sweetened coconut offers the best flavor and texture for this particular recipe.
- Vanilla Extract: A teaspoon of pure vanilla extract enhances the other flavors, adding a wonderful warmth and depth to the truffles.
- White Chocolate Melting Wafers: For the coating, high-quality white chocolate melting wafers or almond bark are your best bet. They are specifically designed to melt smoothly and set up with a nice, glossy finish.
A Note on Ingredients
When selecting your cream cheese, be sure to use the full-fat, block-style variety rather than the whipped kind sold in tubs. The block version has a lower water content, which is essential for helping the truffles hold their shape. Similarly, for the white chocolate, while you can use white chocolate chips, they often contain stabilizers that can make them more difficult to melt into a smooth, dippable consistency. Therefore, melting wafers are highly recommended for a frustration-free experience. The rich coconut flavor is a wonderful part of many spring treats, much like the fruit flavors in our Strawberry Shortcake Easter Egg Bombs.
Step-by-Step Instructions
Now that you have your ingredients, you’re ready to create these adorable treats. Follow these simple steps for perfect Coconut Bunny Tail Truffles every time. Remember to read through all the steps before beginning so you understand the process.
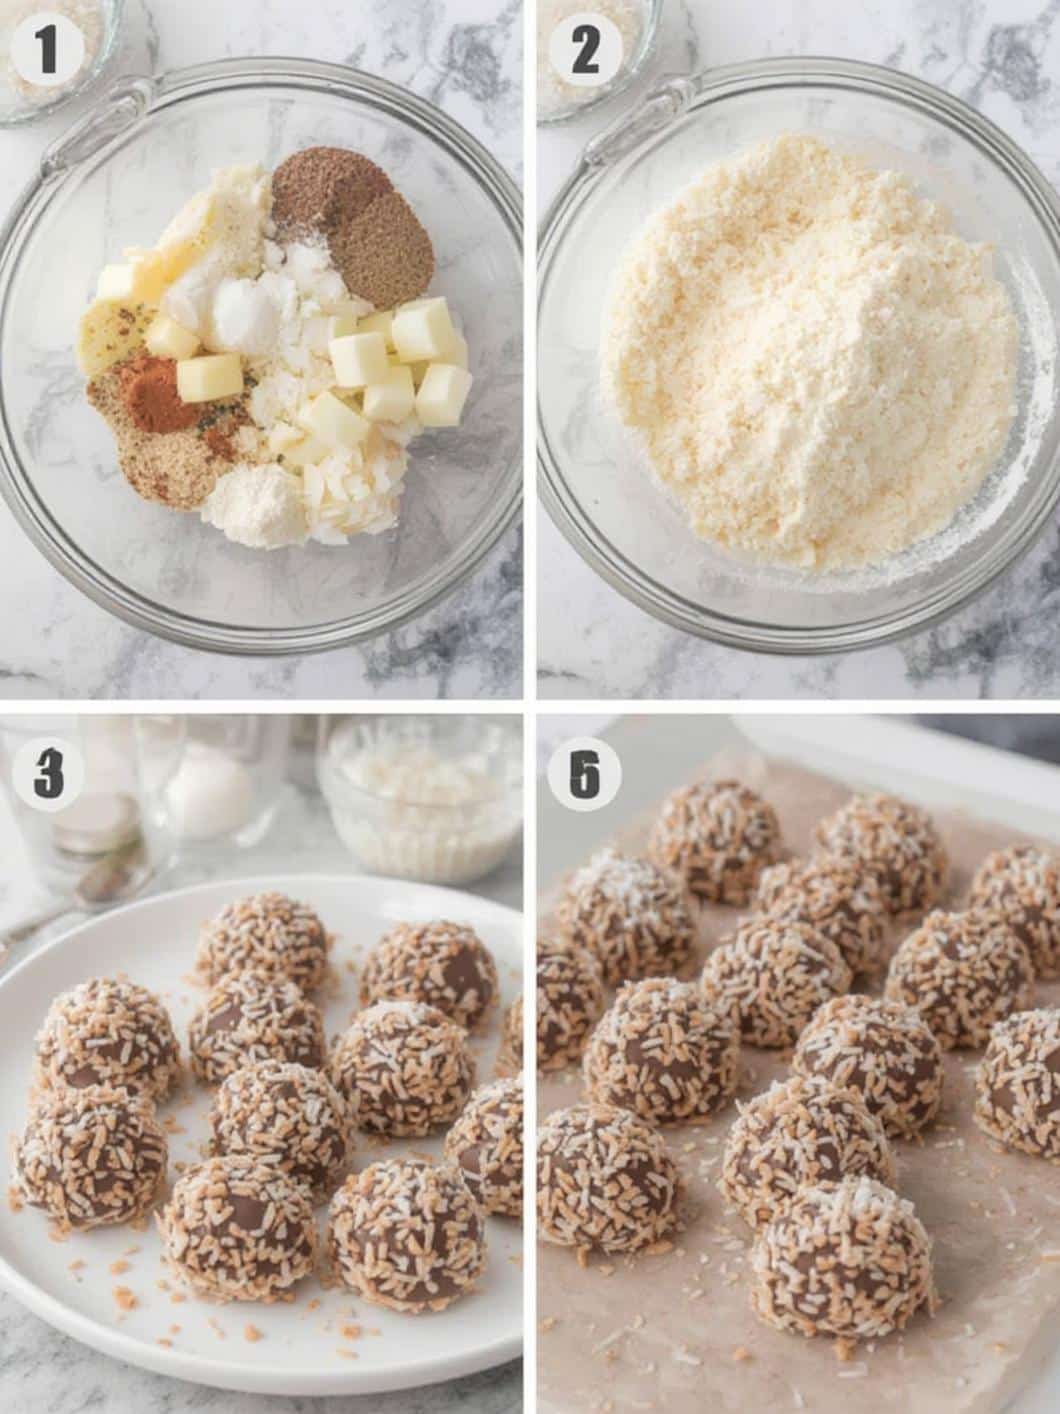
Step 1: Create the Filling. In a large mixing bowl, use a hand mixer or stand mixer to beat the softened cream cheese until it is completely smooth and creamy. Next, slowly pour in the sweetened condensed milk and beat until well combined. Finally, switch to a spatula and fold in 2 cups of the shredded coconut and the vanilla extract. The mixture will be thick and sticky.
Step 2: Chill the Mixture. Cover the bowl with plastic wrap and place it in the refrigerator for at least 2 hours, or until the mixture is firm enough to handle. This chilling step is absolutely crucial; otherwise, the filling will be too soft to roll into balls.
Step 3: Roll the Truffles. Once the filling is firm, use a small cookie scoop (about 1 tablespoon) to portion out the mixture. Roll each portion between your hands to form a smooth, round ball. Place the rolled truffles on a baking sheet lined with parchment paper.
Step 4: Freeze for Firmness. Place the baking sheet with the truffles into the freezer for at least 30 minutes. Freezing the truffles ensures they are very firm, which will prevent them from falling apart when you dip them in the warm, melted white chocolate.
Step 5: Melt the White Chocolate. While the truffles are freezing, you can prepare the coating. Place the white chocolate melting wafers in a microwave-safe bowl. Microwave in 30-second intervals, stirring in between each one, until the chocolate is fully melted and smooth. Be careful not to overheat it, as white chocolate can burn easily.
Step 6: Dip and Coat. Remove the truffles from the freezer. Working one at a time, use a fork or a dipping tool to dip each truffle into the melted white chocolate, ensuring it’s fully coated. Lift the truffle out of the chocolate and gently tap the fork on the side of the bowl to allow any excess chocolate to drip off.
Step 7: Add the Coconut Tail. Immediately after dipping, place the chocolate-covered truffle into a separate bowl containing the remaining shredded coconut. Gently roll it around to coat it completely. This creates the fluffy “bunny tail” effect.
Step 8: Let Them Set. Place the finished truffles back on the parchment-lined baking sheet. Let them sit at room temperature or in the refrigerator until the white chocolate has fully hardened. This usually takes about 15-20 minutes.
Tips for Perfect Truffles and Fun Variations
Making homemade truffles is a rewarding process, and a few extra tips can help ensure your Coconut Bunny Tail Truffles turn out flawlessly. Additionally, once you master the basic recipe, you can experiment with fun variations to make them your own.
Pro Tips for Success
- Use a Cookie Scoop: For perfectly uniform truffles, a small cookie scoop is your best friend. This ensures all your bunny tails are the same size.
- Don’t Skip the Chilling: The chilling and freezing steps are non-negotiable. They are essential for a manageable consistency and a successful dipping process.
- Work in Batches: If your kitchen is warm, consider taking only a few truffles out of the freezer at a time to dip. This keeps them from softening too quickly.
- Smooth Your Chocolate: If your melted white chocolate seems too thick for dipping, you can stir in a tiny amount (about 1/2 teaspoon) of coconut oil or vegetable shortening to thin it out.
Flavor Variations to Try
While the classic recipe is fantastic, feel free to get creative. For a zesty twist, you could add the zest of one lemon or lime to the cream cheese mixture. Alternatively, a dash of almond extract instead of vanilla can provide a new and delicious flavor profile. For those who love a contrast, dipping the truffles in dark or milk chocolate instead of white would also be a delightful change. These treats are a wonderful part of a larger dessert spread, especially alongside something like a beautiful Easter Swirl Pie.
A Quick Look at Coconut’s Benefits
While these truffles are certainly an indulgent treat, it’s interesting to note that the star ingredient, coconut, does offer some nutritional benefits. According to Healthline, coconut is particularly rich in manganese, which is essential for bone health and metabolism. It is also a good source of fiber and medium-chain triglycerides (MCTs), a type of fat that is metabolized differently than other fats. Of course, these truffles are a dessert, but it’s nice to know you’re getting a little something extra from the ingredients.
Similarly, the cream cheese in this recipe provides a small amount of key nutrients. As noted by sources like WebMD, cream cheese is a source of Vitamin A, which is important for vision and immune function. Ultimately, enjoying these Coconut Bunny Tail Truffles is all about balance and savoring a special, homemade treat during a festive time of year.
Conclusion
In summary, creating these delightful Coconut Bunny Tail Truffles is a simple and joyful way to celebrate the spring season. With a rich, creamy coconut center and a smooth white chocolate shell, they are a treat that appeals to all ages. Moreover, their no-bake nature makes them an accessible and stress-free project for any home cook. This recipe provides a wonderful opportunity to create something both beautiful and delicious for your Easter or spring gatherings. Consequently, these charming truffles are sure to become a cherished tradition in your holiday baking for years to come. Give them a try and watch as these little bunny tails hop right off the dessert plate.
Frequently Asked Questions
Can I use unsweetened coconut for this recipe?
Yes, you can use unsweetened coconut if you prefer a less sweet truffle. However, keep in mind that the filling’s sweetness comes primarily from the sweetened condensed milk and the coconut, so using unsweetened coconut will result in a noticeably less sweet final product. The texture will remain largely the same.
Why is my truffle mixture too sticky to roll?
If your mixture is too sticky, it almost certainly needs to be chilled for longer. The coconut and cream cheese mixture needs to be very firm to be rolled easily. Make sure you chill it for at least two hours in the refrigerator, or even longer if needed, until it has a consistency similar to play-doh.
Can I make these Coconut Bunny Tail Truffles ahead of time?
Absolutely! These are a great make-ahead dessert. You can store the finished truffles in an airtight container in the refrigerator for up to one week. You can also freeze them for up to a month. If you freeze them, just let them sit at room temperature for about 15-20 minutes before serving.
What is the best type of white chocolate to use for dipping?
For the best results, it is highly recommended to use white chocolate melting wafers or almond bark. These products are designed to melt smoothly and set with a firm, glossy finish. Regular white chocolate chips often contain stabilizers that prevent them from melting into a thin, dippable consistency, which can lead to a thick, clumpy coating.