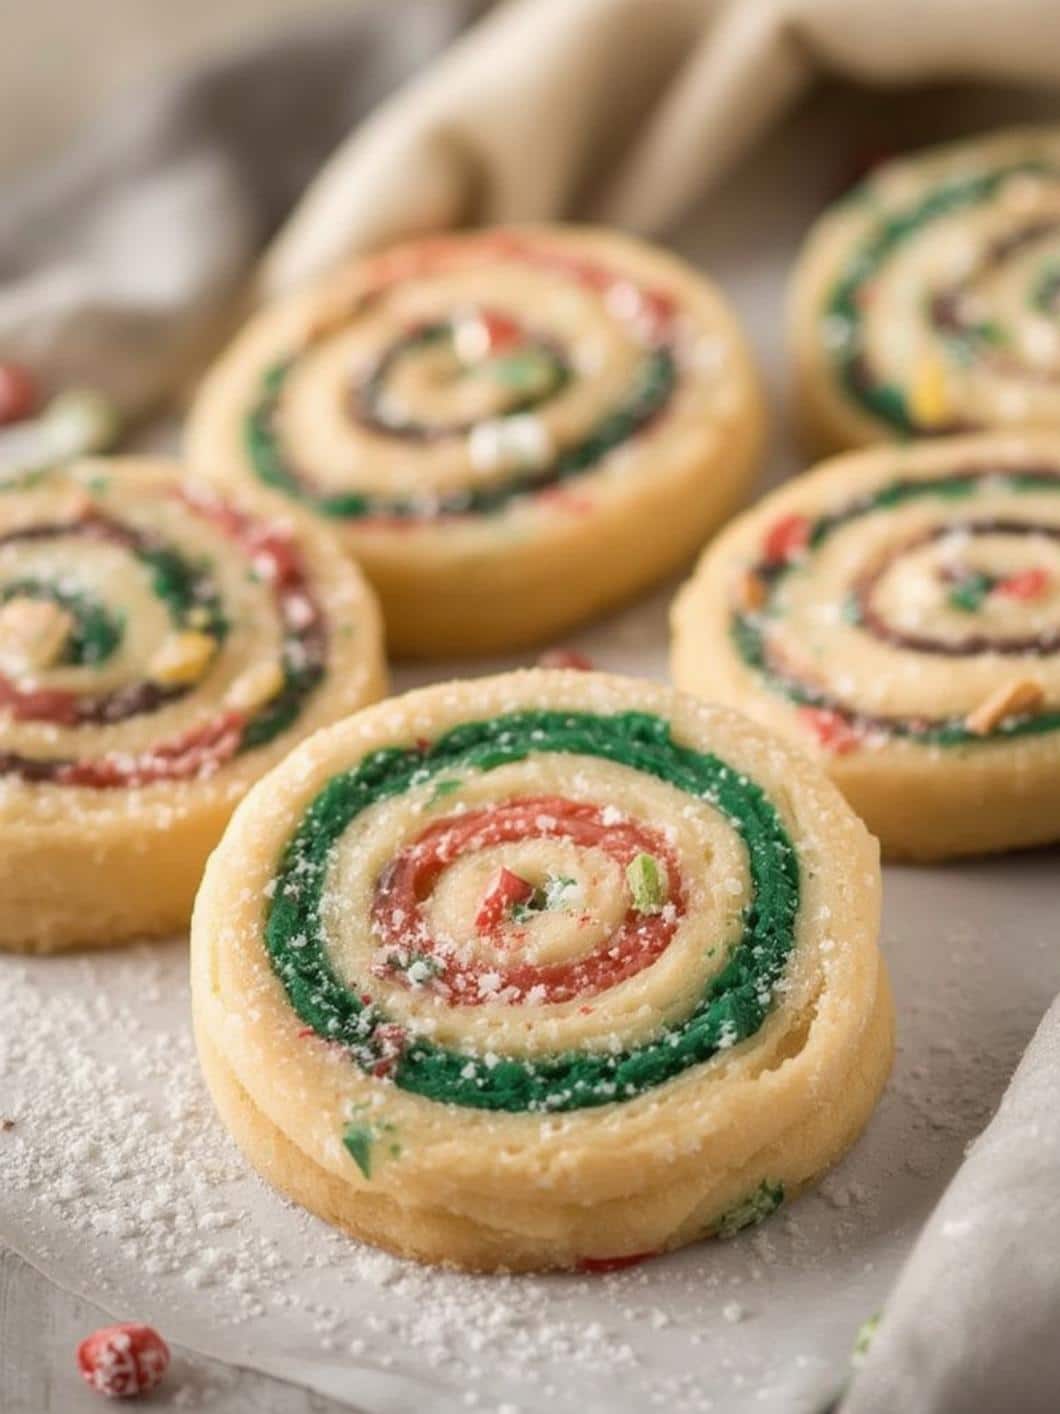
The holiday season brings with it a wonderful array of festive treats, but few are as visually captivating and delightfully fun as Christmas pinwheel cookies. These eye-catching cookies, with their vibrant red and green swirls, are a staple on cookie platters and at holiday exchanges across the country. They look impressive and complex, yet they are surprisingly straightforward to create. In fact, with a simple sugar cookie dough base and a little bit of patience, you can easily master this festive recipe. This guide will walk you through everything you need to know, from the essential ingredients to the expert tips that guarantee perfect swirls every single time. Consequently, you’ll be well on your way to baking a batch of the most beautiful cookies of the season.
What Makes Christmas Pinwheel Cookies a Holiday Classic?
Christmas pinwheel cookies are essentially a type of refrigerator cookie, also known as an icebox cookie. The magic comes from creating two different colors of dough, layering them, and then rolling them into a tight log. After chilling, the log is sliced to reveal a stunning spiral pattern. The classic red and green combination immediately evokes the spirit of Christmas, making them a perfect addition to any holiday celebration. Moreover, their buttery, sweet flavor is universally loved by both kids and adults.
One of the primary reasons for their popularity is their make-ahead convenience. You can prepare the dough logs days or even weeks in advance and store them in the freezer. Then, whenever you need a fresh batch of cookies, you can simply slice and bake. This is incredibly helpful during the busy holiday season. Furthermore, they are incredibly sturdy, which makes them ideal for packaging as gifts or shipping to loved ones. The simple yet delightful taste of these Christmas pinwheel cookies provides a perfect canvas for festive cheer.
Print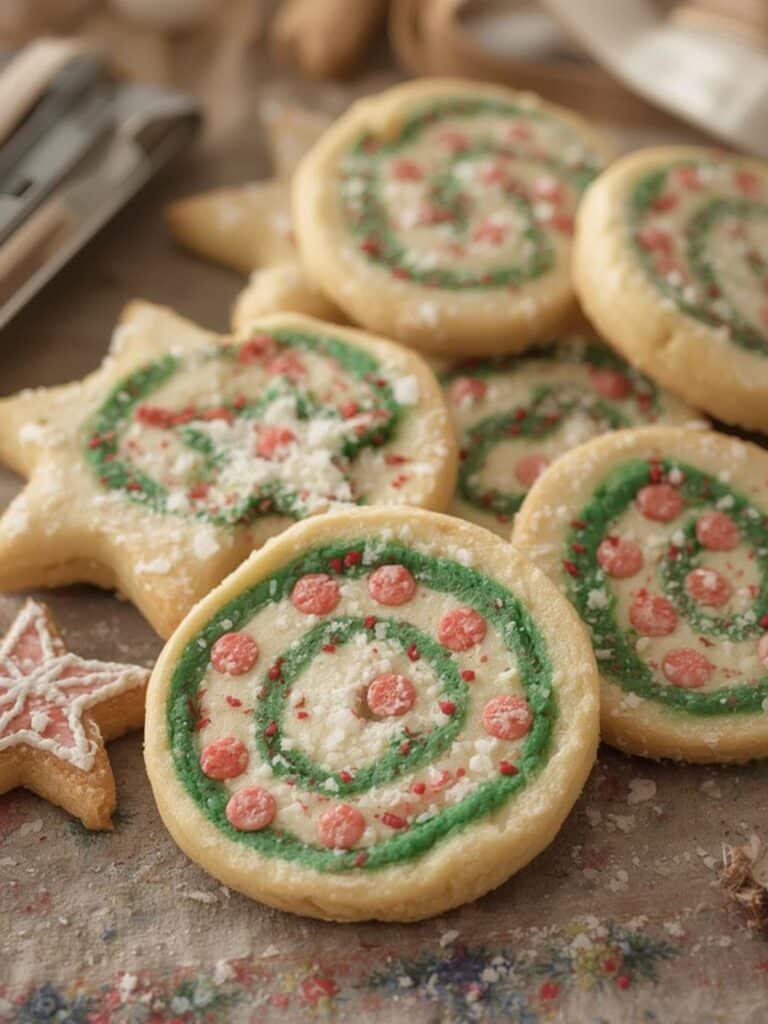
Christmas Pinwheel Cookies: The 15 Ultimate Steps to Festive Perfection
Festive red and green swirled sugar cookies that are as stunning as they are delicious — perfect for holiday gifting, cookie exchanges, and spreading Christmas cheer.
- Total Time: 6 hours (includes chilling)
- Yield: 36 cookies 1x
Ingredients
2 ½ cups all-purpose flour
1 cup unsalted butter, softened
1 cup granulated sugar
1 large egg, room temperature
1 ½ tsp pure vanilla extract
1 tsp baking powder
¼ tsp salt
Red gel food coloring
Green gel food coloring
Instructions
1. In a large mixing bowl, cream together the softened butter and granulated sugar until light and fluffy, about 2–3 minutes.
2. Beat in the egg and vanilla extract until well combined.
3. In a separate bowl, whisk together the flour, baking powder, and salt.
4. Gradually add the dry ingredients to the wet mixture, mixing on low speed just until combined.
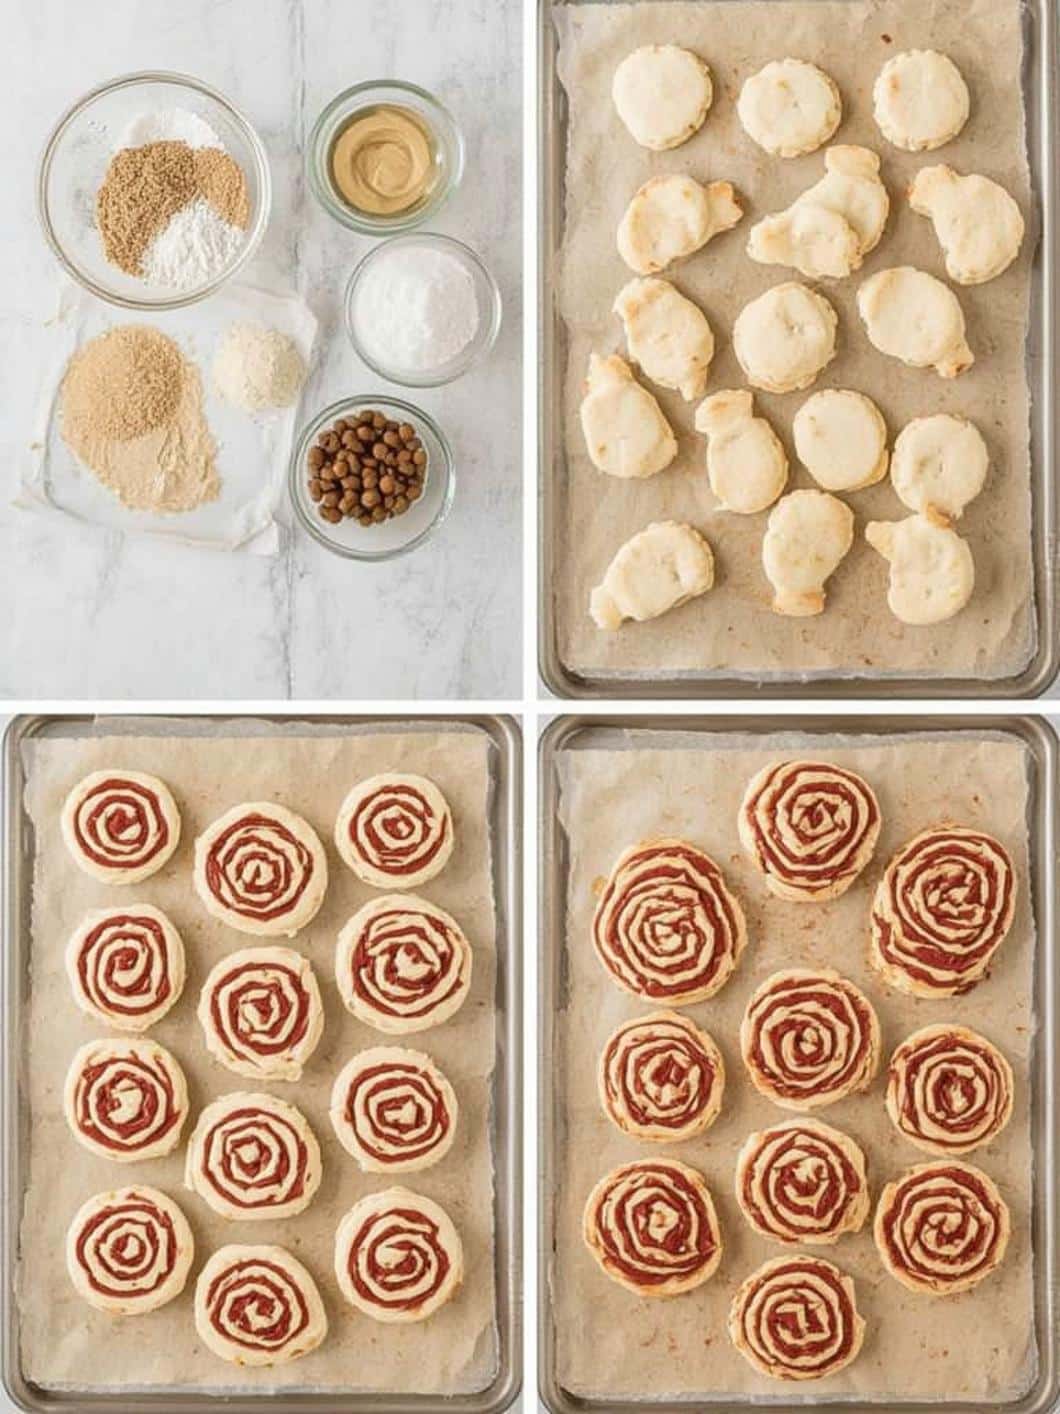
5. Divide the dough evenly into two portions.
6. Tint one half of the dough with red gel food coloring and the other half with green, mixing each until the color is fully incorporated.
7. Form each colored dough into a flat disk, wrap in plastic wrap, and refrigerate for at least 1 hour.
8. On a lightly floured surface, roll out the red dough into a 12×9-inch rectangle. Repeat with the green dough.
9. Carefully place one rectangle on top of the other and gently press together.
10. Starting from the long edge, tightly roll the stacked dough into a log, creating a spiral pattern.
11. Wrap the log in plastic wrap and refrigerate for at least 4 hours or overnight. For clean slicing, freeze for 30–60 minutes before cutting.
12. Preheat the oven to 350°F (175°C) and line baking sheets with parchment paper.
13. Slice the chilled dough log into ¼-inch rounds.
14. Place cookies 2 inches apart on the prepared baking sheets.
15. Bake for 10–12 minutes or until the edges are just barely golden.
16. Let cool on the baking sheet for a few minutes before transferring to a wire rack to cool completely.
Notes
Chilling is essential for clean swirls and shape retention — don’t skip it!
Use gel food coloring to achieve vibrant colors without altering dough consistency.
Roll dough between parchment sheets for uniform rectangles and minimal sticking.
Store unbaked dough logs in the freezer for up to 3 months — perfect for holiday prep.
Add festive flair by rolling the log in sprinkles before the final chill.
- Prep Time: 90 minutes
- Cook Time: 12 minutes
- Category: Dessert
- Method: Baking
- Cuisine: American
- Diet: Vegetarian
Nutrition
- Serving Size: 1 cookie
- Calories: 120
- Sugar: 9g
- Sodium: 40mg
- Fat: 6g
- Saturated Fat: 4g
- Unsaturated Fat: 2g
- Trans Fat: 0g
- Carbohydrates: 15g
- Fiber: 0g
- Protein: 1g
- Cholesterol: 20mg
Essential Ingredients for Your Christmas Pinwheel Cookies
The foundation of any great cookie is quality ingredients. Fortunately, this recipe uses common pantry staples, making it accessible for bakers of all skill levels. Before you begin, it is a good idea to gather everything you need. As a result, the baking process will go much more smoothly.
For the Sugar Cookie Dough:
- All-Purpose Flour: This provides the structure for the cookies. Be sure to measure it correctly by spooning it into your measuring cup and leveling it off.
- Unsalted Butter: It’s crucial that the butter is softened to room temperature for proper creaming. Unsalted butter allows you to control the salt content, which is important for flavor. According to Healthline, understanding the different types of fats, like those in butter, can be helpful for a balanced diet.
- Granulated Sugar: This provides the sweetness and helps create a tender texture.
- Large Egg: The egg acts as a binder, holding the dough together. It should also be at room temperature.
- Vanilla Extract: Use pure vanilla extract for the best, richest flavor.
- Baking Powder: This gives the cookies a slight lift, preventing them from being too dense.
- Salt: A small amount of salt enhances all the other flavors.
For the Festive Colors:
- Red and Green Food Coloring: For the most vibrant and beautiful Christmas pinwheel cookies, it is highly recommended to use gel food coloring. It provides intense color without adding excess liquid, which could alter the dough’s consistency.
Step-by-Step Instructions for Christmas Pinwheel Cookies
Now that you have your ingredients ready, it’s time to create these festive treats. Follow these steps carefully for the best results. Remember, patience, especially during the chilling stages, is the key to success.
- Cream Butter and Sugar: In a large mixing bowl, beat the softened butter and granulated sugar with an electric mixer on medium-high speed until light and fluffy, usually about 2-3 minutes.
- Add Wet Ingredients: Next, beat in the egg and vanilla extract until they are well combined.
- Combine Dry Ingredients: In a separate bowl, whisk together the all-purpose flour, baking powder, and salt.
- Mix the Dough: Gradually add the dry ingredient mixture to the wet ingredients, mixing on low speed until just combined. Be careful not to overmix.
- Divide and Color: Divide the dough into two equal halves. Place one half back in the mixer and add green gel food coloring, mixing until the color is evenly distributed. Repeat this process with the other half of the dough using the red food coloring.
- First Chill: Form each colored dough half into a flat disk, wrap tightly in plastic wrap, and refrigerate for at least one hour. This step is crucial for making the dough easier to roll out.
- Roll Out the Dough: On a lightly floured surface, roll out the red dough into a rectangle approximately 12×9 inches. Then, do the same with the green dough, aiming for the same dimensions.
- Stack the Layers: Carefully place one rectangle of dough directly on top of the other. You can gently press them together to ensure they adhere.
- Roll the Log: Starting from one of the long sides, tightly roll the stacked dough into a log. Try to roll as tightly as possible to avoid gaps in the center of your swirl.
- Wrap and Chill Again: Wrap the finished log tightly in plastic wrap. For the cleanest cuts, it is essential to chill the log in the refrigerator for at least 4 hours, or preferably overnight. For even better results, you can freeze it for 30-60 minutes before slicing.
- Preheat and Slice: When you are ready to bake, preheat your oven to 350°F (175°C) and line baking sheets with parchment paper. Unwrap the chilled log and use a sharp knife to slice it into ¼-inch thick rounds.
- Arrange on Baking Sheet: Place the cookie slices about 2 inches apart on the prepared baking sheets.
- Bake: Bake for 10-12 minutes, or until the edges are just lightly golden. The centers should still look soft.
- Cool Completely: Let the cookies cool on the baking sheet for a few minutes before transferring them to a wire rack to cool completely. If you enjoy making colorful holiday treats, you might also love our festive Grinch Cookies.
Expert Tips for Picture-Perfect Swirls
Achieving those crisp, clean swirls is the ultimate goal when making Christmas pinwheel cookies. A few extra tricks can elevate your cookies from good to great. Therefore, paying attention to these details will make a noticeable difference.
The Importance of Chilling
We cannot stress this enough: do not skip the chilling steps. Chilling the dough after mixing makes it less sticky and much easier to roll. Subsequently, the final, long chill after rolling the log is what solidifies the butter, allowing for sharp, clean slices without squishing the design. Rushing this process will almost certainly lead to misshapen cookies that spread too much in the oven.
Achieving Uniform Rectangles
For a consistent swirl throughout the entire log, it’s important to roll both colors of dough to a similar size and thickness. A helpful trick is to roll the dough between two sheets of parchment paper. This prevents sticking and helps you guide the dough into a more precise rectangular shape. You can even use a ruler to trim the edges for perfectly straight lines before stacking.
Storing Your Cookies and Dough
Proper storage ensures your cookies stay fresh and delicious. Baked cookies can be stored in an airtight container at room temperature for up to a week. For longer storage, the unbaked dough log is your best friend. Tightly wrapped, it can be refrigerated for up to 3 days or frozen for up to 3 months. This method is a fantastic way to get a head start on holiday baking. According to the Mayo Clinic, proper food storage is key to preventing foodborne illness, which is always important to keep in mind.
Creative Variations and Flavor Combinations
While the classic red and green vanilla-flavored cookie is a timeless favorite, don’t be afraid to get creative. This recipe is wonderfully adaptable to different flavors and occasions. In addition to the classic, you could try some of these exciting variations.
- Chocolate Peppermint: Replace a few tablespoons of flour with unsweetened cocoa powder in one half of the dough. Additionally, add ¼ teaspoon of peppermint extract to the other half for a classic holiday flavor combination.
- Sprinkle Edges: Before the final chill, gently roll the outside of the log in festive sprinkles or colored sanding sugar. This adds a beautiful, crunchy border to each cookie.
- Citrus Zest: Add a teaspoon of orange or lemon zest to the dough for a bright, fresh flavor that pairs wonderfully with the buttery cookie.
- Other Holiday Themes: Use orange and black dough for Halloween, or pastel colors like pink and blue for a baby shower. The possibilities are truly endless.
Exploring different flavors is part of the fun of holiday baking. For another melt-in-your-mouth holiday option that is also wonderfully customizable, check out these Christmas Gooey Butter Cookies.
Conclusion About Christmas Pinwheel Cookies
In conclusion, baking a batch of beautiful Christmas pinwheel cookies is a rewarding and festive activity that is much easier than it looks. By following this detailed guide and paying close attention to the chilling process, you can create stunning cookies with perfect swirls. These treats are not only delicious but also a joy to share, making them an ideal choice for cookie exchanges, holiday parties, and homemade gifts. Ultimately, the vibrant colors and classic buttery taste of these cookies are sure to bring a smile to everyone’s face this holiday season. So, roll up your sleeves and get ready to add these incredible Christmas pinwheel cookies to your baking tradition.
Frequently Asked Questions About Christmas Pinwheel Cookies
Why did my Christmas pinwheel cookies spread so much and lose their shape?
The most common reason for cookies spreading is that the dough was not chilled for long enough. The butter in the dough needs to be very cold when it goes into the oven. If it’s too soft, it will melt too quickly, causing the cookies to spread and lose their defined swirl. Ensure you chill the log for at least 4 hours, or even freeze it for 30-60 minutes before slicing and baking.
Can I make the dough ahead of time?
Absolutely! This is one of the best features of this recipe. You can prepare the dough log, wrap it tightly in plastic wrap and then a layer of foil, and freeze it for up to three months. When you’re ready to bake, you can either thaw it in the refrigerator overnight or simply let it sit on the counter for about 10-15 minutes to make slicing a little easier before baking as directed.
What is the best food coloring to use for vibrant colors?
For the brightest, most saturated red and green colors, gel food coloring is the best choice. Liquid food coloring can add too much moisture to the dough, potentially changing its texture and making it sticky. Gel-based colors are highly concentrated, so a little goes a long way without affecting the consistency of your Christmas pinwheel cookies.