The holiday season brings with it a flurry of delightful baking traditions, from intricate sugar cookies to classic gingerbread. However, if you’re looking for a treat that is both incredibly delicious and wonderfully simple, then you have come to the right place. Introducing the ultimate holiday hero: Christmas Kitchen Sink Cookies. These cookies are the perfect solution for using up leftover holiday candies and pantry snacks. Furthermore, they offer a delightful explosion of sweet, salty, and crunchy in every single bite. Christmas Kitchen Sink Cookies is all about creativity, allowing you to throw in everything but the kitchen sink for a truly unique and festive treat that everyone will love.
What Exactly Are Christmas Kitchen Sink Cookies?
You might be wondering about the unusual name. “Kitchen sink” cookies get their name from the popular phrase “everything but the kitchen sink,” which perfectly describes their composition. Essentially, they are a type of cookie where a delicious, buttery base dough becomes a canvas for a wide array of mix-ins. In this case, we are giving this concept a festive makeover. Consequently, these aren’t just any kitchen sink cookies; they are specifically Christmas Kitchen Sink Cookies, loaded with holiday-themed goodies.
The foundation is typically a chewy, brown sugar cookie dough that is sturdy enough to hold a generous amount of add-ins without falling apart. From there, the magic truly begins. Instead of just standard chocolate chips, you can incorporate crushed candy canes, red and green M&Ms, salty pretzels, crunchy potato chips, and festive sprinkles. In addition, other popular choices include toffee bits, caramel chunks, and even chopped nuts. The result is a cookie that is wonderfully chaotic and incredibly satisfying. Each bite offers a different combination of textures and flavors, making them an exciting treat for any holiday party or cookie exchange.
Print
Christmas Kitchen Sink Cookies: The 15 Ultimate Mix-Ins for Holiday Perfection
These chewy, sweet-and-salty Christmas Kitchen Sink Cookies are packed with festive mix-ins like candy canes, chocolate chips, pretzels, M&Ms, and more — perfect for using up leftover holiday treats!
- Total Time: 1 hour
- Yield: 36 cookies 1x
Ingredients
For the Cookie Dough:
1 cup unsalted butter, softened
3/4 cup light brown sugar
1/2 cup granulated sugar
2 large eggs
2 teaspoons vanilla extract
2 1/4 cups all-purpose flour
1 teaspoon baking soda
1/2 teaspoon salt
Suggested Festive Mix-Ins (choose 1/4 to 1/3 cup of each):
Red and green M&Ms
Semi-sweet or dark chocolate chips
White chocolate chips
Crushed pretzels
Crushed potato chips
Toffee bits
Caramel chunks or chopped caramels
Crushed peppermint candies or candy canes
Holiday sprinkles
Rolled oats
Chopped pecans or walnuts
Dried cranberries
Instructions
1. Preheat your oven to 375°F (190°C) and line two baking sheets with parchment paper.
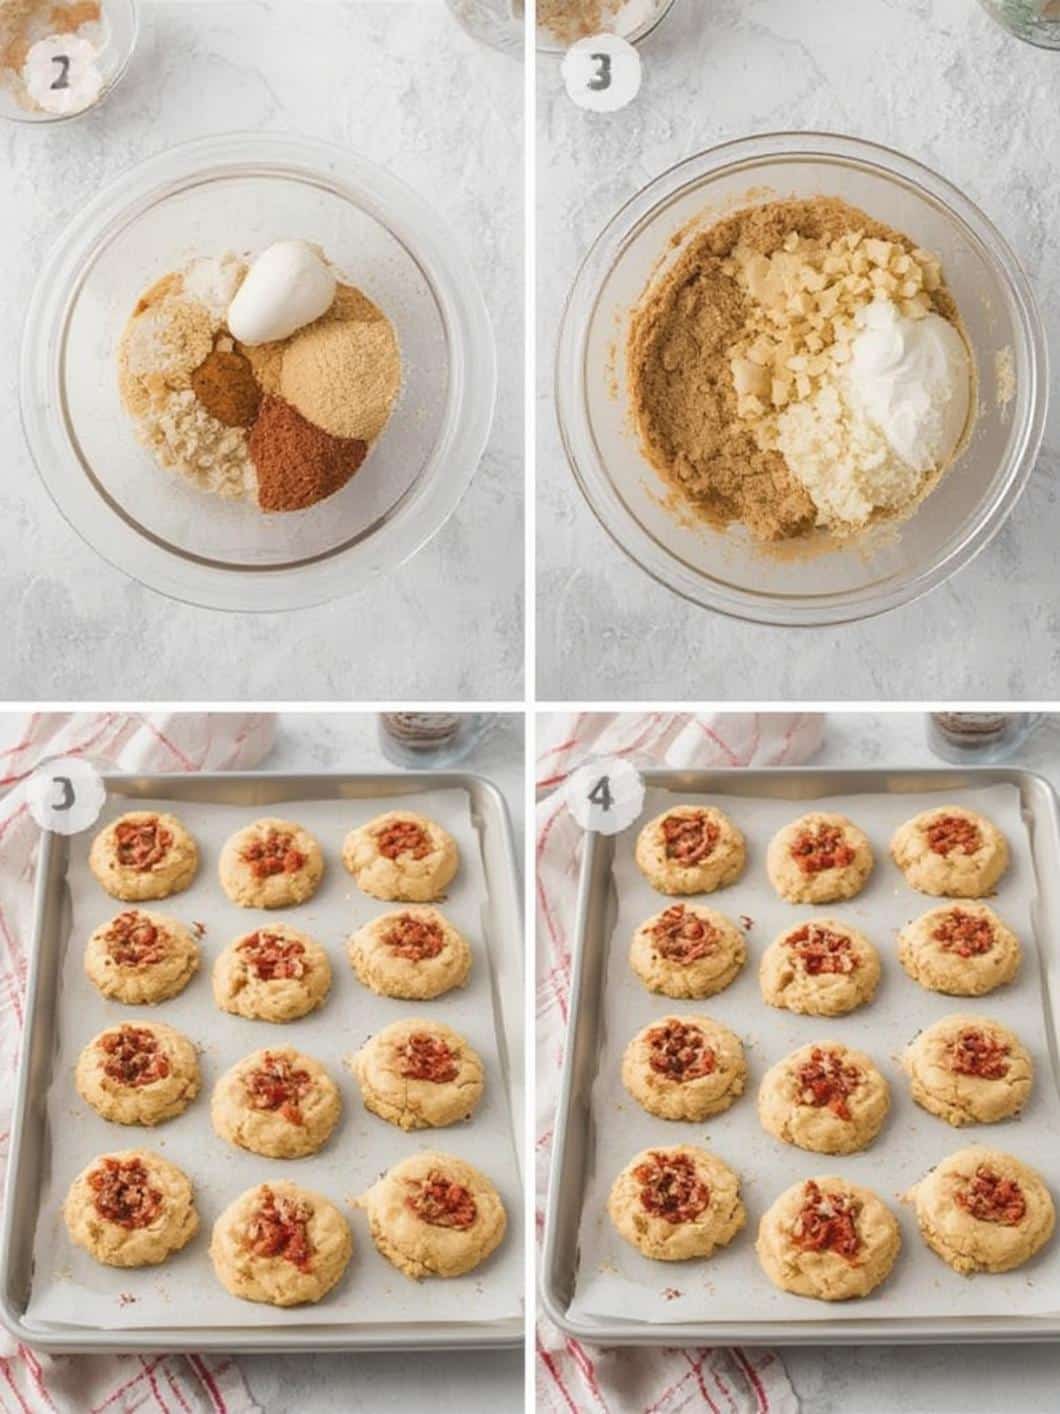
2. In a large bowl, cream together the softened butter, brown sugar, and granulated sugar until light and fluffy.
3. Add the eggs one at a time, beating well after each addition, then mix in the vanilla extract.
4. In a separate bowl, whisk together the flour, baking soda, and salt.
5. Gradually add the dry ingredients to the wet ingredients, mixing just until combined.
6. Gently fold in your chosen mix-ins using a spatula, distributing them evenly through the dough.
7. Cover the dough and refrigerate for at least 30 minutes to chill.
8. Scoop tablespoon-sized balls of dough and place them on the prepared baking sheets, spacing them about 2 inches apart.
9. Bake for 10–12 minutes, until the edges are golden and the centers are set but slightly soft.
10. Let the cookies cool on the baking sheet for 5 minutes before transferring to a wire rack to cool completely.
11. Repeat with the remaining dough, rotating sheets if needed for even baking.
12. Store cooled cookies in an airtight container at room temperature for up to 5 days.
13. To freeze, place cooled cookies in a single layer to freeze, then transfer to a container with parchment between layers.
14. For freezing unbaked dough, roll into balls and freeze; bake from frozen with 1–2 extra minutes added to the bake time.
Notes
Use a mix of textures and flavors — like crunchy pretzels and smooth caramel — to make every bite exciting.
Chill the dough to prevent spreading and ensure thick, chewy cookies.
Avoid overbaking; remove cookies when centers are still soft.
To keep cookies fresh longer, store them with a slice of bread in the container.
Add a pinch of cinnamon or nutmeg to the dough for extra holiday warmth.
- Prep Time: 20 minutes
- Cook Time: 12 minutes
- Category: Dessert
- Method: Baking
- Cuisine: American
- Diet: Vegetarian
Nutrition
- Serving Size: 1 cookie
- Calories: 210
- Sugar: 17g
- Sodium: 105mg
- Fat: 11g
- Saturated Fat: 6g
- Unsaturated Fat: 4g
- Trans Fat: 0g
- Carbohydrates: 26g
- Fiber: 1g
- Protein: 2g
- Cholesterol: 30mg
Why Christmas Kitchen Sink Cookies Is a Holiday Must-Have
There are countless reasons why these cookies should be at the top of your holiday baking list. Not only are they delicious, but they also offer a level of fun and flexibility that many other traditional recipes lack. As a result, they quickly become a family favorite.
Perfectly Customizable
First and foremost, the beauty of Christmas Kitchen Sink Cookies lies in their adaptability. You can truly make them your own. Do you have half a bag of pretzels going stale in the pantry? Throw them in. Are there leftover candy canes from decorating the tree? Crush them up and add them to the dough. Christmas Kitchen Sink Cookies is an excellent way to clean out your pantry after holiday festivities. Furthermore, you can cater the mix-ins to your family’s specific tastes. If you love white chocolate and cranberries, for instance, you can easily incorporate those flavors for a result reminiscent of our delicious Cranberry Bliss Bars.
A Fun Family Activity
In addition to being customizable, making these cookies is a fantastic activity to do with kids. You can set out several bowls of different mix-ins and let them create their own signature cookie combinations. For example, one child might love a mix of potato chips and chocolate, while another might prefer caramel and pretzels. This hands-on approach not only makes baking more engaging for little ones but also creates wonderful holiday memories. It’s a fun, low-stress baking project, much like making Classic Candy Cane Cookies, where the process is just as enjoyable as the final product.
The Ultimate Salty and Sweet Treat
Finally, the flavor profile of Christmas Kitchen Sink Cookies is simply unbeatable. The combination of sweet ingredients like chocolate and caramel with salty ones like pretzels and potato chips creates a complex and addictive taste. This balance prevents the cookies from being overly sweet, which is a common issue with holiday treats. Consequently, even those who don’t have a huge sweet tooth will find themselves reaching for a second, or even a third, cookie. The variety of textures, from the chewy cookie base to the crunchy add-ins, further enhances the eating experience, making each bite a delightful surprise.
Essential Ingredients for Your Christmas Kitchen Sink Cookies
To create the best Christmas Kitchen Sink Cookies, you need a solid base and an exciting assortment of festive mix-ins. The dough itself is simple, ensuring that the additions are the true stars of the show.
For the Cookie Base
- Unsalted Butter: Make sure it’s softened to room temperature for proper creaming.
- Light Brown Sugar and Granulated Sugar: This combination provides both chewiness and a crisp edge.
- Large Eggs: These act as a binder for the dough.
- Vanilla Extract: For a classic, warm flavor foundation.
- All-Purpose Flour: The main structure of your cookie.
- Baking Soda: This is the leavening agent that helps the cookies rise.
- Salt: To balance the sweetness and enhance all the other flavors.
Our Favorite Festive Mix-Ins
Here is where you can let your creativity shine. While you can use anything you have on hand, here are some of our favorite additions for truly spectacular Christmas Kitchen Sink Cookies. Many of these ingredients can contribute to a balanced diet, as noted by health experts at Healthline, especially when using dark chocolate or whole nuts.
- Red and Green M&Ms
- Semi-Sweet or Dark Chocolate Chips
- White Chocolate Chips
- Crushed Pretzels (for that perfect salty crunch)
- Crushed Potato Chips (a surprising but amazing addition)
- Toffee Bits
- Caramel Chunks or Chopped Caramels
- Crushed Peppermint Candies or Candy Canes
- Holiday Sprinkles (Jimmies or Nonpareils)
- Rolled Oats (for extra chewiness and texture)
- Chopped Nuts (Pecans or Walnuts work beautifully)
- Dried Cranberries
Step-by-Step Instructions To Make Christmas Kitchen Sink Cookies
Now that you have your ingredients ready, let’s get baking! This process is straightforward, making it perfect for bakers of all skill levels.
First, preheat your oven to 375°F (190°C) and line two large baking sheets with parchment paper. This prevents the cookies from sticking and makes cleanup a breeze.
Next, in a large mixing bowl, use an electric mixer to cream together the softened butter, brown sugar, and granulated sugar until the mixture is light and fluffy. This step is crucial for achieving a tender cookie texture. After that, beat in the eggs one at a time, followed by the vanilla extract, mixing well after each addition.
In a separate, medium-sized bowl, whisk together the all-purpose flour, baking soda, and salt. Then, gradually add this dry mixture to the wet ingredients, mixing on low speed until just combined. Be careful not to overmix the dough at this stage.
Now for the best part: folding in the mix-ins. Gently stir in your chosen combination of M&Ms, pretzels, chocolate chips, and any other goodies you’ve selected for your Christmas Kitchen Sink Cookies. Use a spatula to ensure they are evenly distributed throughout the dough.
For the best results, cover the bowl with plastic wrap and chill the dough in the refrigerator for at least 30 minutes. This step is highly recommended as it helps prevent the cookies from spreading too much in the oven.
Finally, drop rounded tablespoons of the chilled dough onto the prepared baking sheets, leaving about two inches of space between each cookie. Bake for 10-12 minutes, or until the edges are golden brown and the centers are set. Let the cookies cool on the baking sheet for a few minutes before transferring them to a wire rack to cool completely.
Pro Tips for Cookie Perfection
To ensure your cookies turn out perfectly every time, here are a few expert tips to keep in mind. These small adjustments can make a big difference in the final product.
Don’t Overmix the Dough
Once you add the flour mixture, mix only until you no longer see streaks of flour. Overmixing develops the gluten in the flour, which can result in tough, dense cookies instead of soft and chewy ones. Therefore, always mix on low speed and finish by hand with a spatula if necessary.
The Importance of Chilling
Chilling the dough is a game-changer. It solidifies the fat (butter) in the cookies. As a result, when the cookies bake, the fat takes longer to melt, which means the cookies spread less. This step ensures thicker, chewier cookies and also allows the flavors to meld together more deeply. Even 30 minutes in the fridge can significantly improve your Christmas Kitchen Sink Cookies.
Get Creative with Add-ins
Don’t be afraid to experiment with your mix-ins. The base dough is incredibly versatile and works well with a wide range of ingredients. For instance, consider adding a pinch of cinnamon or nutmeg for extra warmth. You could also try different types of candy, like the ones found in our Twix Cookies recipe, for a unique twist.
Storage and Make-Ahead Guide
Proper storage is key to keeping your cookies fresh and delicious. To store baked Christmas Kitchen Sink Cookies, place them in an airtight container at room temperature. They will stay fresh for up to five days. For an extra soft texture, you can add a slice of bread to the container; the cookies will absorb the moisture from the bread.
These cookies also freeze exceptionally well. You can freeze the baked cookies by placing them in a single layer on a baking sheet until solid, then transferring them to a freezer-safe bag or container. They will last for up to three months. Alternatively, you can freeze the cookie dough. Simply roll the dough into balls, freeze them on a baking sheet, and then store them in a freezer bag. You can bake them directly from frozen; just add a few extra minutes to the baking time. When handling and storing food, it’s always important to follow food safety guidelines, like those provided by the Mayo Clinic, to prevent illness.
Conclusion About Christmas Kitchen Sink Cookies

In summary, Christmas Kitchen Sink Cookies are the perfect holiday treat for anyone looking for a fun, flexible, and incredibly delicious recipe. Their unique combination of sweet and salty flavors, along with a delightful mix of textures, makes them an instant crowd-pleaser. Furthermore, their customizable nature means you can create a new version every time you bake. So, this holiday season, gather your favorite festive mix-ins, get the whole family involved, and bake a batch of these unforgettable cookies.
Frequently Asked Questions About Christmas Kitchen Sink Cookies
Can I make these Christmas Kitchen Sink Cookies gluten-free?
Yes, you certainly can. To make these cookies gluten-free, simply substitute the all-purpose flour with a high-quality, cup-for-cup gluten-free flour blend. Also, ensure that all of your mix-ins, such as oats and pretzels, are certified gluten-free to avoid cross-contamination. According to WebMD, reading labels is crucial for a gluten-free diet.
What are the best pretzels to use?
For the best texture, we recommend using thin pretzel twists or sticks. Break them into small, bite-sized pieces before adding them to the dough. This ensures you get a bit of salty crunch in every bite without overwhelming the other flavors. Avoid using large, soft pretzels as they will not provide the desired crunch.
How do I keep my cookies soft and chewy?
The key to soft and chewy cookies is to avoid overbaking them. Pull them out of the oven when the edges are golden brown, but the centers still look slightly underdone. They will continue to bake on the hot cookie sheet after you remove them from the oven. Using a good amount of brown sugar and chilling the dough also contribute significantly to a chewy texture.