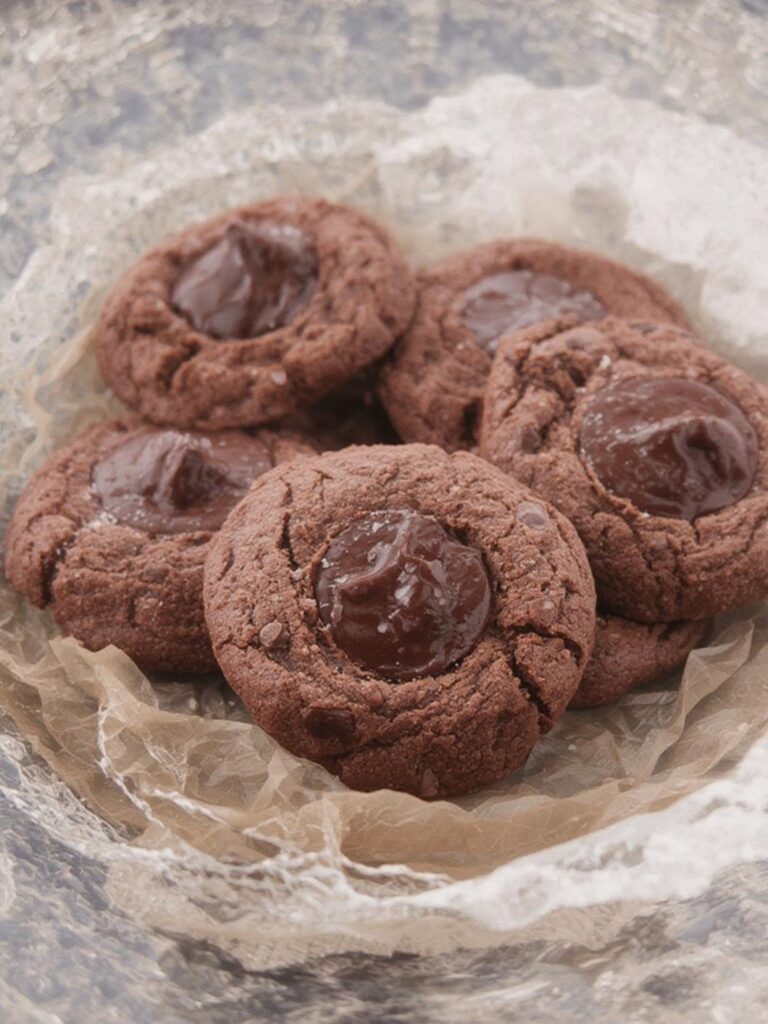
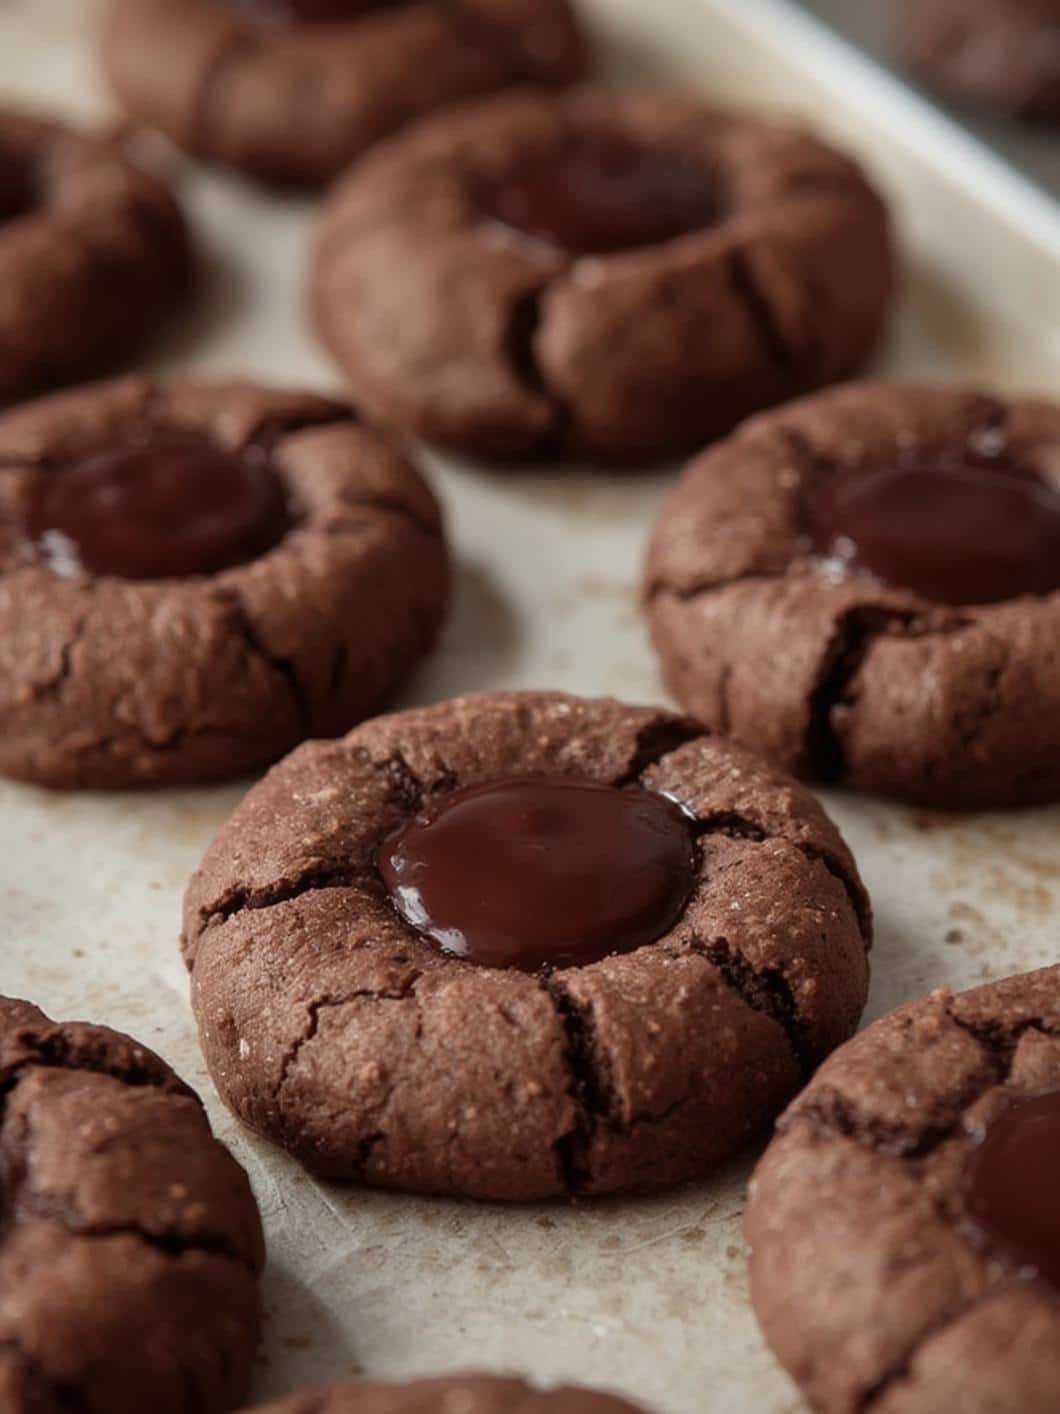
There are few things more comforting than the aroma of freshly baked cookies filling your home. Moreover, when those cookies are rich, buttery, and filled with a decadent chocolate center, you know you have a winning recipe. Today, we are diving deep into the world of classic **Chocolate Thumbprint Cookies**. These delightful treats are a staple for holiday cookie platters, bake sales, and cozy afternoons with a cup of coffee. Consequently, this guide will provide you with everything you need to know to create the most perfect, melt-in-your-mouth cookies every single time. Whether you’re a seasoned baker or just starting, this recipe is designed to be straightforward and incredibly rewarding.
These cookies get their name from the signature indentation made in the center of the dough ball, traditionally with a thumb. This little well is then filled with all sorts of delicious things, but for this recipe, we’re focusing on a rich chocolate ganache. As a result, you get a beautiful contrast between the tender, crumbly cookie and the smooth, creamy filling. Furthermore, making **Chocolate Thumbprint Cookies** is a wonderful activity to share with family, as kids especially love helping to make the thumbprints.
Why You’ll Adore Chocolate Thumbprint Cookies
First and foremost, this recipe for **Chocolate Thumbprint Cookies** is incredibly simple to follow. The ingredients are pantry staples, which means you can likely whip up a batch whenever a craving strikes. In addition, the dough comes together quickly and doesn’t require any complicated techniques. This makes it an accessible choice for bakers of all skill levels.
Another reason to love these cookies is their versatility. While we’re filling them with a classic chocolate ganache, you can easily customize them to your liking. For example, you could use caramel, raspberry jam, or even a dollop of peanut butter. This flexibility makes them a fantastic addition to any cookie exchange. If you are looking for other classic holiday treats, you might also enjoy these traditional Italian Christmas cookies, which offer a wonderful variety for your festive baking.
Finally, the texture and flavor are simply unbeatable. The cookie base is a rich chocolate shortbread that is buttery and tender, providing the perfect foundation. Subsequently, the smooth, decadent chocolate filling adds a luxurious touch that elevates these simple cookies into something truly special. These **Chocolate Thumbprint Cookies** are guaranteed to be a hit with everyone who tries them.
Print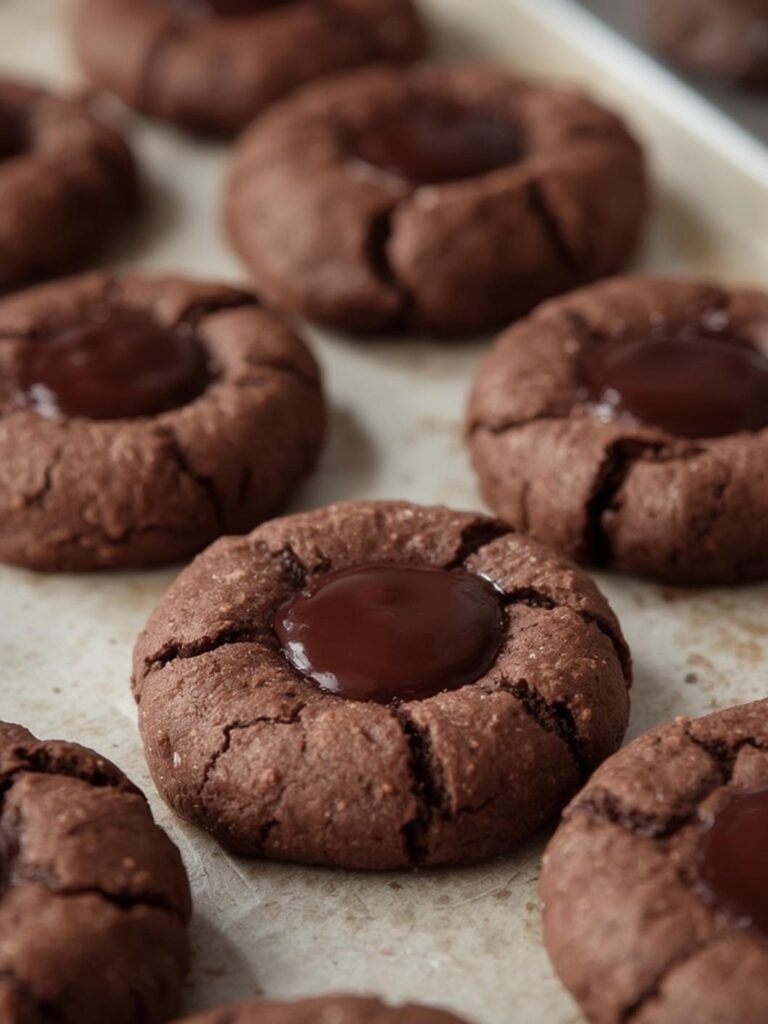
Chocolate Thumbprint Cookies: The 10 Ultimate Steps for a Perfect Batch
Rich, buttery chocolate shortbread cookies with a smooth, decadent ganache center — these Chocolate Thumbprint Cookies are the perfect balance of texture and flavor for the holidays or any time of year.
- Total Time: 1 hour
- Yield: 24 cookies 1x
Ingredients
For the Cookie Dough:
1 1/4 cups all-purpose flour
1/3 cup unsweetened cocoa powder
1/2 teaspoon baking soda
1/4 teaspoon salt
1/2 cup unsalted butter, softened
1/3 cup granulated sugar
1/3 cup packed light brown sugar
1 large egg yolk
1 teaspoon vanilla extract
For the Chocolate Ganache Filling:
1/2 cup semi-sweet chocolate chips
1/4 cup heavy cream
Instructions
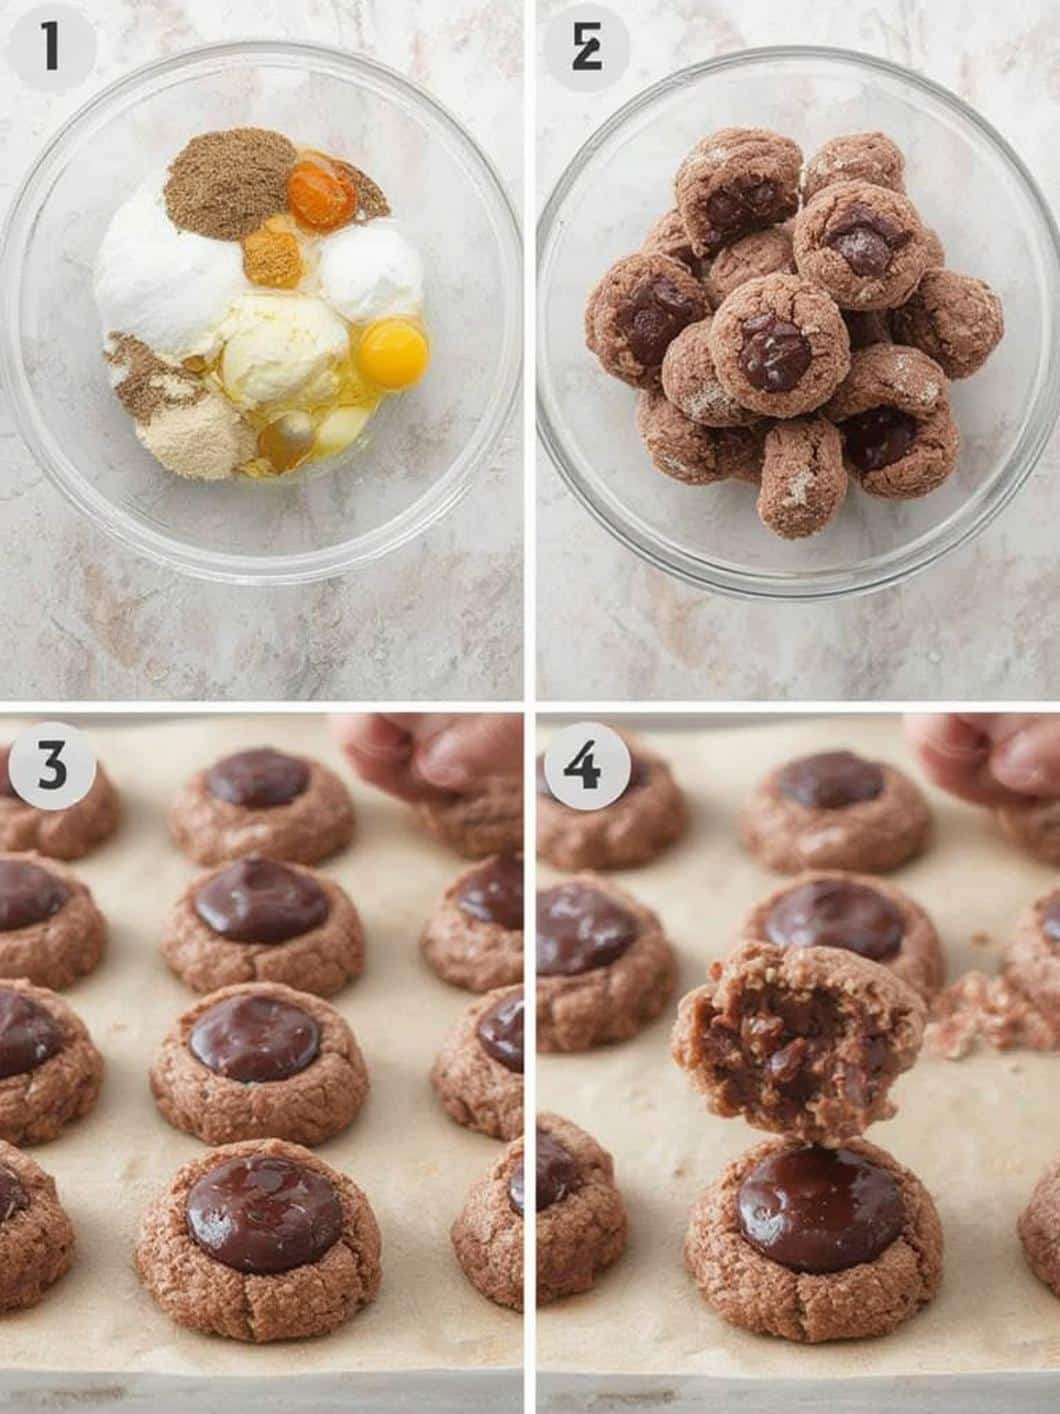
1. In a medium bowl, whisk together the flour, cocoa powder, baking soda, and salt. Set aside.
2. In a large mixing bowl, cream the softened butter, granulated sugar, and brown sugar until light and fluffy, about 2–3 minutes.
3. Add the egg yolk and vanilla extract, and beat until just combined.
4. Gradually add the dry ingredients to the wet ingredients and mix on low speed until a dough forms. Do not overmix.
5. Cover the bowl with plastic wrap and chill the dough in the refrigerator for at least 30 minutes.
6. Preheat the oven to 350°F (175°C) and line two baking sheets with parchment paper.
7. Roll chilled dough into 1-inch balls and place them 2 inches apart on the prepared baking sheets.
8. Use your thumb or the back of a small spoon to gently press an indentation into the center of each ball.
9. Bake for 10–12 minutes, or until the edges are set. If needed, re-press the centers immediately after baking.
10. Allow cookies to cool on the baking sheet for 5 minutes before transferring to a wire rack to cool completely.
11. To make the ganache, heat the heavy cream in a small saucepan until just simmering, then pour over chocolate chips in a bowl.
12. Let sit for 5 minutes, then stir until smooth. Spoon or pipe ganache into the centers of the cooled cookies and let set.
Notes
Use Dutch-processed cocoa for a deeper chocolate flavor and smoother texture.
Re-press the indentations right after baking if they puff up.
For perfect ganache, allow the cream to just simmer before pouring it over the chocolate.
Let ganache set at room temperature for 1 hour before storing cookies.
Cookies can be stored at room temperature in an airtight container for up to 5 days.
- Prep Time: 20 minutes
- Cook Time: 12 minutes
- Category: Dessert
- Method: Baking
- Cuisine: American
- Diet: Vegetarian
Nutrition
- Serving Size: 1 cookie
- Calories: 160
- Sugar: 10g
- Sodium: 65mg
- Fat: 10g
- Saturated Fat: 6g
- Unsaturated Fat: 3g
- Trans Fat: 0g
- Carbohydrates: 17g
- Fiber: 1g
- Protein: 2g
- Cholesterol: 25mg
Essential Ingredients You Will Need For Chocolate Thumbprint Cookies
Gathering your ingredients before you begin is a key step for a smooth baking process. Fortunately, the components for these **Chocolate Thumbprint Cookies** are common and easy to find. Here is what you will need for this recipe:
- All-Purpose Flour
- Unsweetened Cocoa Powder
- Baking Soda
- Salt
- Unsalted Butter, softened
- Granulated Sugar
- Light Brown Sugar, packed
- Egg Yolk
- Vanilla Extract
- Heavy Cream
- Semi-Sweet Chocolate Chips
A Note on Cocoa Powder
The type of cocoa powder you use will significantly impact the flavor of your **Chocolate Thumbprint Cookies**. For a deep, rich chocolate taste, Dutch-processed cocoa powder is an excellent choice. It has a smoother, less acidic flavor compared to natural cocoa powder. However, if you only have natural cocoa powder on hand, it will still produce a delicious cookie. The key is to use a quality product for the best results. Beyond flavor, certain types of cocoa, especially those found in dark chocolate, contain flavonoids, which according to Healthline, may have antioxidant benefits.
Choosing Your Chocolate Filling
For the filling, we recommend using semi-sweet chocolate chips to create a simple yet elegant ganache. This type of chocolate provides a balanced sweetness that complements the cookie base perfectly. If you prefer a more intense flavor, you could certainly use bittersweet chocolate. On the other hand, for a sweeter, creamier filling, milk chocolate chips are a great alternative. The choice ultimately comes down to your personal preference. For a different take on a rich chocolate cookie, you could explore these chocolate peppermint brownie cookies for another festive option.
Step-by-Step Instructions for Making Chocolate Thumbprint Cookies
Now that you have your ingredients ready, it’s time to start baking. Following these steps carefully will ensure your **Chocolate Thumbprint Cookies** turn out perfectly.
- Prepare Your Dry Ingredients: First, in a medium bowl, whisk together the all-purpose flour, unsweetened cocoa powder, baking soda, and salt. Whisking helps to aerate the ingredients and ensures they are evenly distributed. Then, set this bowl aside for later.
- Cream Butter and Sugars: Next, in the bowl of a stand mixer fitted with a paddle attachment, or in a large bowl with a hand mixer, beat the softened unsalted butter, granulated sugar, and light brown sugar together on medium-high speed until the mixture is light and fluffy. This process usually takes about 2-3 minutes.
- Add Egg Yolk and Vanilla: After creaming the butter and sugar, add the egg yolk and vanilla extract. Beat on medium speed until they are just combined. Remember to scrape down the sides of the bowl to ensure everything is well incorporated.
- Combine Wet and Dry Ingredients: With the mixer on low speed, gradually add the dry ingredient mixture to the wet ingredients. Mix until just combined, being careful not to overmix the dough. Overmixing can result in tough cookies.
- Chill the Dough: Subsequently, cover the bowl with plastic wrap and chill the dough in the refrigerator for at least 30 minutes. Chilling the dough is a crucial step; it helps prevent the cookies from spreading too much during baking and makes the dough easier to handle.
- Shape the Cookies: Once chilled, preheat your oven to 350°F (175°C) and line two baking sheets with parchment paper. Scoop the dough and roll it into 1-inch balls. Place the balls about 2 inches apart on the prepared baking sheets.
- Create the Thumbprints: Using your thumb or the back of a small round measuring spoon (like a 1/2 teaspoon), gently press an indentation into the center of each dough ball. This creates the well for your chocolate filling.
- Bake the Cookies: Bake the cookies for 10-12 minutes, or until the edges are set. Immediately after removing them from the oven, you may need to gently press the centers again if they have puffed up during baking. Let the cookies cool on the baking sheet for a few minutes before transferring them to a wire rack to cool completely.
- Make the Chocolate Ganache: While the cookies are cooling, prepare the filling. Place the semi-sweet chocolate chips in a heatproof bowl. Then, heat the heavy cream in a small saucepan over medium heat until it just begins to simmer. Pour the hot cream over the chocolate chips and let it sit for 5 minutes without stirring. After 5 minutes, stir the mixture until it becomes a smooth, glossy ganache.
- Fill and Set: Finally, spoon or pipe the warm ganache into the indentations of each cooled cookie. Let the **Chocolate Thumbprint Cookies** sit at room temperature for about an hour, or until the ganache is set.
Tips and Tricks for Chocolate Thumbprint Cookies
Even with a straightforward recipe, a few extra tips can make a big difference. Here are some tricks to ensure your **Chocolate Thumbprint Cookies** are flawless.
Achieving the Perfect Thumbprint
Sometimes, the dough can crack around the edges when you make the indentation. To prevent this, make sure your dough balls are smooth before you press them. If cracks do appear, you can gently smooth them over with your fingers before baking. Additionally, pressing the indentations right after the cookies come out of the oven can help redefine the well if it has lost its shape.
Storing Your Cookies
Proper storage is essential to keep your cookies fresh. Once the ganache has fully set, you can store your **Chocolate Thumbprint Cookies** in an airtight container at room temperature for up to 5 days. For longer storage, it’s best to keep them in the refrigerator. For more information on safe food storage practices, you can consult resources from the Mayo Clinic to ensure your treats stay safe to eat.
Freezing Instructions
These cookies also freeze beautifully, making them a great make-ahead option. You can freeze the baked, unfilled cookies for up to 3 months. Simply let them cool completely, then place them in a single layer in a freezer-safe container. When you’re ready to serve them, thaw the cookies at room temperature and then prepare and add the ganache filling. This is a fantastic strategy for holiday baking, much like preparing dough for Christmas pinwheel cookies in advance.
Conclusion About Chocolate Thumbprint Cookies
In summary, this recipe for **Chocolate Thumbprint Cookies** is a delightful journey into classic baking. With their rich chocolate flavor and tender, buttery texture, they are sure to become a new favorite in your household. The process is simple, from mixing the straightforward dough to creating the decadent ganache filling. Furthermore, their versatility allows for endless customization, making them perfect for any occasion, especially during the holidays. Ultimately, baking a batch of these cookies is a rewarding experience that yields a delicious and impressive treat for everyone to enjoy.
Frequently Asked Questions About Chocolate Thumbprint Cookies
Why did my cookies spread too much?
Excessive spreading is often caused by dough that is too warm or butter that is too soft. Chilling the dough for at least 30 minutes before baking is the most effective way to prevent this. Also, ensure your butter is softened to room temperature but not melted.
Can I make this recipe gluten-free?
Yes, you can adapt this recipe to be gluten-free. Simply substitute the all-purpose flour with a high-quality 1-to-1 gluten-free baking flour blend that contains xanthan gum. The texture might be slightly different, but the **Chocolate Thumbprint Cookies** will still be delicious.
Can I use a different filling besides chocolate ganache?
Absolutely! That’s one of the best things about thumbprint cookies. You can fill them with caramel, seedless raspberry jam, Nutella, or even a cream cheese frosting. Just be sure to add the filling after the cookies have baked and cooled slightly.