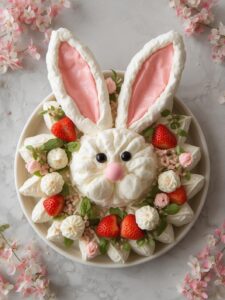
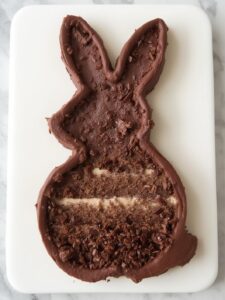
Get ready to create the ultimate showstopper for your Easter celebration! The Chocolate Bunny Silhouette Layer Cake is more than just a dessert; it’s a stunning centerpiece that tastes as incredible as it looks. This cake features layers of rich, moist chocolate cake enveloped in a fluffy vanilla buttercream frosting. However, the true magic lies in the clever silhouette of a bunny, created with a dusting of cocoa powder, that makes this treat uniquely festive. Consequently, it’s the perfect project for bakers of all skill levels who want to impress their family and friends. This guide will walk you through every step, ensuring your baking experience is both fun and successful, resulting in a delicious masterpiece.
What Makes This Cake a Holiday Favorite?
There are many reasons why this particular cake has become a go-to for spring festivities. First and foremost, its visual appeal is undeniable. The contrast between the crisp, dark chocolate bunny silhouette and the creamy white frosting creates a striking and elegant design. Furthermore, it’s a sophisticated take on a classic holiday theme, moving beyond simple sprinkles and pastel colors. As a result, it appeals to both children and adults alike.
Beyond its looks, the flavor profile is a timeless classic. The deep, decadent flavor of the chocolate cake is perfectly balanced by the sweet and light vanilla buttercream. Each bite offers a delightful combination of moist cake and smooth frosting that simply melts in your mouth. In addition, this recipe is surprisingly straightforward, using a simple stenciling technique to achieve its professional-looking design. Therefore, you don’t need to be a pastry chef to create this beautiful Chocolate Bunny Silhouette Layer Cake. It’s a dessert that brings joy and a sense of accomplishment, making your holiday gathering even more memorable.
Print
Chocolate Bunny Silhouette Layer Cake
A showstopper Easter dessert featuring layers of rich, moist chocolate cake enveloped in a fluffy vanilla buttercream, decorated with a clever bunny silhouette made from cocoa powder.
- Total Time: 2 hours 35 minutes
- Yield: 12 servings
Ingredients
All-purpose flour
Granulated sugar
Unsweetened cocoa powder
Baking soda
Baking powder
Salt
Large eggs, at room temperature
Buttermilk, at room temperature
Vegetable oil
Vanilla extract
Hot brewed coffee or hot water
Unsalted butter, softened
Powdered sugar, sifted
Heavy cream or whole milk
Cocoa powder, for dusting
Instructions
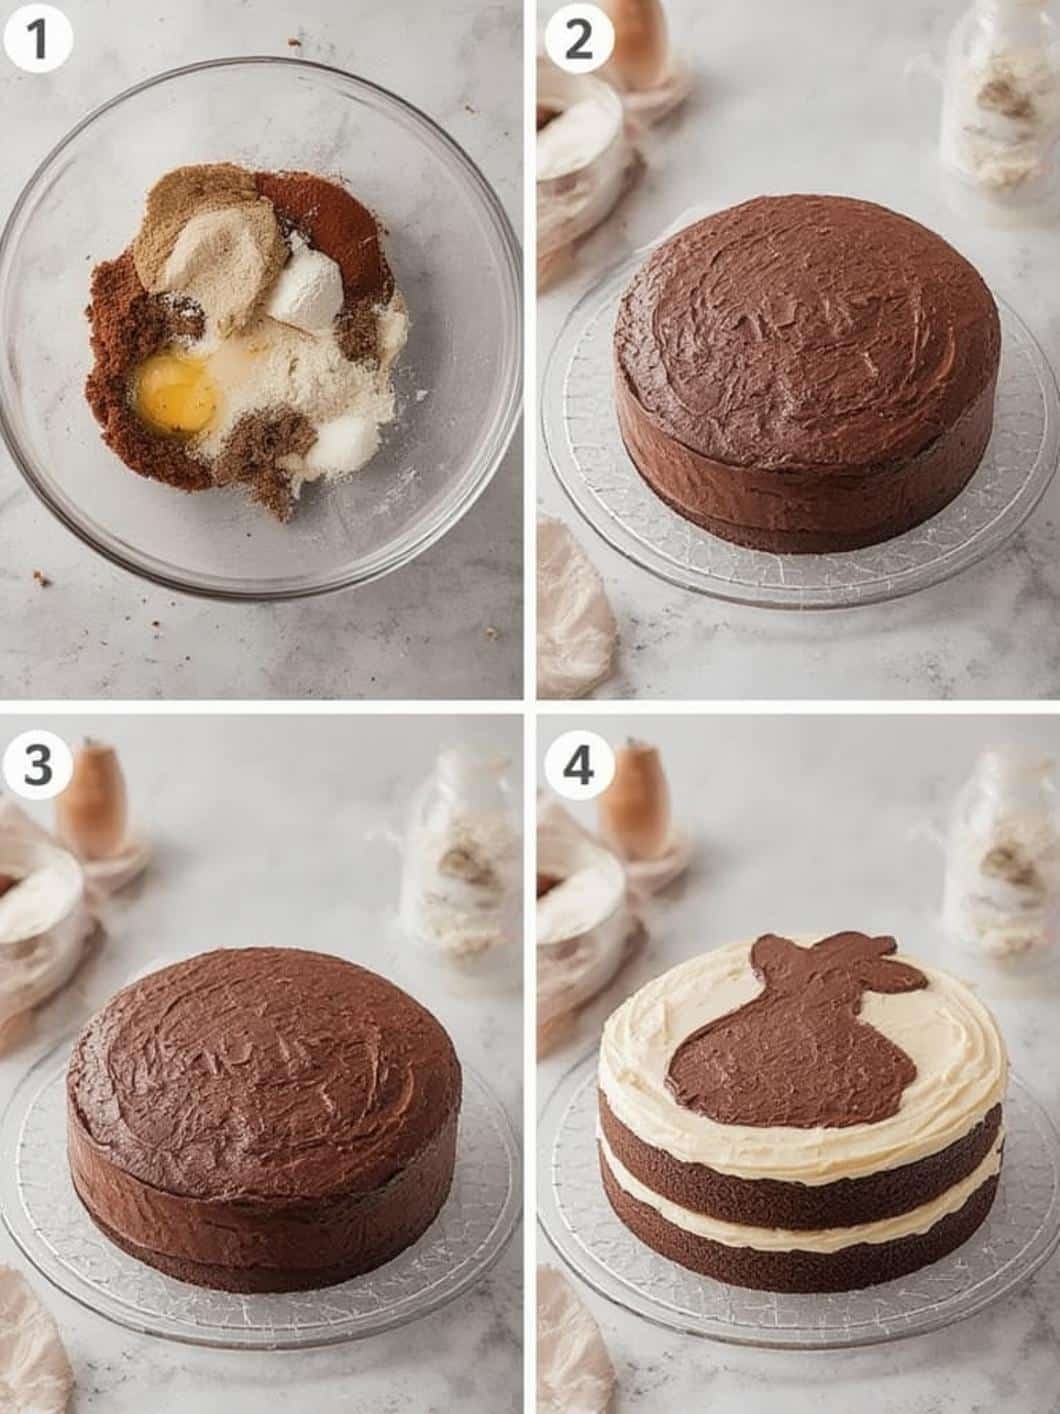
1. Preheat oven to 350°F (175°C) and prepare two 8-inch or 9-inch round cake pans.
2. In a large bowl, whisk together the flour, sugar, cocoa powder, baking soda, baking powder, and salt.
3. In a separate bowl, mix the eggs, buttermilk, oil, and vanilla.
4. Add the wet ingredients to the dry, mixing on low until just combined, then slowly mix in the hot coffee until smooth.
5. Divide batter between pans and bake for 30-35 minutes, or until a toothpick inserted into the center comes out clean.
6. Cool cakes in pans for 15 minutes before inverting onto a wire rack to cool completely.
7. To make the frosting, beat softened butter until light and creamy, about 3-4 minutes.
8. Gradually add powdered sugar on low speed, then add vanilla and salt.
9. Slowly add cream and beat on medium-high for 3-5 minutes until light and fluffy.
10. To assemble, place one cake layer on a plate and top with a layer of frosting.
11. Place the second cake layer on top and cover the entire cake with a thin crumb coat of frosting.
12. Refrigerate for at least 30 minutes to set the crumb coat.
13. Apply a final, smooth layer of frosting over the entire cake and chill until firm.
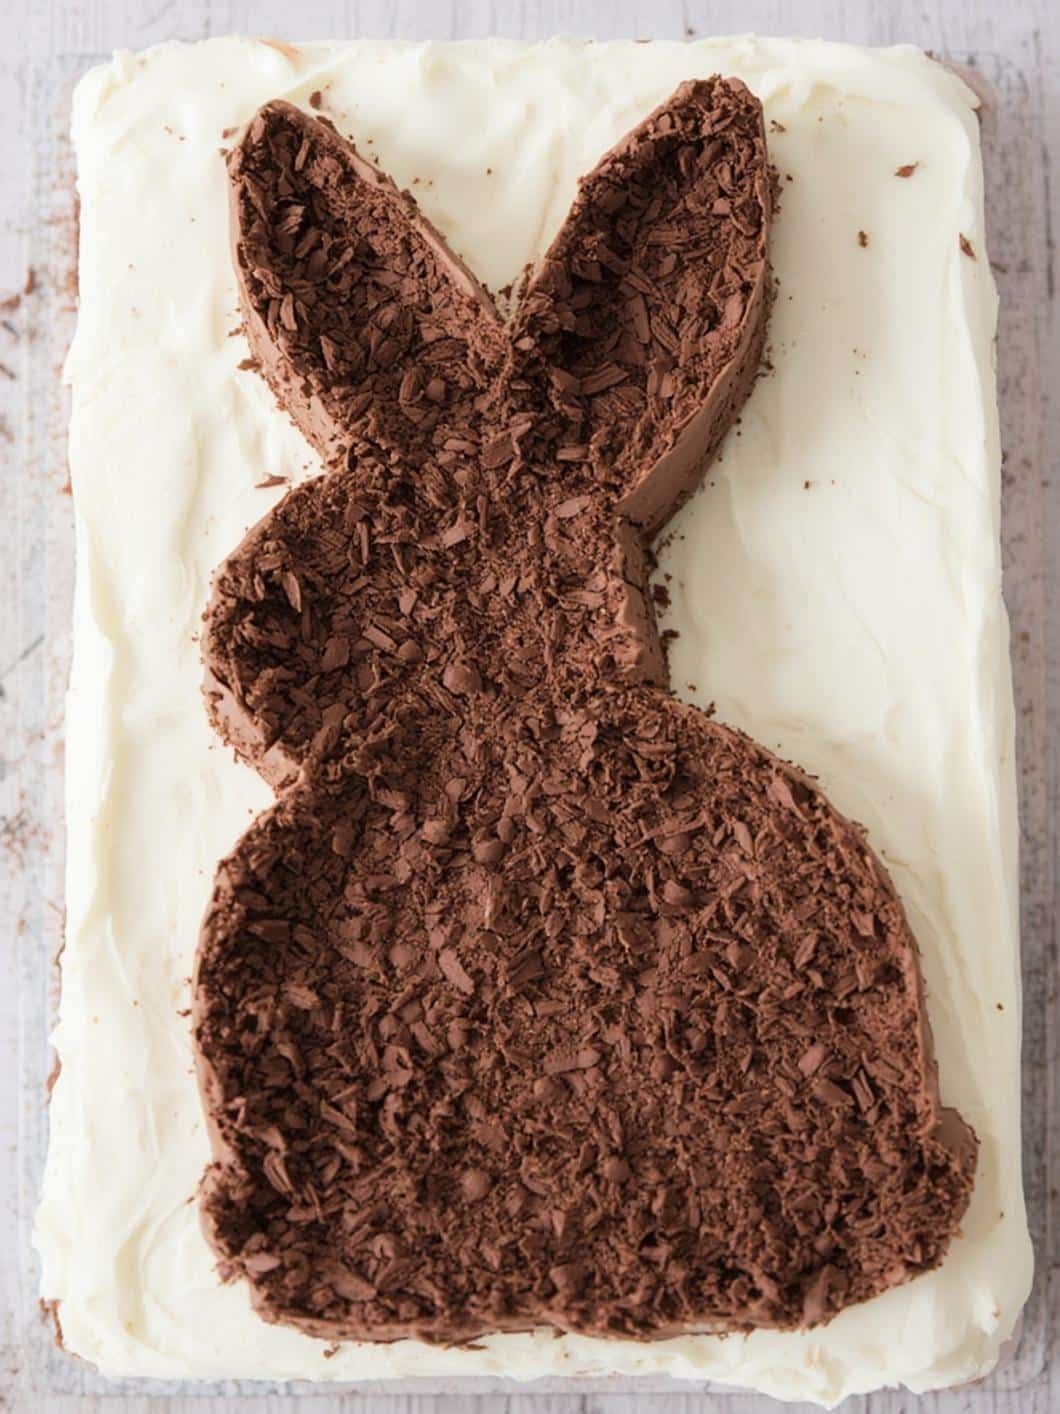
14. Gently place a bunny stencil on the cake’s center and dust the top with cocoa powder using a fine-mesh sieve.
15. Carefully lift the stencil straight up to reveal the clean bunny silhouette.
Notes
For the sharpest silhouette, ensure the final frosting layer is well-chilled and firm before stenciling. Using room temperature ingredients for the cake and frosting will result in a better texture. The cake can be made a day in advance.
- Prep Time: 30 minutes
- Cook Time: 35 minutes
- Category: Dessert
- Method: Baking
- Cuisine: American
Nutrition
- Serving Size: 1 slice
- Calories: 450
- Sugar: 42g
- Sodium: 350mg
- Fat: 25g
- Saturated Fat: 14g
- Unsaturated Fat: 11g
- Trans Fat: 0.5g
- Carbohydrates: 58g
- Fiber: 3g
- Protein: 5g
- Cholesterol: 85mg
Gathering Your Ingredients and Tools
Before you begin the baking process, it’s essential to gather all your ingredients and tools. This practice, known as ‘mise en place,’ ensures a smooth and stress-free experience in the kitchen. Consequently, you can focus on the joy of creating your beautiful cake rather than searching for a missing ingredient.
For the Moist Chocolate Cake Layers:
The foundation of this cake is its rich, tender crumb. Using high-quality ingredients will make a significant difference in the final taste and texture. For example, using good cocoa powder can even provide some health benefits, as noted in studies about dark chocolate’s antioxidants, which you can read more about on Healthline.
- All-purpose flour
- Granulated sugar
- Unsweetened cocoa powder (Dutch-process preferred for a darker color and richer flavor)
- Baking soda and baking powder
- Salt
- Large eggs, at room temperature
- Buttermilk, at room temperature (this adds incredible moisture)
- Vegetable oil
- Vanilla extract
- Hot brewed coffee or hot water (this enhances the chocolate flavor)
For the Fluffy Vanilla Buttercream:
This frosting is light, creamy, and not overly sweet, making it the perfect complement to the rich chocolate cake.
- Unsalted butter, softened to room temperature
- Powdered sugar, sifted to remove lumps
- Heavy cream or whole milk
- Vanilla extract
- A pinch of salt to balance the sweetness
Essential Tools and Equipment:
Having the right tools on hand will make assembling your Chocolate Bunny Silhouette Layer Cake much easier.
- Two 8-inch or 9-inch round cake pans
- Parchment paper
- Mixing bowls
- Electric mixer (stand or hand mixer)
- Whisk and spatula
- Wire cooling rack
- Offset spatula or bench scraper for frosting
- Cake turntable (optional, but very helpful)
- Bunny silhouette template (printed on cardstock and cut out)
- Fine-mesh sieve for dusting cocoa powder
Step-by-Step Instructions for the Perfect Chocolate Bunny Silhouette Layer Cake
Now that you have everything ready, it’s time to start creating your masterpiece. Follow these instructions carefully for a flawless result. Remember to take your time and enjoy the process.
Preparing the Chocolate Cake Layers
First, preheat your oven to 350°F (175°C). Next, grease and flour your cake pans, then line the bottoms with parchment paper. In a large bowl, whisk together the flour, sugar, cocoa powder, baking soda, baking powder, and salt. In a separate bowl, mix the eggs, buttermilk, oil, and vanilla extract. Gradually add the wet ingredients to the dry ingredients, mixing on low speed until just combined. Be careful not to overmix. Finally, slowly pour in the hot coffee or water and mix until the batter is smooth and thin. Divide the batter evenly between the prepared pans. Bake for 30-35 minutes, or until a toothpick inserted into the center comes out clean. Let the cakes cool in the pans for about 15 minutes before inverting them onto a wire rack to cool completely.
Making the Silky Smooth Frosting
While the cakes are cooling, you can prepare the vanilla buttercream. In the bowl of a stand mixer fitted with the paddle attachment, or using a hand mixer, beat the softened butter on medium-high speed until it’s light and creamy, which should take about 3-4 minutes. Next, with the mixer on low, gradually add the sifted powdered sugar until it’s fully incorporated. Then, add the vanilla extract and salt. Slowly stream in the heavy cream or milk, and increase the mixer speed to medium-high. Continue to beat for another 3-5 minutes until the frosting is light, fluffy, and smooth. If the frosting seems too stiff, you can add a little more cream; if it’s too thin, add more powdered sugar.
Assembling and Decorating Your Cake
Once your cake layers are completely cool, it’s time for the fun part. Place one cake layer on your cake stand or serving plate. Spread a generous layer of frosting over the top, extending it just to the edges. After that, carefully place the second cake layer on top. Apply a thin layer of frosting all over the cake—this is called a crumb coat. The crumb coat traps any loose crumbs, ensuring your final layer of frosting is clean and smooth. Refrigerate the cake for at least 30 minutes to set the crumb coat. After chilling, apply the final, thicker layer of frosting, using an offset spatula or bench scraper to get the sides and top as smooth as possible.
Now, for the silhouette. Gently place your bunny cutout in the center of the top of the cake. Hold a fine-mesh sieve over the cake and generously dust cocoa powder over the entire top surface, making sure to cover the stencil completely. Very carefully, using tweezers or your fingertips, lift the stencil straight up and away from the cake to reveal the clean bunny silhouette. Your stunning Chocolate Bunny Silhouette Layer Cake is now complete!
Expert Tips for a Flawless Finish
Creating a beautiful cake comes down to a few key techniques. To ensure your Chocolate Bunny Silhouette Layer Cake looks as good as it tastes, here are some pro tips to keep in mind.
- Level Your Cakes: For a stable and professional-looking layer cake, it’s crucial that your cake layers are flat. If your cakes have a dome after baking, use a long serrated knife to carefully trim the top, making it level.
- Chill for a Cleaner Silhouette: For the sharpest possible silhouette, make sure your final coat of frosting is well-chilled and firm to the touch before applying the stencil and cocoa powder. This prevents the stencil from sticking and smudging the frosting.
- Room Temperature Ingredients: Using room temperature eggs and buttermilk for the cake batter and softened butter for the frosting helps the ingredients emulsify properly. As a result, this leads to a smoother batter and a creamier frosting.
- Practice Makes Perfect: If you’re nervous about placing the stencil, you can practice on a piece of wax paper dusted with powdered sugar first. This will help you get a feel for lifting the stencil without disturbing the design.
- Make It Ahead: You can bake the cake layers a day in advance. Once they are completely cool, wrap them tightly in plastic wrap and store them at room temperature. The frosting can also be made ahead and stored in an airtight container in the refrigerator for up to a week; just be sure to let it come to room temperature and re-whip it before using. For more fun Easter baking projects, check out our adorable Marshmallow Peep Nest Brownies.
Fun Variations and Customizations
While the classic chocolate and vanilla combination is always a winner, don’t be afraid to get creative with your cake. This recipe is a fantastic base for all sorts of delicious variations. Here are a few ideas to inspire you.
- Switch Up the Frosting: Instead of vanilla, try a tangy cream cheese frosting, a rich chocolate buttercream, or even a fun strawberry or raspberry frosting for a pop of fruity flavor.
- Add a Filling: Make your cake even more decadent by adding a filling between the layers. For example, raspberry jam, salted caramel sauce, or a layer of chocolate ganache would all be incredible additions.
- Different Silhouettes: This technique isn’t just for bunnies! You can use this method for any holiday or occasion. Think about creating a heart for Valentine’s Day, a pumpkin for Halloween, or a star for the Fourth of July.
- Add a Border: To frame your beautiful silhouette, consider piping a simple decorative border around the top edge of the cake using a piping bag and a star tip. You could also press toasted coconut or mini chocolate chips around the base of the cake for extra texture and flavor. For other festive treats, you might also enjoy making these lovely Speckled Easter Egg Sugar Cookies.
Proper food handling is always important in the kitchen. For comprehensive guidelines on food safety, you can visit trusted resources like the Mayo Clinic to ensure your creations are not only delicious but also safe for everyone to enjoy.
Conclusion
In conclusion, baking a Chocolate Bunny Silhouette Layer Cake is a wonderfully rewarding experience that is sure to become a cherished part of your Easter traditions. This dessert perfectly combines rich, moist chocolate cake with a light and creamy frosting, creating a universally loved flavor combination. Moreover, the elegant bunny silhouette technique is much simpler than it appears, allowing you to create a bakery-worthy cake right in your own kitchen. Ultimately, this cake is all about celebrating the joy of the season with a treat that is both beautiful and delicious. We hope this guide inspires you to get into the kitchen and create a stunning dessert that will delight your loved ones.
Frequently Asked Questions
Can I make this cake ahead of time?
Absolutely! You can bake the cake layers up to two days in advance. Just let them cool completely, then wrap them tightly in plastic wrap and store them on the counter. The buttercream can be made up to a week ahead and stored in an airtight container in the refrigerator. Simply let it come to room temperature and give it a good whip with your mixer before frosting the cake. The fully assembled cake can be stored in the refrigerator for up to 3 days.
Can I use a boxed cake mix instead of making the cake from scratch?
Of course. If you’re short on time or prefer the convenience, you can certainly use your favorite boxed chocolate cake mix. To enhance the flavor and texture of a mix, you can try substituting melted butter for the oil, milk or buttermilk for the water, and adding an extra egg. Prepare two 8-inch or 9-inch round cakes according to the package directions and proceed with the frosting and decorating instructions as written.
My bunny silhouette came out blurry. What went wrong?
A blurry silhouette is usually caused by one of two things. First, the frosting may have been too soft when you applied the stencil. It’s very important to chill the cake after the final coat of frosting so it becomes firm. Secondly, when lifting the stencil, you must lift it straight up and off the cake. If you slide it even slightly, it can smudge the cocoa powder and blur the edges. Using tweezers to lift the stencil can help you get a cleaner lift.