Are you searching for the perfect meal that is both incredibly satisfying and remarkably easy to make? In that case, look no further. This amazing Chicken Caesar Wrap recipe combines the classic, beloved flavors of a Caesar salad with the convenience of a handheld wrap. It’s the ideal solution for a quick weekday lunch, a light and refreshing dinner, or even a simple meal to pack for a picnic. Consequently, you get all the creamy, crunchy, and savory goodness you crave without the need for a fork. This guide will walk you through everything you need to know, from the essential ingredients to expert tips that guarantee a perfect wrap every single time. So, let’s get ready to transform a restaurant favorite into a homemade masterpiece.
Why You’ll Absolutely Love This Wrap
There are countless reasons why this Chicken Caesar Wrap recipe will quickly become a staple in your meal rotation. First and foremost, it’s all about the flavor. The combination of tender, seasoned chicken, crisp romaine lettuce, salty Parmesan cheese, and a rich, creamy Caesar dressing is truly a classic for a reason. Each bite delivers a perfect balance of textures and tastes. Furthermore, this recipe is incredibly versatile. You can easily customize it to suit your preferences, whether that means adding extra veggies or using a spicy dressing.
In addition to its delicious taste, this wrap is exceptionally convenient. It comes together in under 30 minutes, especially if you use pre-cooked chicken. As a result, it’s a lifesaver on busy days when you need something nutritious and fast. Unlike a traditional salad, this wrap is completely portable, making it an excellent choice for packed lunches for school or work. Ultimately, this recipe provides a wholesome and filling meal that doesn’t feel heavy, giving you the energy you need to power through your day. It’s a simple, elegant solution for your mealtime needs.
Print
Chicken Caesar Wrap Recipe: The 10 Ultimate Steps for the Best Quick Lunch
A quick and satisfying Chicken Caesar Wrap packed with juicy seasoned chicken, crisp romaine lettuce, creamy Caesar dressing, and Parmesan cheese all rolled into a soft tortilla for the perfect handheld lunch.
- Total Time: 25 minutes
- Yield: 4 wraps 1x
Ingredients
1 pound boneless, skinless chicken breasts
1 tablespoon olive oil
1 teaspoon garlic powder
1/2 teaspoon salt
1/4 teaspoon black pepper
4 large (10-inch) flour tortillas
1 head romaine lettuce, chopped and dried
1/2 cup grated or shaved Parmesan cheese
1/2 cup croutons, lightly crushed (optional)
For the Caesar Dressing:
1/2 cup mayonnaise or plain Greek yogurt
2 cloves garlic, minced
1/4 cup grated Parmesan cheese
2 tablespoons fresh lemon juice
1 teaspoon Dijon mustard
1 teaspoon Worcestershire sauce
Salt and black pepper to taste
Instructions
1. Pat chicken dry and season both sides with garlic powder, salt, and pepper.
2. Heat olive oil in a skillet over medium-high heat and cook chicken for 6–8 minutes per side until golden brown and internal temperature reaches 165°F (74°C).
3. Remove chicken from heat and let rest for 5 minutes before chopping into bite-sized pieces.
4. In a small bowl, whisk together mayonnaise (or Greek yogurt), garlic, Parmesan, lemon juice, Dijon mustard, Worcestershire sauce, salt, and pepper until smooth.
5. In a large bowl, combine chopped chicken, romaine lettuce, Parmesan cheese, and crushed croutons.
6. Add Caesar dressing gradually and toss until evenly coated without overdressing.
7. Warm tortillas in a dry skillet or microwave for 20–30 seconds until soft and pliable.
8. Place one-quarter of the filling in the center of each tortilla, leaving a border around the edges.
9. Fold in the sides, roll tightly from the bottom burrito-style, and secure seam-side down.
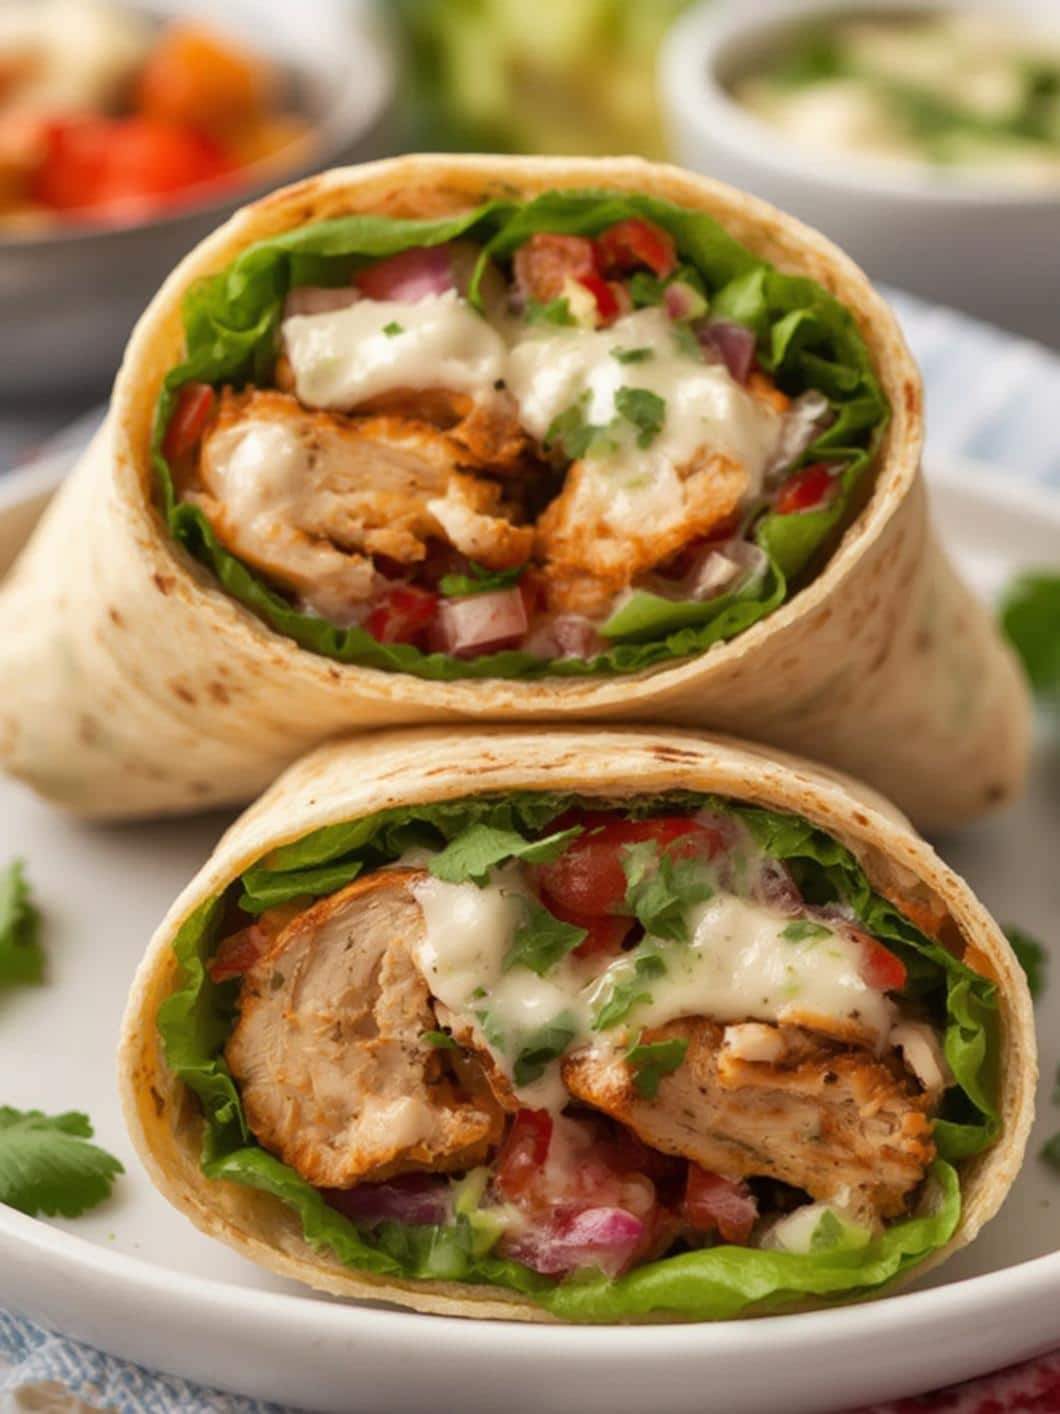
10. Slice in half if desired and serve immediately.
Notes
Ensure lettuce is completely dry to prevent soggy wraps.
Use rotisserie chicken for a faster preparation option.
For extra flavor, toast the assembled wrap seam-side down in a skillet for 1–2 minutes.
Store components separately in airtight containers for up to 4 days and assemble fresh for best texture.
- Prep Time: 10 minutes
- Cook Time: 15 minutes
- Category: Lunch
- Method: Stovetop
- Cuisine: American
Nutrition
- Serving Size: 1 wrap
- Calories: 510
- Sugar: 3g
- Sodium: 760mg
- Fat: 25g
- Saturated Fat: 7g
- Unsaturated Fat: 16g
- Trans Fat: 0g
- Carbohydrates: 36g
- Fiber: 3g
- Protein: 34g
- Cholesterol: 90mg
Essential Ingredients for the Perfect Wrap
To create the best possible wrap, gathering high-quality ingredients is the first crucial step. While the list is simple, each component plays a vital role in building the overall flavor profile. Below, we break down exactly what you’ll need.
For the Seasoned Chicken
The chicken is the star protein of this wrap. For the best results, you want it to be juicy and flavorful. Using boneless, skinless chicken breasts is a great lean option. In fact, chicken is an excellent source of protein, which is essential for muscle repair and overall health, as noted by sources like Healthline. You can also use chicken thighs for a richer flavor.
- 1 lb boneless, skinless chicken breasts
- 1 tablespoon olive oil
- 1 teaspoon garlic powder
- 1/2 teaspoon salt
- 1/4 teaspoon black pepper
For the Creamy Caesar Dressing
The dressing is what truly defines a Caesar-style dish. While you can certainly use your favorite store-bought brand to save time, a homemade dressing offers a fresh and vibrant flavor that is hard to beat. A classic dressing provides that signature tangy and savory taste.
- 1/2 cup mayonnaise or Greek yogurt for a lighter version
- 2 cloves garlic, minced
- 1/4 cup grated Parmesan cheese
- 2 tablespoons fresh lemon juice
- 1 teaspoon Dijon mustard
- 1 teaspoon Worcestershire sauce
- Salt and pepper to taste
For Assembling the Wrap
These are the final components that bring everything together. The right tortilla is key to holding all the delicious fillings without falling apart, and crisp lettuce provides that essential crunch.
- 4 large (10-inch) flour tortillas
- 1 head of romaine lettuce, washed, dried, and chopped
- 1/2 cup shaved or grated Parmesan cheese
- 1/2 cup croutons, lightly crushed (optional for extra crunch)
Step-by-Step Instructions for the Best Chicken Caesar Wrap Recipe
Now that you have all your ingredients, it’s time to assemble your delicious meal. Following these steps will ensure your Chicken Caesar Wrap recipe turns out perfectly every time.
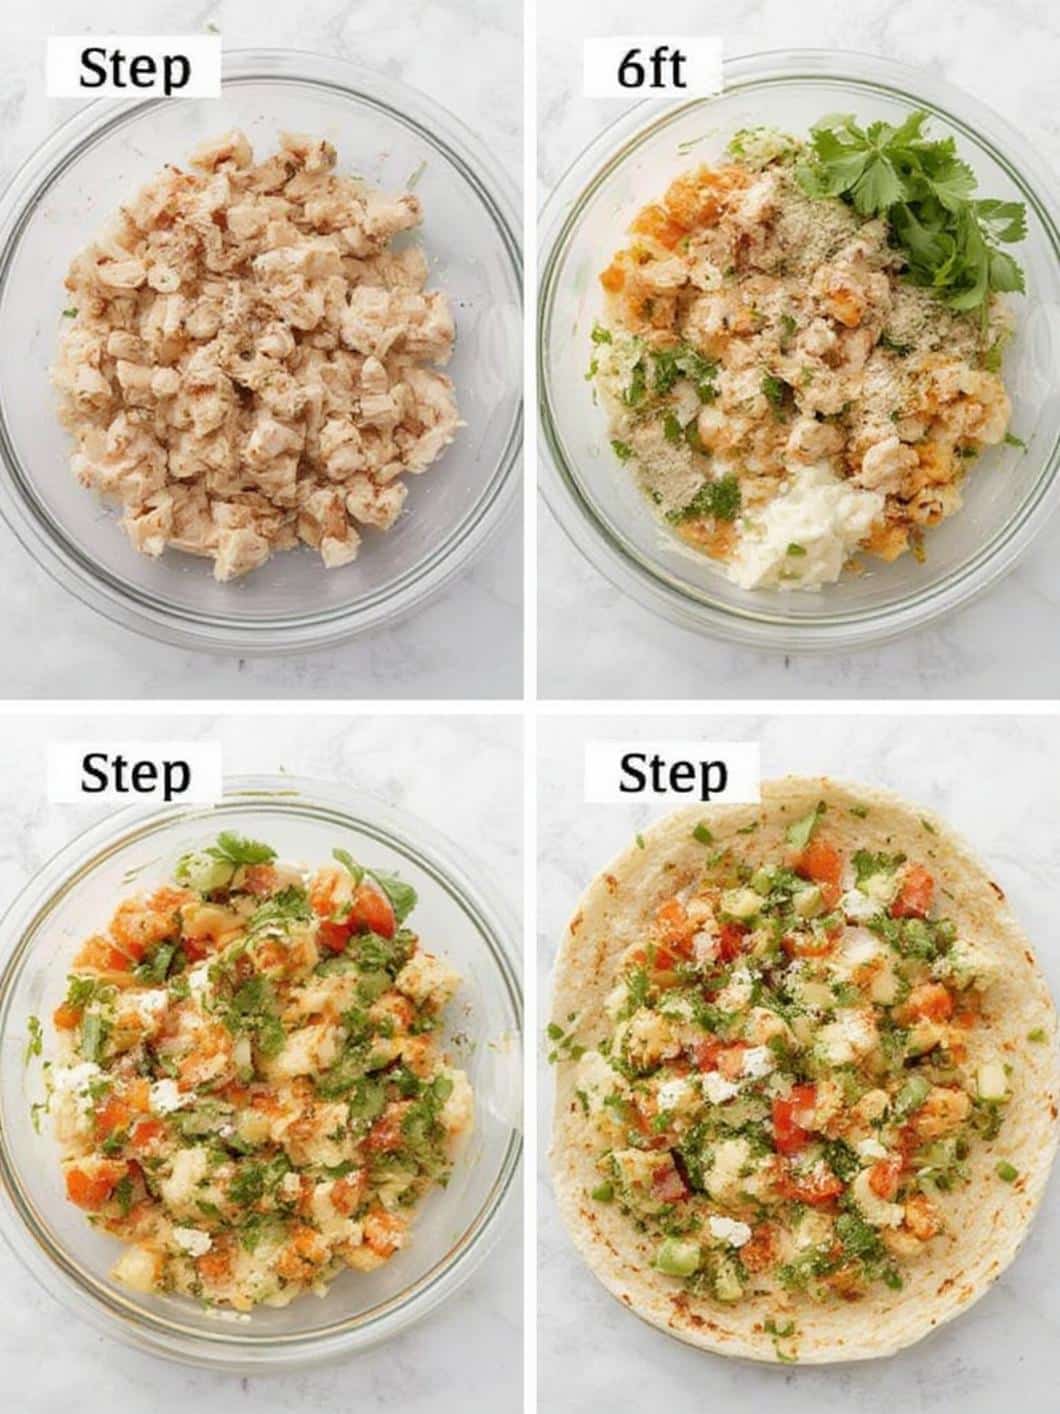
- Cook the Chicken: First, pat the chicken breasts dry and season them evenly on both sides with garlic powder, salt, and pepper. Then, heat the olive oil in a large skillet over medium-high heat. Add the chicken and cook for about 6-8 minutes per side, or until it’s golden brown and cooked through (internal temperature reaches 165°F).
- Rest and Chop: Next, remove the chicken from the skillet and let it rest on a cutting board for at least 5 minutes. This step is crucial because it allows the juices to redistribute, ensuring a moist and tender result. Afterward, chop the chicken into bite-sized pieces.
- Prepare the Dressing: While the chicken is resting, you can prepare the dressing. In a small bowl, whisk together the mayonnaise (or Greek yogurt), minced garlic, Parmesan cheese, lemon juice, Dijon mustard, and Worcestershire sauce. Continue whisking until the mixture is smooth and creamy. Then, season with salt and pepper to your liking.
- Combine the Filling: In a large bowl, combine the chopped chicken, chopped romaine lettuce, shaved Parmesan cheese, and crushed croutons (if using). This is the heart of your Chicken Caesar Wrap recipe.
- Dress the Salad: Pour about half of the Caesar dressing over the ingredients in the bowl. Gently toss everything together until the chicken and lettuce are evenly coated. You can add more dressing as needed, but be careful not to oversaturate the salad, as this can make the wrap soggy.
- Warm the Tortillas: For a more pliable wrap that is less likely to tear, warm the tortillas. You can do this by heating them in a dry skillet for about 30 seconds per side or by wrapping them in a damp paper towel and microwaving for 20-30 seconds.
- Assemble the Wraps: Now, lay a warm tortilla flat on a clean surface. Spoon about one-fourth of the chicken Caesar salad mixture onto the center of the tortilla, leaving a border of about 2 inches around the edges. If you enjoy flavorful chicken dishes, you might also love our Garlic Parmesan Chicken recipe.
- Fold the Wraps: To fold, bring the bottom edge of the tortilla up and over the filling. Then, fold in the two sides. Finally, roll the wrap up tightly from the bottom. This burrito-style fold will keep all the delicious contents securely inside.
- Serve Immediately: For the best texture and experience, serve the wraps immediately while the lettuce and croutons are still crisp. You can slice them in half on a diagonal for a classic deli-style presentation.
Tips and Variations for Customization
One of the best things about this Chicken Caesar Wrap recipe is how easily you can adapt it. Here are some professional tips and creative variations to make it your own.
Pro Tips for Success
- Don’t Skip Resting the Chicken: Letting the chicken rest before chopping is non-negotiable for juicy results. This simple step makes a huge difference.
- Use Crisp Romaine: Make sure your romaine lettuce is thoroughly washed and, more importantly, completely dry. Excess water will make your dressing thin and your wrap soggy. A salad spinner is excellent for this.
- Use Rotisserie Chicken: To make this recipe even faster, feel free to use shredded rotisserie chicken from the grocery store. It’s a fantastic time-saver.
- Toast Your Wraps: After assembling, you can place the wrap seam-side down in a hot, dry skillet for a minute or two. This helps seal the wrap and gives the tortilla a lovely golden-brown, slightly crispy texture.
Fun and Tasty Variations
- Add Bacon: For a smoky and salty addition, crumble some crispy cooked bacon into the salad mixture.
- Include Avocado: Creamy avocado slices or chunks can add a wonderful texture and healthy fats to your wrap. For another great meal with chicken and avocado, try our Lime Chicken with Avocado.
- Make it Spicy: Add a pinch of red pepper flakes to the chicken seasoning or a dash of hot sauce to the dressing for a little kick.
- Switch Up the Greens: While romaine is classic, you could also use kale or a spring mix for a different flavor and nutritional profile.
- Try Different Tortillas: Experiment with spinach, sun-dried tomato, or whole wheat tortillas to add extra flavor and nutrients.
Storing and Meal Prep Advice
While a Chicken Caesar Wrap is best enjoyed fresh, you can certainly prepare components ahead of time to make assembly even quicker. Proper storage is key to maintaining freshness and preventing a soggy mess.
For meal prepping, it is best to store the ingredients separately in airtight containers in the refrigerator. The cooked and chopped chicken can be stored for up to 4 days. Similarly, the Caesar dressing can be made ahead and kept in a sealed jar for up to a week. Wash and chop your romaine lettuce, but wait to combine it with anything. Then, when you are ready to eat, you can assemble your wrap in just a couple of minutes. This ensures the lettuce stays crisp.
If you have leftover assembled wraps, wrap them tightly in plastic wrap or aluminum foil and store them in the refrigerator. They are best eaten within 24 hours. The lettuce will likely lose some of its crispness, but the wrap will still be delicious. For information on safe food handling, you can consult resources like the Mayo Clinic.
Conclusion
In summary, this Chicken Caesar Wrap recipe offers a fantastic combination of classic flavor and modern convenience. It’s a quick, satisfying, and versatile meal perfect for any occasion, from a busy workday lunch to a relaxed weekend dinner. By following these simple steps and tips, you can easily create a delicious wrap that rivals any restaurant version. Furthermore, the ability to customize ingredients ensures that you can tailor this recipe perfectly to your taste. We hope you enjoy making and eating this incredible Chicken Caesar Wrap recipe as much as we do.
Frequently Asked Questions
Can I use leftover or rotisserie chicken for this recipe?
Absolutely! Using pre-cooked chicken is a wonderful shortcut that makes this recipe even faster. Simply chop or shred about 2-3 cups of leftover or rotisserie chicken and proceed with the recipe as instructed.
How do I prevent my wrap from becoming soggy?
The key to avoiding a soggy wrap is to ensure your lettuce is completely dry before tossing it with the dressing. Additionally, don’t overdress the salad. It’s also best to assemble the wrap just before you plan to eat it. If packing for lunch, consider packing the salad mixture and the tortilla separately.
Is a Chicken Caesar Wrap a healthy meal choice?
A Chicken Caesar Wrap can definitely be part of a healthy diet. To make it healthier, you can use a whole wheat tortilla, opt for grilled chicken, and use a Greek yogurt-based Caesar dressing to lower the fat and calorie content. It provides a good balance of protein, carbohydrates, and vegetables. Experts at WebMD often highlight the importance of balanced meals for overall health.