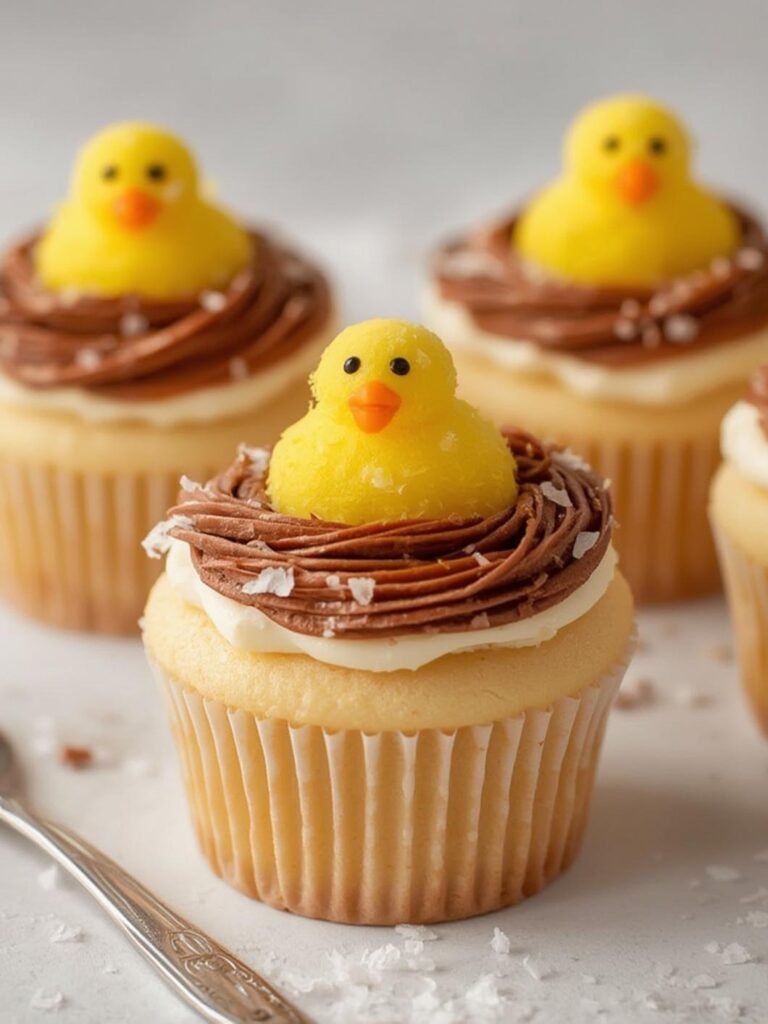
Spring is in the air, and with it comes the joy of Easter celebrations, family gatherings, and of course, adorable themed treats. If you’re looking for the perfect dessert to capture the spirit of the season, look no further than these delightful Chick Nest Coconut Cupcakes. These cupcakes are not only incredibly delicious with their moist coconut crumb and creamy frosting, but they are also visually stunning. In fact, they look just like tiny bird nests, complete with colorful candy eggs and a little chick peeking out. This recipe is designed to be straightforward and fun, consequently making it a wonderful project to do with kids. Ultimately, you’ll have a dessert that will be the centerpiece of any spring or Easter table.
Why You’ll Love This Recipe
There are countless reasons to fall in love with this festive cupcake recipe. First and foremost, they are an absolute delight for coconut lovers. The cupcakes are infused with coconut flavor, and the toasted coconut on top adds a wonderful texture and nutty aroma. Beyond the taste, however, there are several other factors that make these Chick Nest Coconut Cupcakes a go-to for any spring occasion.
- Perfectly Festive: The design is undeniably cute and perfectly suited for Easter, spring baby showers, or any garden party. Moreover, they bring a whimsical touch that both children and adults will appreciate.
- Simple to Make: Despite their intricate appearance, these cupcakes are surprisingly easy to assemble. The recipe uses simple ingredients and follows a clear, step-by-step process. As a result, even beginner bakers can achieve beautiful results.
- Crowd-Pleasing Flavor: The combination of sweet, moist coconut cake and rich buttercream frosting is a classic that appeals to a wide range of palates. You can be confident that these will be a hit with your guests.
- Fun to Decorate: Decorating these cupcakes is a creative and enjoyable activity. For instance, you can involve the whole family in dipping the cupcakes in toasted coconut and arranging the candy eggs, making it a memorable experience.
Chick Nest Coconut Cupcakes
Delightful Chick Nest Coconut Cupcakes with a moist coconut crumb and creamy buttercream frosting, decorated to look like tiny bird nests perfect for Easter or spring celebrations.
- Total Time: 1 hour 30 minutes
- Yield: 12 cupcakes 1x
Ingredients
1 1/2 cups All-Purpose Flour
1 cup Granulated Sugar
1 1/2 tsp Baking Powder
1/2 tsp Baking Soda
1/2 tsp Salt
1/2 cup Unsalted Butter, room temperature
2 large Eggs, room temperature
1 tsp Vanilla Extract
3/4 cup Canned full-fat Coconut Milk, shaken
1 cup Sweetened Shredded Coconut
1 cup Unsalted Butter, softened
4 cups Powdered Sugar, sifted
2-3 tbsp Heavy Cream or Milk
1 tsp Vanilla Extract
1 1/2 cups Toasted Sweetened Shredded Coconut
Small Candy Eggs (e.g., Cadbury Mini Eggs)
Optional: Small sugar chick decorations
Instructions
1. Preheat oven to 350°F (175°C) and line a 12-cup muffin tin with paper liners.
2. In a medium bowl, whisk together flour, baking powder, baking soda, and salt.
3. In a large bowl, beat 1/2 cup butter and the granulated sugar with an electric mixer until light and fluffy.
4. Beat in the eggs one at a time, then beat in 1 tsp of vanilla extract.
5. On low speed, alternate adding the dry ingredients and the coconut milk to the butter mixture, beginning and ending with the dry ingredients.
6. Gently fold in 1 cup of sweetened shredded coconut.
7. Divide batter among the 12 cupcake liners, filling each about two-thirds full.
8. Bake for 18-22 minutes, or until a skewer inserted into the center comes out clean.
9. Let cupcakes cool in the tin for 5 minutes before transferring to a wire rack to cool completely.
10. Toast 1 1/2 cups of shredded coconut in a dry skillet over medium-low heat or in the oven until golden brown, then let cool in a shallow bowl.
11. To make the frosting, beat 1 cup of softened butter until creamy, then gradually mix in powdered sugar.
12. Increase mixer speed to medium-high and beat for 3 minutes until fluffy, then beat in 1 tsp vanilla and enough cream to reach a spreadable consistency.
13. Spread a layer of frosting over each cooled cupcake.
14. Press the frosted top of each cupcake into the bowl of toasted coconut to coat completely.
15. Gently press 2-3 candy eggs into the center of each nest and add an optional chick decoration on the side.
Notes
Store cupcakes in an airtight container at room temperature for up to 2 days. For a deeper nest, use a spoon to press a small well into the center of the frosting before adding the coconut and eggs.
- Prep Time: 25 minutes
- Cook Time: 22 minutes
- Category: Dessert
- Method: Baking
- Cuisine: American
Nutrition
- Serving Size: 1 cupcake
- Calories: 415
- Sugar: 38g
- Sodium: 210mg
- Fat: 24g
- Saturated Fat: 15g
- Unsaturated Fat: 9g
- Trans Fat: 0g
- Carbohydrates: 48g
- Fiber: 2g
- Protein: 4g
- Cholesterol: 75mg
Essential Ingredients and Tools
To create these amazing Chick Nest Coconut Cupcakes, you will need a few key ingredients and standard baking tools. Gathering everything before you begin will ensure the process goes smoothly. Consequently, you’ll have more fun and less stress in the kitchen.
For the Coconut Cupcakes
The foundation of this recipe is a perfectly moist and flavorful coconut cupcake. The secret is using both coconut milk and shredded coconut to layer the flavor.
- All-Purpose Flour: Provides the structure for the cupcakes.
- Granulated Sugar: Sweetens the cake and helps create a tender crumb.
- Baking Powder & Baking Soda: These leavening agents help the cupcakes rise and become light and fluffy.
- Salt: A small amount enhances all the other flavors.
- Unsalted Butter: Make sure it’s at room temperature for easy creaming with the sugar.
- Eggs: Room temperature eggs incorporate better into the batter, creating a more uniform texture.
- Vanilla Extract: Adds a warm, aromatic note that complements the coconut.
- Canned Coconut Milk: Use full-fat coconut milk for the richest flavor and most moisture. Shake the can well before using.
- Sweetened Shredded Coconut: This is folded into the batter for extra texture and coconut flavor in every bite.
For the Buttercream Frosting and Toppings
A simple vanilla buttercream is the perfect “glue” for our nests, while the toppings bring the theme to life.
- Unsalted Butter: The base of our frosting. Again, it should be softened to room temperature.
- Powdered Sugar: Sift it to avoid any lumps in your frosting.
- Heavy Cream or Milk: Used to thin the frosting to the perfect consistency.
- Vanilla Extract: For flavor.
- Toasted Sweetened Shredded Coconut: This is what creates the “nest” effect. Toasting it brings out a nutty, deeper flavor.
- Candy Eggs: Use your favorite small, egg-shaped candies like jelly beans, Cadbury Mini Eggs, or chocolate eggs.
- Optional Chick Decorations: You can find small sugar or plastic chick decorations at most craft or baking supply stores, especially around Easter.
Necessary Kitchen Tools
You likely already have most of these tools in your kitchen. Having them ready will make the baking process much more efficient.
- Standard 12-cup muffin tin
- Paper cupcake liners
- Mixing bowls (at least one large and one medium)
- Electric mixer (stand or handheld)
- Whisk and rubber spatula
- Measuring cups and spoons
- Wire cooling rack
- Small skillet or baking sheet (for toasting coconut)
- Offset spatula or butter knife
Step-by-Step Instructions for Perfect Chick Nest Coconut Cupcakes
Now, let’s get to the fun part: baking and decorating! Follow these steps carefully for delicious and beautiful results every time. Remember to read through all the steps before you begin.
Part 1: Baking the Coconut Cupcakes
- Prep Your Station: First, preheat your oven to 350°F (175°C). Then, line a standard 12-cup muffin tin with paper liners.
- Combine Dry Ingredients: In a medium bowl, whisk together the all-purpose flour, baking powder, baking soda, and salt. Set this mixture aside for later.
- Cream Butter and Sugar: In a large bowl, using an electric mixer, beat the room temperature butter and granulated sugar together on medium-high speed until the mixture is light and fluffy. This process usually takes about 3-4 minutes.
- Add Eggs and Vanilla: Add the eggs one at a time, beating well after each addition. Following the eggs, beat in the vanilla extract until it’s fully combined.
- Alternate Wet and Dry Ingredients: Reduce the mixer speed to low. Add about one-third of the dry ingredient mixture to the butter mixture, and mix until just combined. Next, add half of the coconut milk and mix. Continue alternating between the dry and wet ingredients, ending with the dry mixture. Be careful not to overmix the batter.
- Fold in Coconut: Gently fold in the sweetened shredded coconut with a rubber spatula.
- Fill and Bake: Divide the batter evenly among the 12 cupcake liners, filling each one about two-thirds full. Bake for 18-22 minutes, or until a wooden skewer inserted into the center of a cupcake comes out clean.
- Cool Completely: Let the cupcakes cool in the muffin tin for about 5 minutes before transferring them to a wire rack to cool completely. It is crucial they are fully cooled before you begin frosting.
Part 2: Preparing the Frosting and Toppings
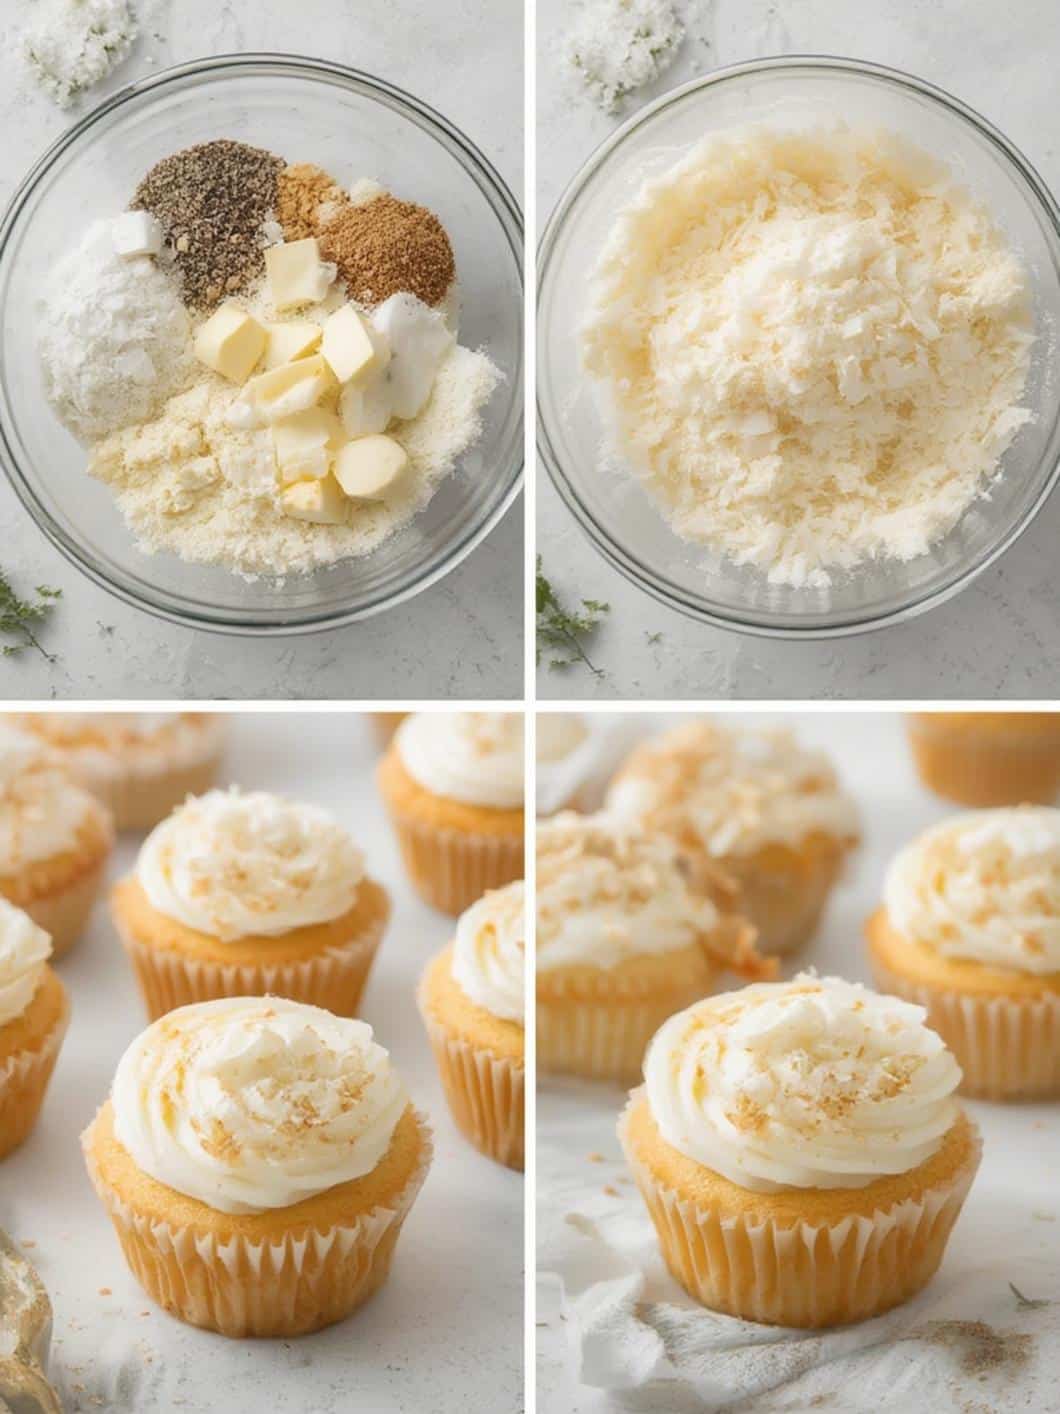
- Toast the Coconut: Spread the shredded coconut in a dry skillet over medium-low heat. Stir frequently until it becomes fragrant and lightly golden brown. Alternatively, you can spread it on a baking sheet and toast it in the 350°F oven for 5-7 minutes, watching it closely to prevent burning. Once toasted, transfer it to a shallow bowl or plate to cool.
- Make the Buttercream: In a large bowl, beat the softened butter with an electric mixer until it’s creamy. Gradually add the sifted powdered sugar, one cup at a time, mixing on low speed until combined. Once all the sugar is added, increase the speed to medium-high and beat for another 3 minutes until it’s light and fluffy. Beat in the vanilla extract. If the frosting is too thick, add heavy cream or milk one tablespoon at a time until you reach a smooth, spreadable consistency.
Part 3: Assembling Your Chick Nest Coconut Cupcakes
- Frost the Cupcakes: Using an offset spatula or a butter knife, spread a generous layer of buttercream frosting over the top of each cooled cupcake.
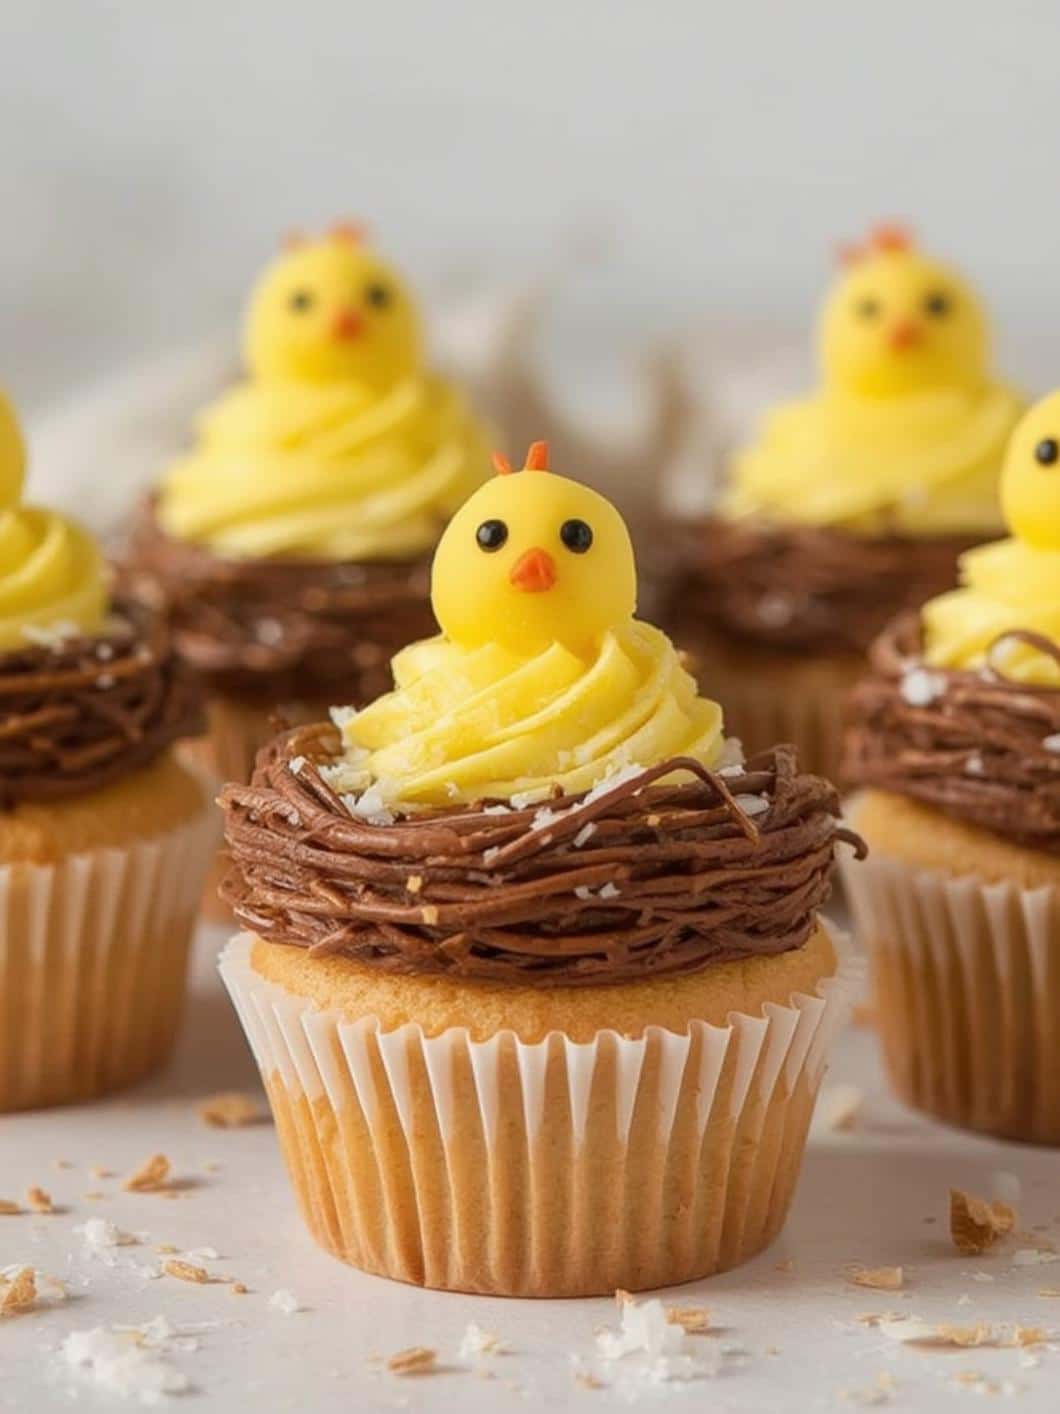
- Create the Nest: Hold a frosted cupcake by its base and gently press the frosted top into the bowl of toasted coconut. You can also sprinkle the coconut over the top. The goal is to cover the frosting completely with the toasted coconut, which creates the nest-like appearance.
- Add the Eggs: Gently press 2-3 candy eggs into the center of each coconut nest. For a more authentic look, you can create a small indentation in the frosting before adding the coconut.
- Place the Chick: If you’re using chick decorations, place one on the edge of each nest, as if it’s peeking over the side. Your adorable Chick Nest Coconut Cupcakes are now ready to be served!
Pro Tips for Decorating and Customization
While the basic recipe is fantastic, there are several ways to customize your Chick Nest Coconut Cupcakes and ensure they look professionally made. For example, if you’re looking for another equally festive treat, consider making a Chocolate Bunny Silhouette Layer Cake to go alongside these cupcakes.
Getting the Perfect “Nest” Look
The key to a realistic nest is the toasted coconut. Don’t be afraid to be a little messy when applying it. A few stray “twigs” of coconut can make it look more natural. In addition, you can color your frosting light brown or green before dipping to enhance the effect. For a deeper nest, use a spoon to press a small well into the center of the frosting before you add the coconut and eggs.
Fun Variations
Feel free to get creative with this recipe! You can add a teaspoon of lemon or orange zest to the cupcake batter for a bright, citrusy note that pairs beautifully with coconut. Alternatively, you could make chocolate nests by using a chocolate cupcake base and chocolate frosting. For another adorable chick-themed treat, try these Chubby Chick Lemon Cupcakes, which offer a delightful citrus twist.
Storing Your Cupcakes
These cupcakes can be stored in an airtight container at room temperature for up to 2 days. If you store them in the refrigerator, the butter in the frosting and cake will harden. Therefore, it’s best to let them sit at room temperature for about 30 minutes before serving to allow them to soften.
The Nutritional Side of Coconut
While these cupcakes are undoubtedly a sweet treat, it’s interesting to note the star ingredient: coconut. Coconut is a versatile fruit that offers some interesting nutritional properties. It is particularly known for its content of healthy fats, specifically medium-chain triglycerides (MCTs). According to Healthline, some studies suggest that MCTs are metabolized differently than other fats, which may offer certain health benefits. Furthermore, coconut is a good source of fiber, which is important for digestive health.
Of course, these cupcakes also contain sugar and butter, so they should be enjoyed in moderation as part of a balanced diet. It’s always a good idea to focus on whole foods and a varied diet for overall wellness. For comprehensive information on maintaining a healthy lifestyle, resources like the Mayo Clinic provide excellent, evidence-based guidance. Enjoying a homemade treat like these Chick Nest Coconut Cupcakes is a wonderful way to celebrate special occasions mindfully.
Conclusion
In summary, these Chick Nest Coconut Cupcakes are the ultimate spring dessert that combines delicious flavor with an irresistibly cute presentation. They are simple enough for bakers of all skill levels, yet impressive enough to be the star of any Easter gathering or spring party. The process of baking and decorating is a joy in itself, especially when shared with family and friends. Ultimately, this recipe provides a wonderful opportunity to create both a tasty treat and lasting memories. We hope you have a fantastic time bringing these sweet little nests to life in your own kitchen.
Frequently Asked Questions
Can I make these cupcakes gluten-free?
Yes, you certainly can. To make these gluten-free, simply substitute the all-purpose flour with a high-quality, 1-to-1 gluten-free baking flour blend. Ensure that your baking powder is also certified gluten-free. The rest of the ingredients are naturally gluten-free, but it’s always wise to check labels to avoid cross-contamination.
How far in advance can I make the Chick Nest Coconut Cupcakes?
You can bake the cupcakes one day in advance and store them in an airtight container at room temperature. The buttercream frosting can also be made a day or two ahead and kept in an airtight container in the refrigerator. However, it’s best to assemble and decorate the cupcakes on the day you plan to serve them for the best texture and freshness, especially since the toasted coconut will be at its best.
What can I use instead of candy eggs?
If you can’t find candy eggs or prefer an alternative, there are many creative options. You could use pastel-colored M&Ms, Skittles, or even small, round chocolate truffles. For a healthier option, you could use blueberries or small grapes. The goal is to find something small, colorful, and vaguely egg-shaped to complete the nest theme.