Spring is in the air, and with it comes the desire for fun, festive, and delicious treats that capture the spirit of the season. If you’re looking for a dessert that is as adorable as it is simple to make, then you have come to the right place. These Carrot Patch Chocolate Pudding Cups are the perfect no-bake dessert for Easter gatherings, spring parties, or just a fun afternoon activity with the kids. In fact, this recipe combines rich, creamy chocolate pudding with the satisfying crunch of chocolate cookie “dirt” and is topped with sweet, candy-coated strawberry “carrots.” Consequently, it’s a whimsical treat that will have everyone, from toddlers to adults, smiling with delight.
Furthermore, the beauty of this dessert lies in its simplicity and visual appeal. You don’t need to be an expert baker to create something that looks like it came straight from a storybook. Because the steps are straightforward and the ingredients are easy to find, you can whip up these delightful pudding cups in no time. So, let’s dig in and learn how to create these charming and tasty Carrot Patch Chocolate Pudding Cups that are sure to be the star of your next celebration.
Why You’ll Adore These Carrot Patch Chocolate Pudding Cups
There are countless reasons to fall in love with this delightful dessert, but its charm and ease are certainly at the top of the list. First and foremost, this is a completely no-bake recipe, which means you can keep your oven off and your kitchen cool. This is especially helpful during busy holiday preparations when oven space is a precious commodity. As a result, you can focus on other dishes, like a delicious Hash Brown Egg Casserole for brunch, without worrying about a complicated dessert.
In addition, these Carrot Patch Chocolate Pudding Cups are incredibly kid-friendly. The process of crushing cookies, layering ingredients, and dipping strawberries is a fantastic way to get children involved in the kitchen. They will feel a great sense of accomplishment when they see the final product they helped create. Moreover, the combination of textures is simply irresistible. You get the smooth, velvety chocolate pudding, the crunchy texture of the cookie crumbs, and the juicy bite of a fresh strawberry hidden beneath a sweet candy coating. It’s a multi-layered experience that satisfies every sweet craving. Ultimately, their visual appeal makes them a perfect centerpiece for any dessert table, sparking joy and conversation among your guests.
Print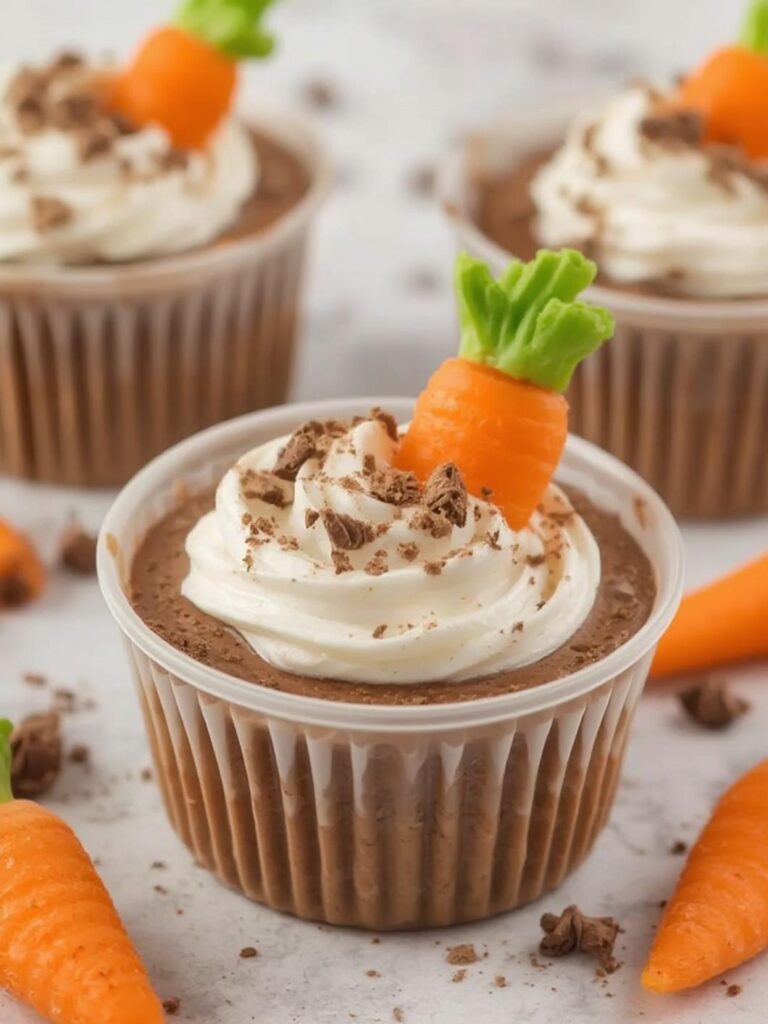
Carrot Patch Chocolate Pudding Cups
A fun, no-bake spring dessert featuring creamy chocolate pudding, crushed chocolate cookie ‘dirt’, and adorable candy-coated strawberry ‘carrots’. Perfect for Easter or a kid-friendly activity.
- Total Time: 45 minutes
- Yield: 6–8 servings 1x
Ingredients
1 (3.9-ounce) box chocolate instant pudding mix
2 cups cold milk
15-20 chocolate sandwich cookies
8-12 medium-sized fresh strawberries
1 (12-ounce) bag orange candy melts
Green decorating icing or sprinkles, for topping (optional)
Instructions
1. Prepare the chocolate pudding with cold milk according to package directions and set aside for about 5 minutes to thicken.
2. Crush the chocolate sandwich cookies into fine crumbs using a food processor or a rolling pin.
3. Spoon a layer of pudding into clear cups, filling them about two-thirds full.
4. Top the pudding in each cup with a thick layer of the crushed cookie crumbs to create ‘dirt’.
5. Melt orange candy melts in a microwave-safe bowl in 30-second intervals, stirring until smooth.
6. Holding by the green top, dip each thoroughly dried strawberry into the melted candy to coat completely.
7. Place the coated strawberries on parchment paper and allow the candy shell to harden completely.
8. Gently press one or two strawberry ‘carrots’ into the center of each pudding cup.
9. If desired, use green icing to pipe carrot stems onto the strawberries.
Notes
For the best texture, assemble the cups just before serving to keep the cookie crumbs crunchy. You can make this gluten-free by using gluten-free sandwich cookies and pudding mix. White chocolate with oil-based orange food coloring can be substituted for candy melts.
- Prep Time: 30 minutes
- Cook Time: 0 minutes
- Category: Dessert
- Method: No-Bake
- Cuisine: American
Nutrition
- Serving Size: 1 cup
- Calories: 330
- Sugar: 35g
- Sodium: 250mg
- Fat: 18g
- Saturated Fat: 9g
- Unsaturated Fat: 7g
- Trans Fat: 0g
- Carbohydrates: 45g
- Fiber: 2g
- Protein: 4g
- Cholesterol: 15mg
Essential Ingredients and Tools
Before you begin creating your adorable edible garden, it’s important to gather all your supplies. Fortunately, the list is short and features items that are readily available at any local grocery store. Having everything ready will ensure the process is smooth and enjoyable. Here’s what you’ll need.
For the Pudding and “Dirt”
The foundation of your carrot patch is a rich, chocolatey base. This part is both simple and delicious, creating the perfect setting for your strawberry carrots.
- Chocolate Instant Pudding Mix: One 3.9-ounce box will do. You can also use a cook-and-serve variety or even your favorite homemade recipe, but instant pudding makes this a truly fast treat.
- Cold Milk: You will need the amount specified on your pudding box, which is typically 2 cups. Whole milk will yield the creamiest result.
- Chocolate Sandwich Cookies: About 15-20 cookies are needed to create the “dirt.” Oreos are a classic choice, but any brand will work perfectly.
- Clear Cups or Jars: Small, 6-8 ounce clear plastic cups, glass jars, or even small terracotta pots (lined with plastic wrap) work wonderfully to showcase the layers.
For the Strawberry “Carrots”
The star of the show is, of course, the carrots. These candy-coated strawberries are surprisingly easy to make and add a vibrant pop of color and sweetness.
- Fresh Strawberries: Choose about 8-12 medium-sized strawberries. Look for ones that are firm, bright red, and have fresh green tops.
- Orange Candy Melts: A 12-ounce bag is more than enough. These melt smoothly and create the perfect carrot-colored shell.
- Green Icing or Sprinkles: A small tube of green decorating icing is perfect for creating realistic carrot tops, especially if you remove the strawberry stems.
Necessary Kitchen Tools
You won’t need any fancy equipment for this recipe. Just a few basic kitchen tools will get the job done efficiently.
- Mixing Bowls
- Whisk
- Food Processor or Ziploc Bag and Rolling Pin (for crushing cookies)
- Microwave-Safe Bowl (for melting candy)
- Spatula
- Parchment Paper
- Piping Bag with a small tip (optional, for the green icing)
Step-by-Step Instructions
Now that you have all your ingredients and tools, it’s time for the fun part: assembly! Follow these simple steps to create your own garden of delights. This process is very forgiving, so feel free to enjoy every moment.
Step 1: Prepare the Chocolate Pudding
First, prepare the chocolate pudding according to the package directions. In a medium mixing bowl, whisk together the instant pudding mix and the cold milk for about two minutes, or until it begins to thicken. Afterward, set the pudding aside to firm up, which usually takes about five minutes. If you are using a cook-and-serve variety, allow it to cool completely before proceeding.
Step 2: Create the Cookie “Dirt”
Next, it’s time to make the dirt. Place your chocolate sandwich cookies into a food processor and pulse until they are fine crumbs. Alternatively, if you don’t have a food processor, you can place the cookies in a large Ziploc bag, seal it, and crush them with a rolling pin. This is a particularly fun step for kids to help with. Set the cookie crumbs aside.
Step 3: Assemble the Pudding Cups
Now, let’s build the cups. Spoon a layer of the prepared chocolate pudding into the bottom of each of your clear cups, filling them about two-thirds full. Then, generously sprinkle a thick layer of the crushed cookie crumbs over the top of the pudding. This creates the illusion of rich, dark soil for your carrot patch. Continue this process until all your cups are filled.
Step 4: Make the Strawberry “Carrots”
For the carrots, begin by washing and thoroughly drying your strawberries. It is crucial that the strawberries are completely dry; otherwise, the melted candy will not stick properly. Next, place the orange candy melts in a microwave-safe bowl and heat them in 30-second intervals, stirring in between, until they are fully melted and smooth. Hold each strawberry by its green top and dip it into the melted orange candy, turning to coat it completely. Gently shake off any excess candy and place the dipped strawberry on a sheet of parchment paper to set.
Step 5: Plant the Carrots
Once the orange candy coating on the strawberries has completely hardened, it’s time to “plant” them. Gently press one or two candy-coated strawberries into the center of each pudding cup, pushing them just deep enough so they stand upright in the cookie “dirt.” If you removed the green tops, you can now use a small piping bag to add a bit of green icing to the top of each strawberry, creating the look of a carrot stem. This final touch truly brings your Carrot Patch Chocolate Pudding Cups to life.
Tips for Success and Creative Variations
While this recipe is incredibly straightforward, a few tips can help ensure your pudding cups are absolutely perfect. Furthermore, don’t be afraid to get creative and put your own spin on this classic spring treat.
Pudding and Dirt Variations
For an even richer flavor, consider making a homemade chocolate pudding or mousse. While it takes more time, the decadent taste is well worth the effort. In another variation, you can swap out the crushed chocolate cookies for other ingredients. For example, crushed brownies create a wonderfully moist and dense “dirt.” If you need a great recipe, these Cosmic Brownies Recipe would be a fantastic choice to crumble on top. You could also use chocolate cake crumbs or even chocolate-flavored granola for a different texture.
Get Creative with the “Carrots”
If strawberries are not in season or if you have a picky eater, there are other options for the carrots. You can use cone-shaped ice cream cones (like Bugles) dipped in orange candy melts. Another fun idea is to use actual baby carrots, but this works best if you plan to serve the cups immediately to maintain their crunch. For a completely candy-based treat, you could also look for carrot-shaped gummy candies, which are often available around Easter.
Making Them Ahead of Time
You can easily prepare the components of these Carrot Patch Chocolate Pudding Cups in advance. The pudding can be made and stored in the refrigerator for up to two days. Likewise, the cookie crumbs can be crushed and kept in an airtight container at room temperature. The strawberry carrots can also be made a day ahead and stored in the fridge. However, for the best results, it is recommended to assemble the cups just before serving to ensure the cookie crumbs stay crunchy. If you’re looking for other great make-ahead Easter treats, these Easter Egg Oreo Balls are another fantastic option.
Conclusion

In summary, these Carrot Patch Chocolate Pudding Cups are a wonderfully simple and charming dessert that embodies the playful spirit of spring. With just a few basic ingredients and easy-to-follow steps, you can create an impressive treat that will delight both children and adults. The combination of creamy pudding, crunchy cookies, and sweet, fruity “carrots” makes for a perfectly balanced and enjoyable dessert experience. Therefore, whether you’re planning an Easter celebration or simply want a fun kitchen project, this recipe is a guaranteed winner. So go ahead, get creative, and enjoy planting your very own delicious carrot patch.
Frequently Asked Questions
Can I make these pudding cups gluten-free?
Yes, absolutely! To make a gluten-free version, simply use your favorite gluten-free chocolate sandwich cookies for the “dirt” layer. Most major grocery stores carry excellent gluten-free cookie options that work perfectly for this recipe. Also, ensure that your chocolate pudding mix is certified gluten-free.
How long will these Carrot Patch Chocolate Pudding Cups last in the refrigerator?
Once assembled, these pudding cups are best enjoyed within 24 hours. While they will still be safe to eat for up to 2-3 days, the cookie crumb layer will soften over time, and the strawberries may release some moisture. For the best texture, assemble them as close to serving time as possible.
What can I use instead of orange candy melts?
If you can’t find orange candy melts, you can use white chocolate chips instead. Simply melt the white chocolate and add a few drops of orange oil-based food coloring. It is important to use oil-based coloring, as water-based food coloring can cause the chocolate to seize and become unusable.