Welcome to a dessert experience that is as adorable as it is delicious! If you’re looking for the perfect treat to elevate your Easter celebration, a spring party, or simply to satisfy a sweet craving, you have found the ultimate recipe. These Bunny Tail Hot Cocoa Mousse Cups are a delightful combination of rich, airy chocolate mousse and a crunchy cookie crust, all topped with a whimsical marshmallow bunny tail. This dessert is not only a joy to eat but also incredibly fun to make. Consequently, it’s a fantastic project for both seasoned bakers and beginners alike. Throughout this guide, we will walk you through every step, ensuring your mousse cups turn out perfectly every single time. Prepare to wow your friends and family with a dessert that tastes just like a warm cup of hot cocoa transformed into a light, creamy mousse.
Why You’ll Absolutely Love These Bunny Tail Hot Cocoa Mousse Cups
There are countless reasons why this dessert will quickly become a new favorite in your household. First and foremost, the flavor profile is simply irresistible. Imagine the deep, comforting taste of your favorite hot chocolate, but with the luxurious, melt-in-your-mouth texture of a classic French mousse. Furthermore, the use of actual hot cocoa mix infuses the dessert with a nostalgic sweetness that is both familiar and exciting. The contrast in textures is another key element; for instance, the silky smooth mousse sits atop a firm, crumbly Oreo cookie crust, providing a satisfying crunch in every single spoonful. In addition to the taste and texture, the presentation is undeniably charming. The little marshmallow “bunny tail” makes these mousse cups a showstopper, especially for spring-themed events or an Easter dessert table. They are a delightful alternative to traditional cakes and pies, offering single-serving portions that are easy to distribute and enjoy. Finally, this recipe is surprisingly simple, requiring no baking and using ingredients that are easy to find at any local grocery store.
Print
Bunny Tail Hot Cocoa Mousse Cups
A delightful no-bake dessert featuring a rich, airy hot cocoa mousse over a crunchy cookie crust, topped with a whimsical marshmallow bunny tail. Perfect for Easter or any spring celebration.
- Total Time: 2 hours 50 minutes
- Yield: 6–8 servings 1x
Ingredients
15 chocolate sandwich cookies (like Oreos)
4 tablespoons unsalted butter, melted
1 1/2 cups heavy whipping cream, cold
1 cup semi-sweet chocolate chips
1/4 cup hot cocoa mix
1/4 cup powdered sugar
1 teaspoon vanilla extract
8 large marshmallows
Shredded coconut for rolling (optional)
Instructions
1. Crush the chocolate sandwich cookies into fine crumbs and mix with the melted butter.
2. Press the crumb mixture firmly into the bottom of 6-8 dessert cups and chill for at least 30 minutes.
3. Melt the semi-sweet chocolate chips until smooth and set aside to cool slightly.
4. In a large bowl, beat the cold heavy whipping cream until it begins to thicken.
5. Gradually add the powdered sugar, hot cocoa mix, and vanilla extract, beating until stiff peaks form.
6. Gently fold the cooled, melted chocolate into the whipped cream until just combined.
7. Spoon or pipe the mousse mixture over the chilled crusts in the dessert cups.
8. Refrigerate for at least 2 hours, or until the mousse is firm.
9. Just before serving, top each cup with a large marshmallow to create a ‘bunny tail’.
Notes
These mousse cups can be made up to two days in advance; just add the marshmallow topping before serving. For leftovers, cover and refrigerate for up to three days. You can substitute the cookie crust with crushed Biscoff cookies or chocolate graham crackers.
- Prep Time: 20 minutes
- Cook Time: 0 minutes
- Category: Dessert
- Method: No-Bake
- Cuisine: American
Nutrition
- Serving Size: 1 dessert cup
- Calories: 450 kcal
- Sugar: 35 g
- Sodium: 150 mg
- Fat: 32 g
- Saturated Fat: 20 g
- Unsaturated Fat: 12 g
- Trans Fat: 0 g
- Carbohydrates: 45 g
- Fiber: 2 g
- Protein: 4 g
- Cholesterol: 70 mg
Gathering Your High-Quality Ingredients
The secret to any fantastic dessert lies in the quality of its ingredients. While this recipe for Bunny Tail Hot Cocoa Mousse Cups is straightforward, choosing the right components will make a significant difference in the final product. Therefore, we’ve broken down the list to help you select the very best for each layer of this delightful treat.
For the Silky Hot Cocoa Mousse
This is the star of the show, so paying attention to these ingredients is crucial. A smooth, airy mousse depends on getting this part right.
- Heavy Whipping Cream: Be sure to use full-fat heavy whipping cream. The higher fat content is essential for creating stable, stiff peaks that give the mousse its structure and lightness. Make sure it’s well-chilled before you begin whipping.
- High-Quality Semi-Sweet Chocolate Chips: The chocolate provides the rich base flavor. Using a good quality brand will result in a deeper, more complex chocolate taste. You can also use a chopped chocolate bar.
- Hot Cocoa Mix: This is our special ingredient! Use your favorite brand of hot cocoa mix. A mix with mini marshmallows can be fun, but a classic, smooth mix will yield the best texture.
- Powdered Sugar: This dissolves easily into the cream without creating a grainy texture, adding just the right amount of sweetness to balance the semi-sweet chocolate.
- Vanilla Extract: A small amount of pure vanilla extract enhances the chocolate flavor and adds a layer of aromatic warmth.
For the Crunchy Oreo Crust
The crust provides a wonderful textural contrast and a solid foundation for the light and airy mousse. It’s simple but incredibly effective.
- Chocolate Sandwich Cookies: Classic Oreos are the go-to choice, but any similar chocolate sandwich cookie will work perfectly. You’ll be using the entire cookie, cream filling and all.
- Unsalted Butter: Melted butter acts as the binder that holds the cookie crumbs together, creating a firm and delicious crust for your mousse cups.
For the Adorable Bunny Tail Topping
This final touch is what gives the dessert its name and its irresistible charm. It’s the simple decoration that brings it all together.
- Large Marshmallows: One large marshmallow per cup creates the perfect fluffy bunny tail.
- Shredded Coconut (Optional): For an even fluffier and more textured “tail,” you can roll the marshmallow in a bit of sweetened shredded coconut.
Step-by-Step Instructions
Now that you have all your ingredients ready, it’s time to assemble these delightful Bunny Tail Hot Cocoa Mousse Cups. Following these steps carefully will ensure a perfect result. Remember, this is a no-bake dessert, so the process is all about chilling and assembly.
Part 1: Crafting the Oreo Cookie Crust
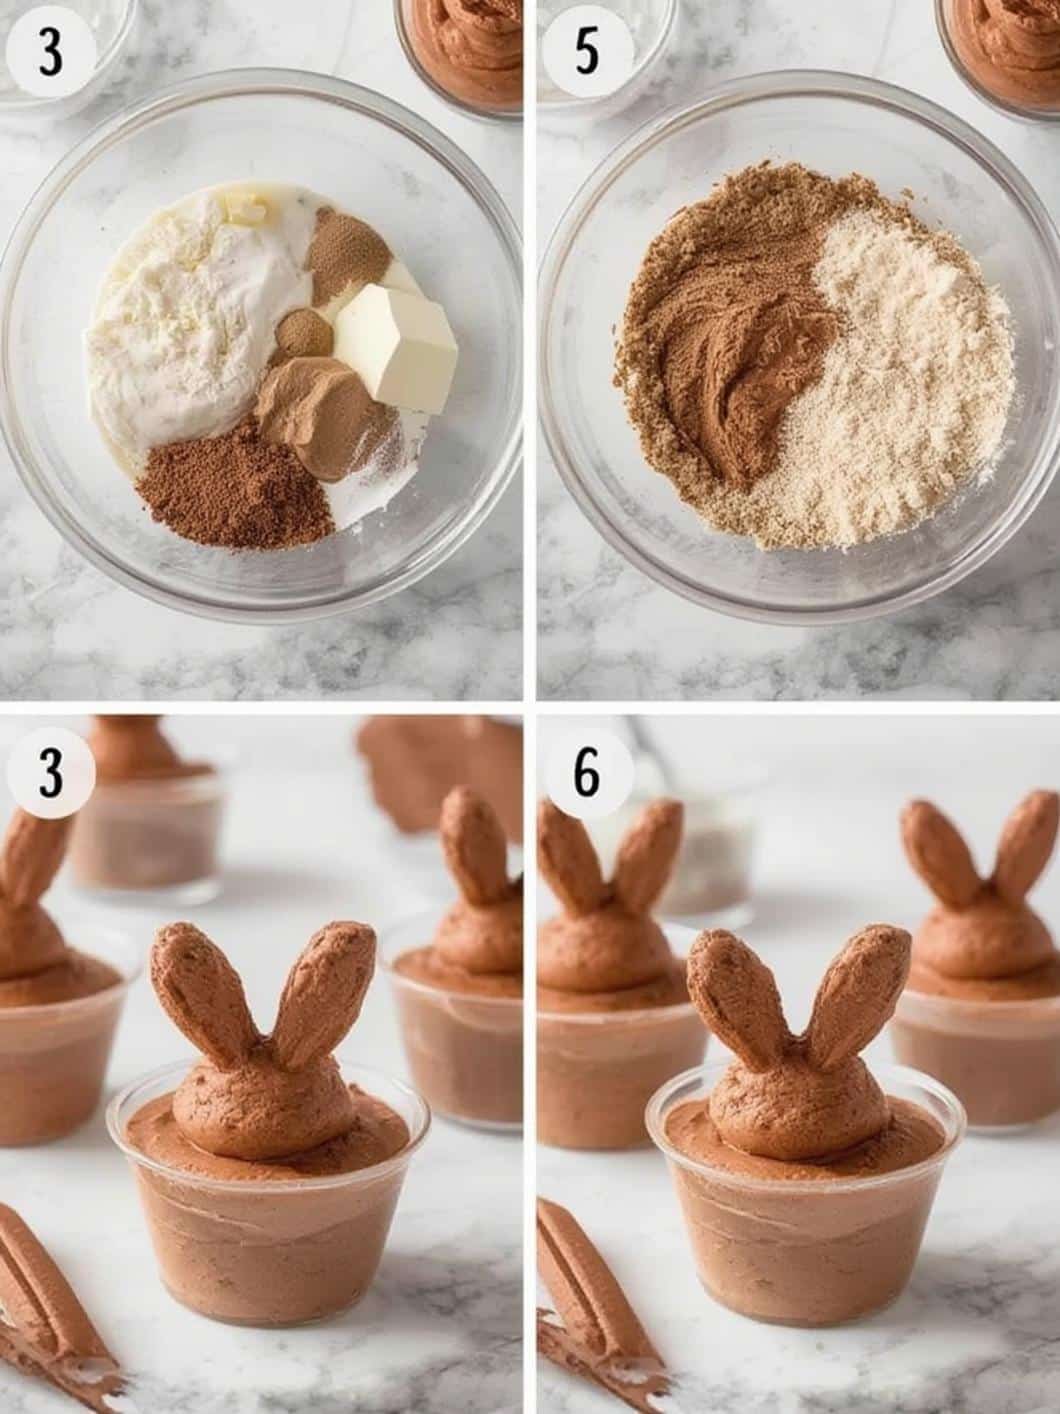
First, we will create the crunchy base for our mousse. Take about 15 chocolate sandwich cookies and place them in a food processor. Pulse until they become fine crumbs. Alternatively, if you don’t have a food processor, you can place the cookies in a zip-top bag and crush them with a rolling pin. Next, transfer the crumbs to a medium bowl. Pour in the melted butter and stir with a fork until all the crumbs are evenly moistened. Following this, spoon the mixture evenly into the bottom of 6 to 8 small dessert cups or glasses. Use the back of a spoon to press the crumbs down firmly, creating a compact layer. Finally, place the cups in the refrigerator to chill for at least 30 minutes while you prepare the mousse.
Part 2: Whipping Up the Light and Airy Hot Cocoa Mousse
While the crust is chilling, you can begin making the mousse. Start by melting your semi-sweet chocolate chips. You can do this in a microwave-safe bowl in 30-second intervals, stirring in between, or in a double boiler over simmering water. Once the chocolate is completely smooth, set it aside to cool slightly. In a separate large bowl, pour in the cold heavy whipping cream. Using an electric hand mixer or a stand mixer with a whisk attachment, beat the cream on medium-high speed. As it begins to thicken, gradually add the powdered sugar, hot cocoa mix, and vanilla extract. Continue to beat until stiff peaks form. This means when you lift the beaters, the cream holds its shape. Next, gently fold the slightly cooled melted chocolate into the whipped cream using a spatula. Be careful not to overmix; instead, use gentle folding motions to combine everything without deflating the air from the cream. The goal is a light, uniformly colored mousse.
Part 3: Assembling and Chilling Your Mousse Cups
With both components ready, it’s time for the final assembly. Remove the chilled crusts from the refrigerator. You can either spoon the mousse mixture on top of the crust or, for a neater appearance, transfer the mousse to a piping bag fitted with a large round tip and pipe it into the cups. Fill each cup almost to the top. Afterwards, return the assembled mousse cups to the refrigerator to chill for at least 2 hours, or until the mousse is firm. This chilling time is crucial for the dessert to set properly. Just before you are ready to serve, top each mousse cup with a single large marshmallow to create the “bunny tail.”
Tips, Tricks, and Fun Variations
To ensure your dessert-making process is as smooth as the mousse itself, here are a few professional tips and creative ideas. These suggestions can help you avoid common pitfalls and also allow you to customize the recipe to your liking. If you’re planning a full Easter spread, these mousse cups pair wonderfully with other festive treats like Fluffy Bunny Butt Cupcakes.
Achieving the Perfect Mousse Consistency
The key to a light and airy mousse is the whipped cream. It is very important not to over-whip your cream; otherwise, it can become grainy. You should stop mixing as soon as stiff peaks form. Additionally, when you combine the melted chocolate with the whipped cream, the “folding” technique is non-negotiable. Folding involves using a spatula to gently cut through the center of the mixture, scrape along the bottom, and bring it up and over the top. This method combines the ingredients while preserving the air you worked so hard to incorporate into the cream. In contrast, stirring would simply deflate the mixture, resulting in a dense, heavy pudding rather than a light mousse.
Creative Customization Ideas
While the classic Bunny Tail Hot Cocoa Mousse Cups recipe is fantastic on its own, there are many ways to add your own personal touch. For example, you can add a teaspoon of instant espresso powder to the melting chocolate to intensify the flavor. For a different flavor profile, consider a layer of raspberry jam or caramel sauce on top of the crust before adding the mousse. You could also experiment with different crusts, such as those made from Biscoff cookies or chocolate graham crackers. For another fun, festive dessert, check out these adorable Marshmallow Peep Nest Brownies.
A Note on Chocolate and Your Health
Indulging in a delicious dessert is one of life’s great pleasures. Interestingly, when you use high-quality dark or semi-sweet chocolate, you might also be getting some health benefits. According to some studies, dark chocolate is rich in antioxidants and may have a positive impact on heart health when enjoyed in moderation. For more information on the potential benefits of chocolate, you can read more from trusted sources like Healthline. Of course, desserts like this are treats and should be consumed as part of a balanced diet, as recommended by health organizations such as the Mayo Clinic.
Conclusion
In summary, creating these delightful Bunny Tail Hot Cocoa Mousse Cups is a simple and rewarding process that yields a truly impressive dessert. With its rich hot cocoa flavor, light-as-air mousse texture, and crunchy cookie base, it is sure to be a hit at any gathering. This no-bake recipe is perfect for getting kids involved in the kitchen and adds a touch of whimsical charm to your dessert table. Ultimately, this treat is more than just a sweet confection; it’s a fun, festive experience from start to finish. We hope you enjoy making and sharing these adorable and delicious mousse cups with your loved ones.
Frequently Asked Questions
Can I make these Bunny Tail Hot Cocoa Mousse Cups ahead of time?
Absolutely! These mousse cups are perfect for making ahead. You can assemble them completely (minus the marshmallow topping) and store them covered in the refrigerator for up to two days. For the best presentation, we recommend adding the marshmallow “bunny tail” just before serving to keep it fresh and fluffy.
What can I use as a substitute for the Oreo cookie crust?
If you don’t have Oreos on hand or prefer a different flavor, you have several great options. Chocolate graham crackers, Biscoff cookies for a spiced flavor, or even shortbread cookies would all make a delicious crust. Simply crush your cookie of choice and mix with melted butter as directed in the recipe.
How should I store any leftovers?
Leftover mousse cups should be covered tightly with plastic wrap or stored in an airtight container in the refrigerator. They will stay fresh and delicious for up to three days. Note that the cookie crust may soften slightly over time, but the dessert will still be incredibly tasty.