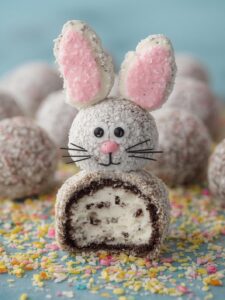
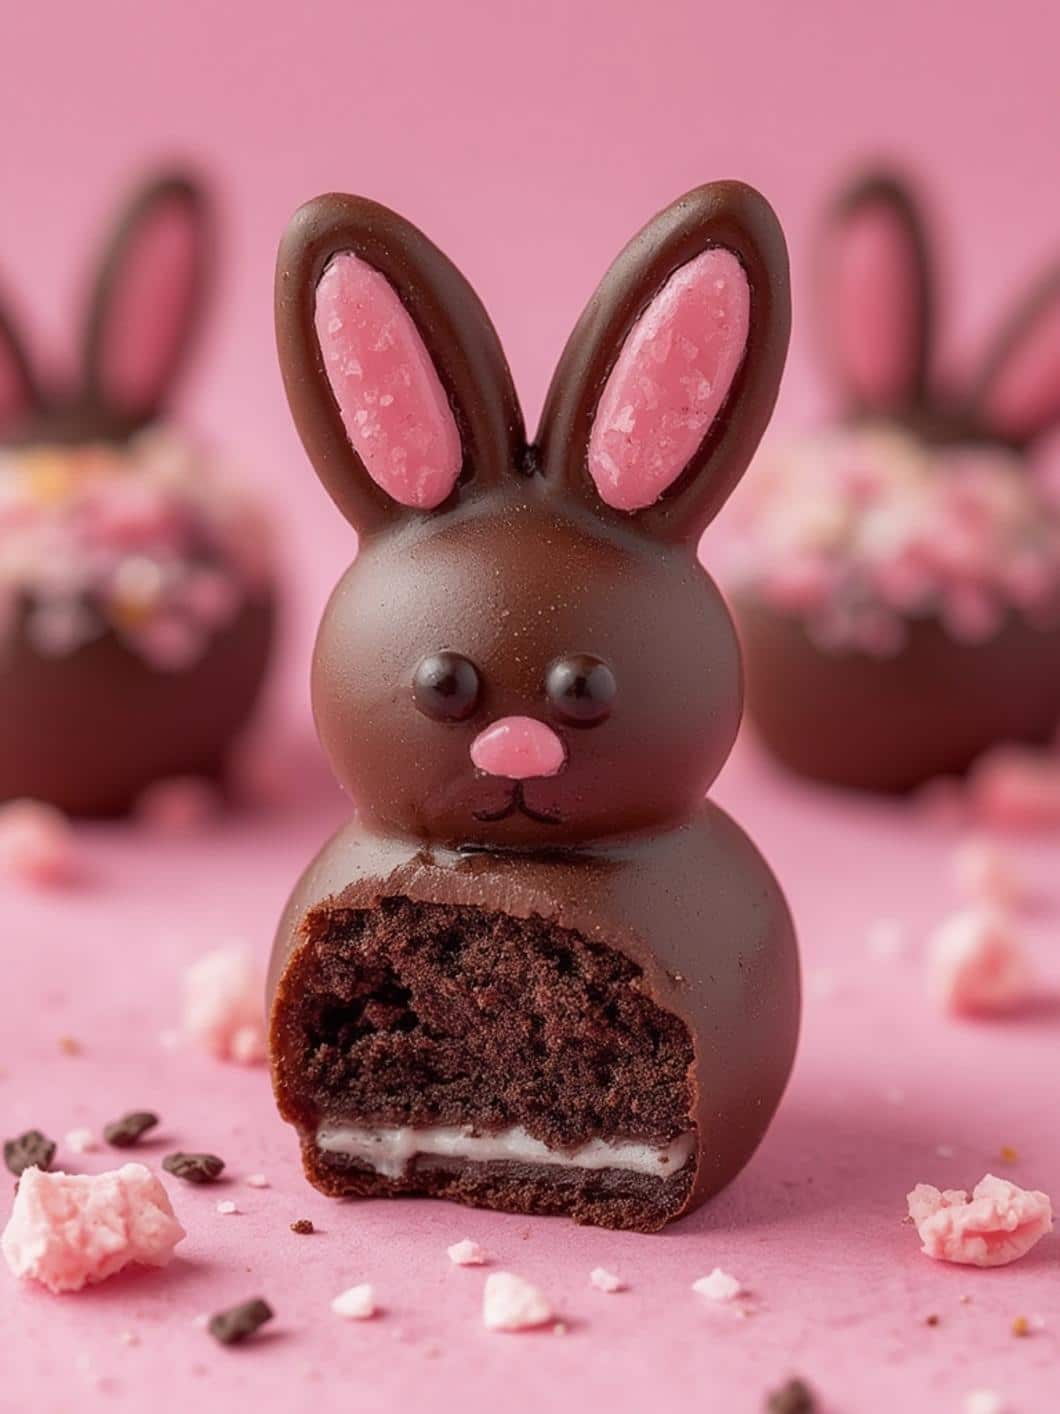
Get ready to create the most adorable and delicious no-bake treat this spring: Bunny Oreo Balls! These delightful little bites are the perfect combination of rich, chocolatey Oreo crumbs and tangy cream cheese, all dipped in a smooth white chocolate coating. Not only are they incredibly easy to make, but their cute bunny design also makes them the star of any Easter celebration or spring gathering. Furthermore, this recipe requires just a handful of simple ingredients and no oven time, which consequently makes it a fantastic activity for bakers of all skill levels, including kids. In this guide, we will walk you through everything you need to know, from the essential ingredients to expert tips for decorating, ensuring your Bunny Oreo Balls turn out perfectly every single time.
Why You’ll Love These Adorable Bunny Oreo Balls
There are countless reasons to fall in love with this simple yet impressive dessert. First and foremost, the recipe is completely no-bake, which means you can whip up a batch without heating up your kitchen. This is especially convenient during busy holiday preparations. In addition, these Bunny Oreo Balls are a guaranteed crowd-pleaser; both kids and adults are drawn to their charming appearance and classic cookies-and-cream flavor. The process of making them is also incredibly fun, providing a wonderful opportunity to get the whole family involved in a creative kitchen project. Consequently, you can create sweet memories along with a sweet treat. Whether you’re looking for an addition to an Easter basket, a centerpiece for your dessert table, or just a festive snack, these truffles are a fantastic choice.
Print
Bunny Oreo Balls
Adorable and delicious no-bake Bunny Oreo Balls, made from Oreo crumbs and cream cheese, dipped in white chocolate. A perfect, easy-to-make treat for Easter or any spring celebration.
- Total Time: 1 hour 10 minutes
- Yield: 30–35 balls 1x
Ingredients
1 (14.3-ounce) package classic Oreo cookies
1 (8-ounce) block full-fat cream cheese, softened
1 (12-ounce) bag white candy melts or almond bark
1–2 teaspoons coconut oil or vegetable shortening (optional)
Large marshmallows, for ears
Pink sanding sugar or pink candy melts
Candy eyeballs
Pink heart-shaped sprinkles, for noses
Instructions
1. Crush the entire package of Oreo cookies into fine crumbs using a food processor or a rolling pin.
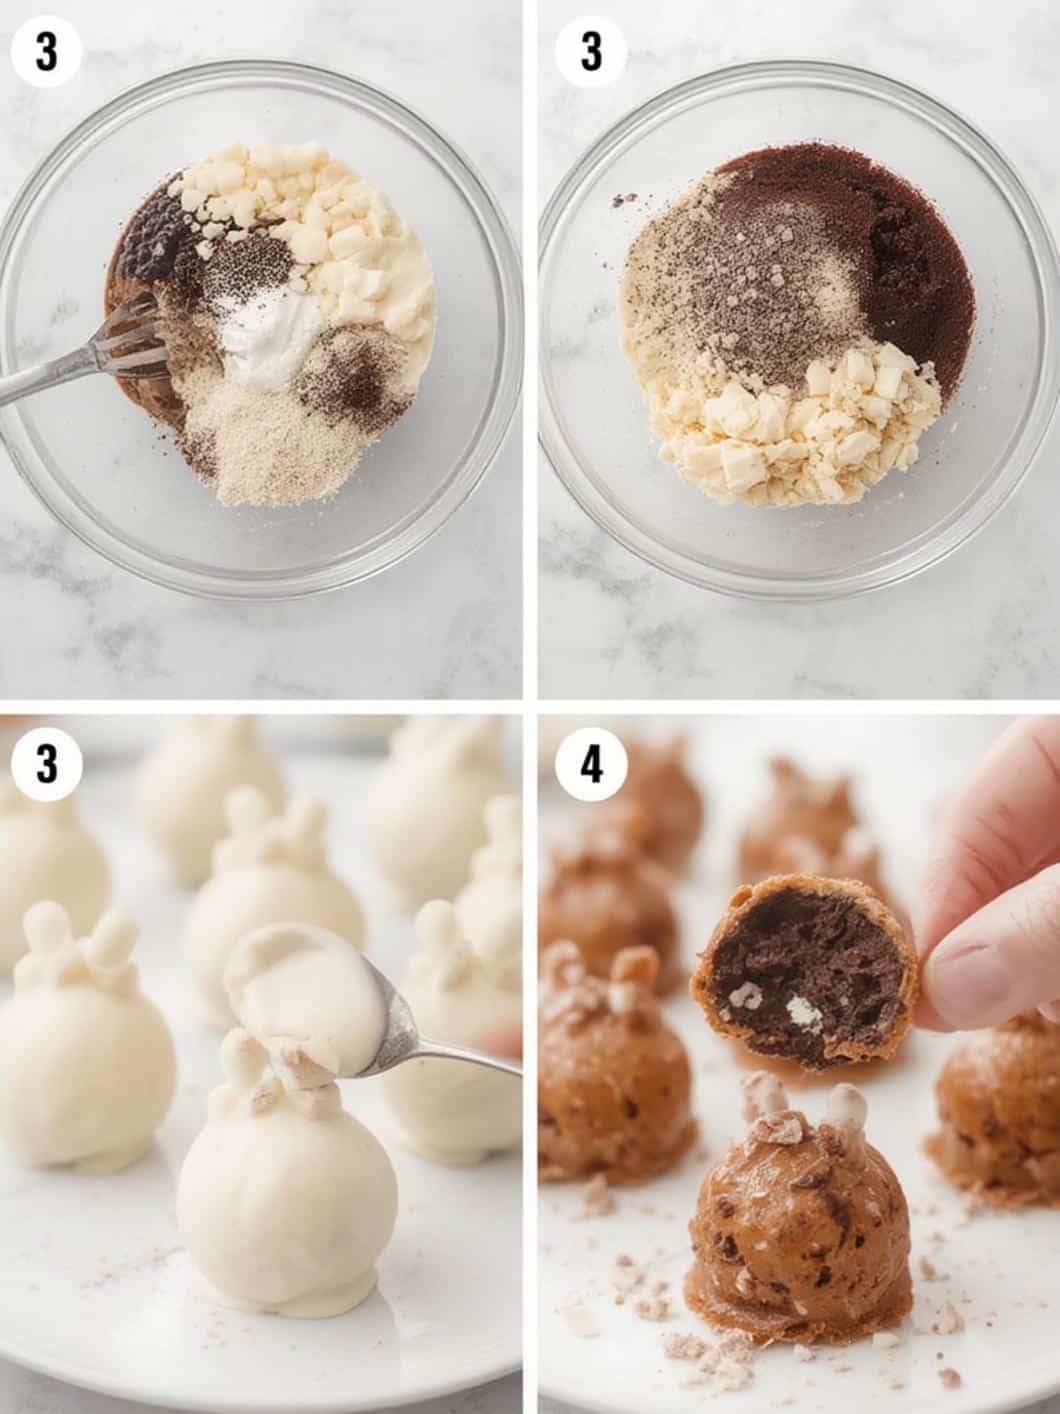
2. In a large bowl, mix the Oreo crumbs and softened cream cheese until fully combined into a thick, dough-like mixture.
3. Roll the mixture into 1-tablespoon sized balls and place on a parchment-lined baking sheet.
4. Freeze the balls for at least 30 minutes until firm.
5. While the balls chill, cut marshmallows in half diagonally and dip the sticky, cut side into pink sanding sugar to create ears.
6. Melt the white candy melts in the microwave in 30-second intervals, stirring until smooth. Add coconut oil to thin if necessary.
7. Using two forks, dip each chilled ball into the melted candy, allowing excess to drip off.
8. Place the coated ball on the baking sheet and immediately attach two marshmallow ears, two candy eyeballs, and a pink heart sprinkle for the nose.
9. Refrigerate the decorated balls for 15-20 minutes, or until the candy coating is completely firm.
Notes
Ensure cream cheese is fully softened for a smooth, lump-free texture. If the melted candy coating is too thick, add a small amount of coconut oil to thin it for easier dipping. Store finished Oreo balls in an airtight container in the refrigerator for up to one week.
- Prep Time: 25 minutes
- Cook Time: 0 minutes
- Category: Dessert
- Method: No-Bake
- Cuisine: American
Nutrition
- Serving Size: 1 ball
- Calories: 150 kcal
- Sugar: 12g
- Sodium: 85mg
- Fat: 8g
- Saturated Fat: 4g
- Unsaturated Fat: 4g
- Trans Fat: 0g
- Carbohydrates: 17g
- Fiber: 1g
- Protein: 1g
- Cholesterol: 15mg
Essential Ingredients and Tools
Before you begin, gathering all your ingredients and tools will make the process run smoothly. The beauty of this Bunny Oreo Balls recipe is its simplicity, and you likely have many of the necessary items in your pantry already. Consequently, preparation is quick and straightforward.
Ingredients You Will Need
Having the right ingredients is the first step to success. For instance, using full-fat cream cheese ensures the Oreo balls have a firm, rich texture that holds together well.
- Oreo Cookies: One standard 14.3-ounce package of classic Oreo cookies is needed. You will use the entire cookie, cream filling and all.
- Cream Cheese: An 8-ounce block of full-fat cream cheese, softened to room temperature. Softening is crucial for a smooth, lump-free mixture.
- White Candy Melts: A 12-ounce bag of white candy melts or almond bark will provide the perfect coating. These melt smoothly and set up firmly.
- Coconut Oil or Vegetable Shortening: One to two teaspoons are optional but highly recommended to thin the melted candy, making dipping much easier.
- Decorations: This is where the magic happens! You will need large marshmallows for the ears, pink candy melts or pink sanding sugar for the inner ear, candy eyeballs, and pink heart-shaped sprinkles for the bunny nose.
Necessary Kitchen Tools
You don’t need any fancy equipment to make these delightful treats. As a matter of fact, a few basic kitchen tools are all it takes to assemble your Bunny Oreo Balls.
- Food Processor: This is the easiest and fastest way to crush the Oreos into fine crumbs.
- Large Mixing Bowl: For combining the Oreo crumbs and cream cheese.
- Baking Sheet: Lined with parchment or wax paper, this is essential for placing the balls on as they chill and set.
- Microwave-Safe Bowls: You will need these for melting the candy melts.
- Forks or a Dipping Tool: Using two forks is a classic trick for dipping truffles, as it allows excess coating to drip off easily.
- Kitchen Shears or Scissors: For cutting the marshmallows to create the bunny ears.
Step-by-Step Instructions
Now that you have everything ready, it is time to start creating your adorable Bunny Oreo Balls. Follow these steps carefully for a perfect result. Remember, patience during the chilling steps is key to making the process easy and mess-free.
First, you must prepare the Oreo mixture. Place the entire package of Oreo cookies into a food processor and pulse until they become fine, uniform crumbs. If you don’t have a food processor, you can alternatively place the cookies in a large, sealed plastic bag and crush them with a rolling pin. Next, transfer the fine crumbs to a large mixing bowl. Add the softened block of cream cheese to the crumbs. Then, using an electric mixer or your hands, mix until the ingredients are fully combined into a thick, dough-like consistency.
Once the mixture is ready, begin shaping your treats. Scoop out about one tablespoon of the Oreo mixture and roll it between your palms to form a smooth ball. Place the ball on a baking sheet lined with parchment paper. Continue this process until you have used all of the mixture, which should yield about 30 to 35 balls. After all the balls are rolled, place the baking sheet in the freezer for at least 30 minutes. Chilling the balls is a critical step because it helps them firm up, which consequently prevents them from falling apart when you dip them in the warm candy coating.
While the Oreo balls are chilling, you can prepare the bunny ears. To do this, take a standard-sized marshmallow and, using clean kitchen shears, cut it in half diagonally. The sticky, cut side of the marshmallow is now exposed. Immediately dip this sticky side into pink sanding sugar to create the pink inner part of the bunny’s ear. Set the ears aside until you are ready to decorate.
After the balls are thoroughly chilled, it is time to melt the coating. Place the white candy melts in a microwave-safe bowl. Microwave them in 30-second intervals, stirring well between each interval, until they are completely melted and smooth. If the coating seems too thick, stir in a teaspoon of coconut oil or shortening to achieve a thinner, more dippable consistency. Now, working with one Oreo ball at a time, use two forks to dip it into the melted white candy. Gently lift the ball out, allowing any excess coating to drip back into the bowl. Place the coated ball back onto the parchment-lined baking sheet.
Immediately after dipping each ball, it is time to decorate. While the coating is still wet, gently press two marshmallow ears into the top. Then, add two candy eyeballs and a pink heart sprinkle for the nose. You must work quickly, as the candy coating will begin to set as soon as it touches the cold Oreo ball. Once all the Bunny Oreo Balls are decorated, place the baking sheet in the refrigerator for about 15-20 minutes, or until the candy coating is completely firm. For other festive treat ideas, you might also enjoy making these adorable Fluffy Bunny Butt Cupcakes.
Tips and Tricks for Perfect Bunny Oreo Balls
Making these treats is simple, but a few expert tips can elevate your Bunny Oreo Balls from good to absolutely perfect. From getting the texture just right to mastering the art of dipping, these tricks will ensure a flawless result. In addition, they can help you troubleshoot any common issues that might arise during the process.
Getting the Consistency Right
The foundation of great Bunny Oreo Balls is the texture of the Oreo and cream cheese mixture. It is essential to use cream cheese that is fully softened to room temperature; otherwise, it will not blend smoothly with the crumbs, resulting in a lumpy texture. Also, be careful not to overmix, as this can make the mixture oily. Mix just until everything is combined. If your mixture feels too soft to roll, simply chill it in the refrigerator for 20 minutes before shaping the balls.
Dipping Like a Pro
A smooth, even candy coating is what makes these treats look professional. The secret to easy dipping is the consistency of your melted candy. If it is too thick, your coating will be clumpy and uneven. Therefore, do not hesitate to add a small amount of coconut oil or shortening to thin it out. Furthermore, using a deep, narrow bowl for your melted candy makes it easier to submerge the entire Oreo ball. The two-fork method is your best friend here: use one fork to lower and lift the ball and the other to help slide it off onto the parchment paper. This technique minimizes mess and ensures a clean finish.
Creative Variations and Ideas
While the classic bunny design is undeniably cute, feel free to get creative. For instance, you could use Golden Oreos for a vanilla-flavored base. For a different look, you could turn them into Easter Egg Oreo Balls by using pastel-colored candy melts and decorating with sprinkles or drizzled chocolate. Another fun idea is to use a black food-safe marker to draw on tiny whiskers once the coating has set. You can also experiment with different decorations, such as small flower sprinkles at the base of the ears. And if you’re looking for more bunny-themed desserts, these Bunny Ear Chocolate Tartlets are another spectacular choice.
Storage and Make-Ahead Guide
Proper storage is important to keep your Bunny Oreo Balls fresh and delicious. Because they contain cream cheese, they must be stored in the refrigerator. Place them in a single layer in an airtight container to prevent them from absorbing any other odors from the fridge. They will stay fresh for up to one week, although they are often eaten long before then! It’s always a good idea to be mindful of food safety, and resources like the Mayo Clinic provide excellent guidelines on handling perishable ingredients.
These treats are also perfect for making ahead of time, which can be a huge help when preparing for a party or holiday. You can prepare the Oreo ball mixture, roll the balls, and store them in an airtight container in the refrigerator for up to two days before dipping and decorating. You can even freeze the undecorated balls for up to a month. When you are ready to decorate, simply thaw them in the refrigerator for a few hours before proceeding with the dipping step. This flexibility makes them an incredibly convenient dessert option. While these treats are a fun indulgence, maintaining a balanced diet is always important, a topic well-covered by experts at WebMD.
Conclusion
In summary, making Bunny Oreo Balls is a delightfully simple and rewarding experience that brings a touch of whimsy to any spring celebration. With just a few basic ingredients and no baking required, you can create a delicious and charming treat that everyone will adore. This recipe is not only easy to follow but also offers plenty of room for creative customization. As a result, you can make them your own with different flavors and decorations. We hope this guide has inspired you to hop into the kitchen and create your own batch of these irresistible Bunny Oreo Balls for your next gathering.
Frequently Asked Questions (FAQ)
Can I make these without a food processor?
Absolutely! If you do not have a food processor, you can place the Oreo cookies in a large, heavy-duty zip-top bag. Squeeze out the excess air, seal it, and then use a rolling pin or the bottom of a heavy pan to crush the cookies into fine crumbs. This method works just as well, though it may take a bit more effort.
Why is my candy coating too thick or clumpy?
Candy melts can sometimes be thick after melting, or they can seize and become clumpy if they come into contact with any water or are overheated. To thin a thick coating, add one teaspoon of coconut oil or vegetable shortening at a time, stirring until it reaches a smooth, fluid consistency. To prevent seizing, ensure all your bowls and utensils are completely dry and avoid overheating the candy in the microwave.
How long do Bunny Oreo Balls last?
Because they are made with cream cheese, these Bunny Oreo Balls must be kept refrigerated. When stored properly in an airtight container, they will stay fresh and delicious for up to one week.
Can I freeze the finished Bunny Oreo Balls?
Yes, you can freeze them. For best results, freeze them in a single layer on a baking sheet until they are solid, then transfer them to an airtight, freezer-safe container. They can be frozen for up to one month. When you’re ready to serve them, let them thaw in the refrigerator for a few hours. Be aware that sometimes condensation can form on the candy coating during thawing.