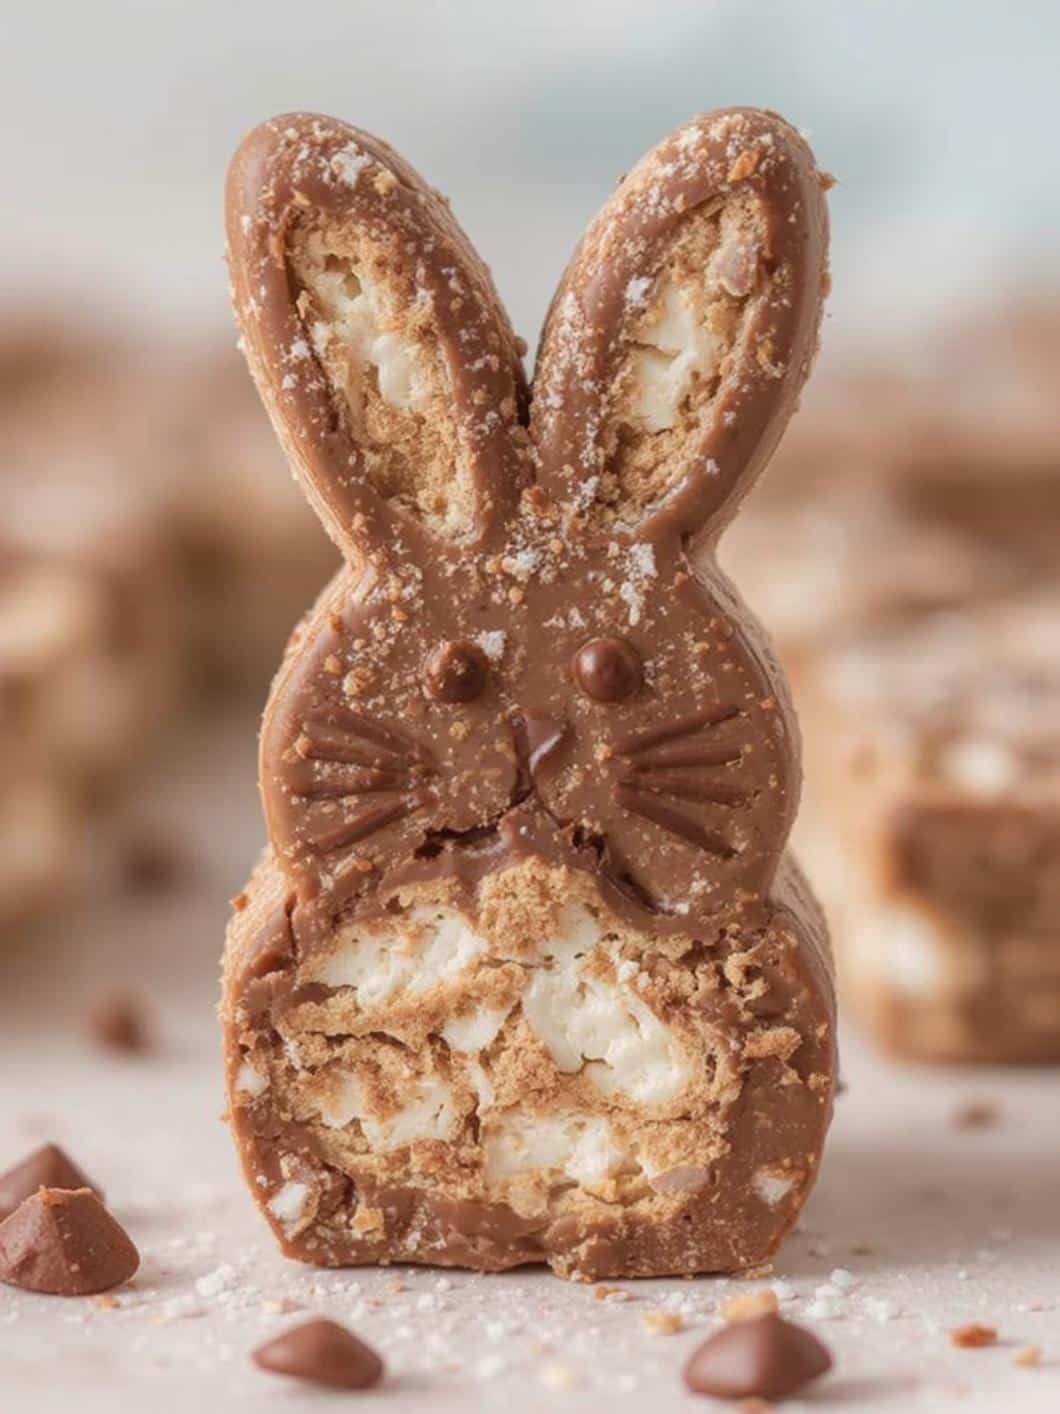
Get ready to create the most delightful and delicious treat for your spring and Easter celebrations! These Bunny Marshmallow Rocky Road Bars are a no-bake wonder, packed with rich chocolate, crunchy cookies, and adorable, chewy bunny-shaped marshmallows. Because they require no oven time, they are an incredibly easy dessert that anyone can make, from seasoned bakers to complete beginners. Furthermore, this recipe is highly customizable, allowing you to tailor the flavors and textures to your exact liking. Whether you’re preparing a treat for a school party, a family gathering, or simply a sweet snack for the weekend, these bars are guaranteed to bring smiles and satisfy any sweet tooth. This guide will walk you through everything you need to know to create the perfect batch every single time.
What Makes These Bunny Marshmallow Rocky Road Bars So Irresistible?
The magic of rocky road lies in its incredible combination of textures and flavors, and this festive version takes it to a whole new level. First and foremost, the textural contrast is simply divine. You experience the smooth, decadent melt of rich chocolate, which is then immediately followed by the soft, pillowy chew of marshmallows. In addition, crunchy pieces of shortbread cookies or biscuits provide a satisfying snap, while optional nuts add a hearty, earthy crunch. It’s a symphony of sensations in every single bite.
Moreover, the visual appeal is undeniable. The colorful, bunny-shaped marshmallows peeking through the dark chocolate create a whimsical and charming look that is perfect for Easter and springtime. They are not just a dessert; they are a festive decoration for your dessert table. Consequently, they are incredibly popular with both kids and adults. The fact that this is a no-bake recipe is another major draw. You can whip up a batch of these Bunny Marshmallow Rocky Road Bars in under 30 minutes of active time, making it a perfect last-minute dessert option without ever having to preheat your oven.
Print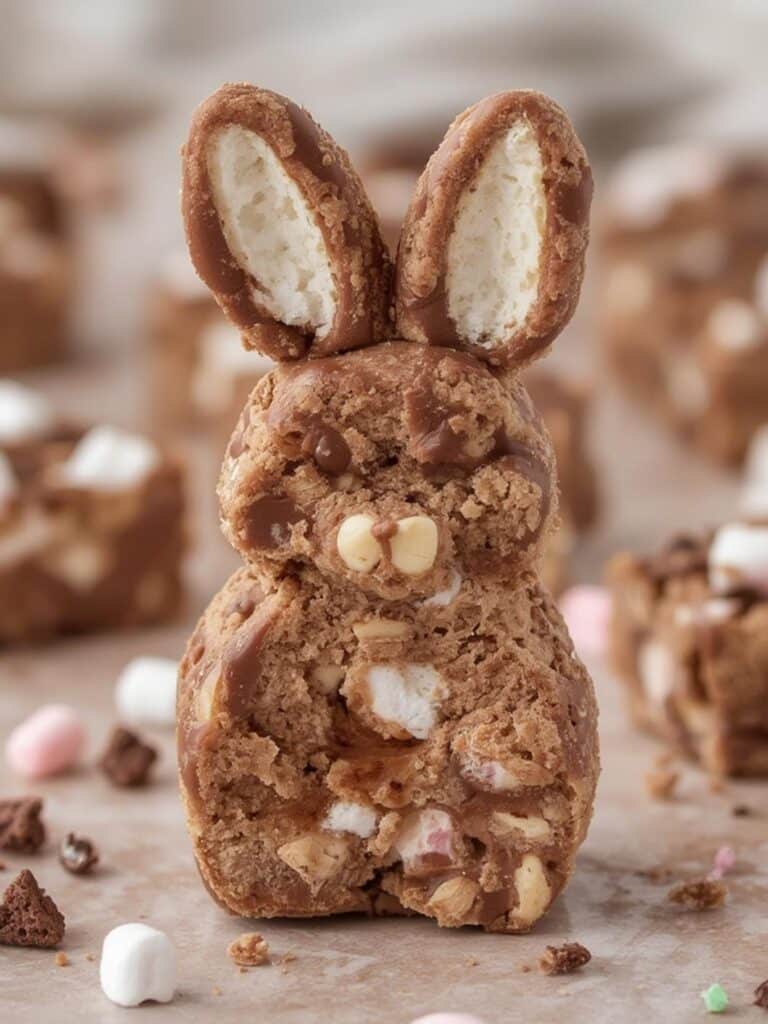
Bunny Marshmallow Rocky Road Bars
Bunny Marshmallow Rocky Road Bars are a no-bake wonder, packed with rich chocolate, crunchy cookies, and adorable, chewy bunny-shaped marshmallows. This easy dessert is highly customizable and perfect for spring and Easter celebrations.
- Total Time: 2 hours 15 minutes
- Yield: 16 bars 1x
Ingredients
12 oz semi-sweet chocolate chips or chopped chocolate
2 tbsp butter or coconut oil
3 cups bunny-shaped marshmallows, divided
2 cups shortbread cookies, broken into bite-sized pieces
1/2 cup toasted walnuts or pecans (optional)
Instructions
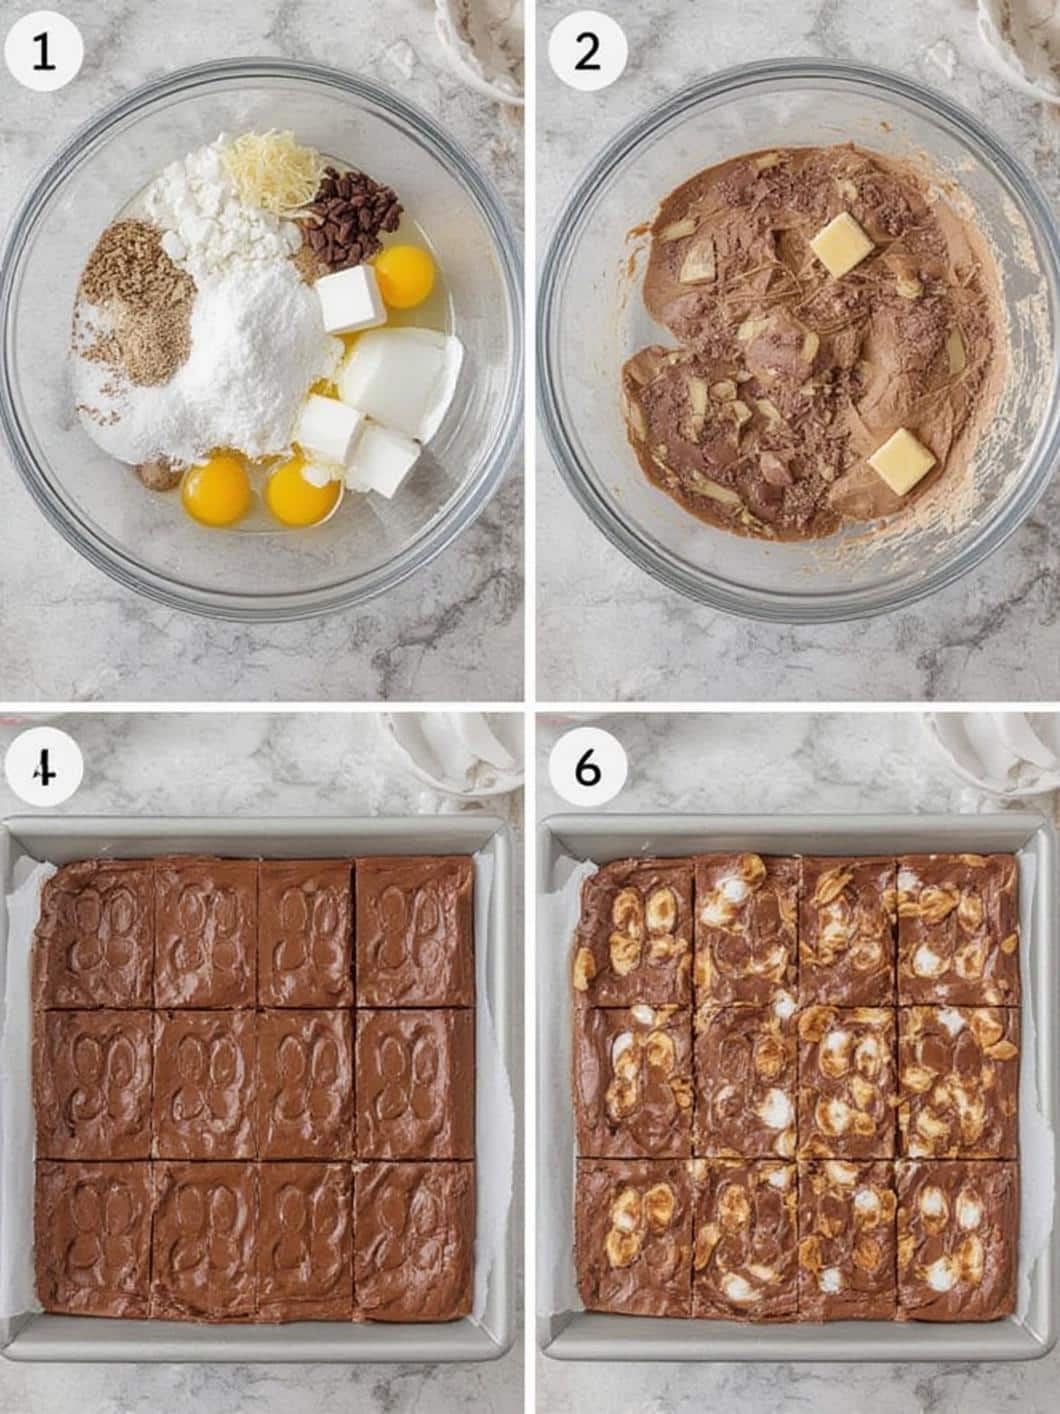
1. Line an 8×8 inch pan with parchment paper, leaving an overhang on the sides to act as handles.
2. In a large microwave-safe bowl, melt the chocolate and butter in 30-second intervals, stirring until completely smooth.
3. In a separate bowl, combine the broken cookie pieces, optional nuts, and most of the bunny marshmallows, reserving about one cup for the topping.
4. Pour the slightly cooled melted chocolate over the marshmallow and cookie mixture and gently fold until everything is evenly coated.
5. Transfer the mixture to the prepared pan and press down firmly and evenly.
6. Sprinkle the reserved marshmallows and cookie pieces over the top, pressing them gently into the surface.
7. Refrigerate for at least 2-3 hours, or until the chocolate is completely firm.
8. Use the parchment paper handles to lift the block from the pan, then slice into bars and serve.
Notes
For variations, try adding a teaspoon of vanilla extract to the chocolate, a swirl of peanut butter, or some dried fruit. Store bars in an airtight container in the refrigerator for up to one week. They can also be frozen for up to two months.
- Prep Time: 15 minutes
- Cook Time: 0 minutes
- Category: Dessert
- Method: No-Bake
- Cuisine: American
Nutrition
- Serving Size: 1 bar
- Calories: 230
- Sugar: 20g
- Sodium: 80mg
- Fat: 12g
- Saturated Fat: 7g
- Unsaturated Fat: 5g
- Trans Fat: 0g
- Carbohydrates: 28g
- Fiber: 1g
- Protein: 2g
- Cholesterol: 15mg
Essential Ingredients You’ll Need
Before you begin, gathering the right ingredients is the first step toward success. While the core components are simple, the quality of each one can significantly affect the final taste and texture of your bars. Therefore, let’s break down what you’ll need.
The Chocolate Foundation
Chocolate is the glue that holds everything together, so choosing a good quality one is crucial. You can use chocolate chips or chopped chocolate bars.
- Semi-Sweet Chocolate: This is the classic choice. It provides a perfect balance of sweetness and rich cocoa flavor that complements the other ingredients without being overpowering.
- Milk Chocolate: If you have a major sweet tooth or are making these primarily for children, milk chocolate is an excellent option. It results in a sweeter, creamier bar.
- Dark Chocolate: For a more intense and sophisticated flavor, dark chocolate (60-70% cacao) is fantastic. It beautifully contrasts the sweetness of the marshmallows and cookies. You can also use a combination, for instance, half semi-sweet and half dark chocolate.
The Stars of the Show: Marshmallows and Cookies
These components provide the signature “rocky” texture.
- Bunny-Shaped Marshmallows: These are typically available in the seasonal aisle of most grocery stores leading up to Easter. If you can’t find them, you can absolutely use regular mini marshmallows instead. The taste will be the same, but you’ll miss a bit of the festive look.
- Crunchy Cookies or Biscuits: Shortbread cookies are a great choice because their buttery flavor pairs wonderfully with chocolate. Digestive biscuits or even Biscoff cookies also work very well. You’ll want to break them into small, bite-sized pieces.
Optional Add-Ins for Extra Crunch and Flavor
This is where you can get creative and customize your bars.
- Nuts: Toasted walnuts, pecans, or almonds add a wonderful, nutty crunch. Toasting them beforehand brings out their flavor even more. However, if you’re concerned about nut allergies, feel free to leave them out. According to the Mayo Clinic, it’s always best to be cautious when serving treats to a crowd.
- Butter or Coconut Oil: A small amount melted with the chocolate helps create a smoother consistency and a fudgier texture that cuts more cleanly.
Step-by-Step Instructions
Now, let’s get to the fun part: making these amazing no-bake bars. Follow these simple steps for perfect results.
First, prepare your pan. Take an 8×8 inch or 9×9 inch baking pan and line it with parchment paper, leaving some overhang on the sides. This overhang will act as handles, making it much easier to lift the bars out of the pan later. Next, in a large, microwave-safe bowl, combine your chosen chocolate chips and the butter or coconut oil. Microwave in 30-second intervals, stirring well after each one, until the chocolate is completely melted and smooth. Be careful not to overheat it. Alternatively, you can melt the chocolate and butter in a double boiler over simmering water.
While the chocolate cools slightly, prepare your mix-ins. In a separate large bowl, combine the broken cookie pieces, most of the bunny marshmallows, and any nuts you’re using. Be sure to reserve about a cup of the marshmallows and some cookie chunks for topping the bars later. Subsequently, pour the slightly cooled melted chocolate over the dry ingredients. Using a spatula, gently fold everything together until all the ingredients are evenly coated in chocolate.
After that, immediately transfer the mixture into your prepared pan. Use the back of your spatula to press the mixture down firmly and evenly across the entire pan. This step is important for ensuring the bars hold together well. Then, sprinkle the reserved bunny marshmallows and cookie pieces over the top, gently pressing them into the surface so they adhere. For another fun Easter treat idea, you might also enjoy our Pastel Easter Egg Fudge Squares.
Finally, it’s time to let them set. Place the pan in the refrigerator for at least 2 to 3 hours, or until the chocolate is completely firm. Once firm, use the parchment paper handles to lift the entire block out of the pan. Place it on a cutting board and, using a sharp knife, slice it into squares. Your delicious Bunny Marshmallow Rocky Road Bars are now ready to serve!
Creative Variations and Storage Tips
One of the best things about this recipe is its versatility. You can easily adapt it to suit different tastes and dietary needs.
Flavor Twists and Customizations
Don’t be afraid to experiment with different flavors. For instance, you could add a teaspoon of vanilla or peppermint extract to the melted chocolate for a different taste profile. A swirl of peanut butter or caramel sauce folded in at the end can add another layer of decadence. For a fruity twist, consider adding some dried cranberries or cherries. If you love festive baking, our Fluffy Bunny Butt Cupcakes are another must-try recipe for the season.
Proper Storage
Storing your Bunny Marshmallow Rocky Road Bars correctly is essential to keep them fresh. They should be kept in an airtight container in the refrigerator. At room temperature, they can become too soft, especially in warmer climates. When stored properly in the fridge, they will stay fresh and delicious for up to one week. You can also freeze them for longer-term storage. To do so, wrap the bars individually in plastic wrap and then place them in a freezer-safe bag. They will keep well in the freezer for up to two months.
The Sweet History of Rocky Road
Interestingly, the origin of this classic confection is a topic of sweet debate. Many food historians trace it back to Australia in 1853, where it was supposedly created as a way to use up confectionery that had spoiled during its long journey from Europe. Entrepreneurs would mix these sweets with local nuts and cheap chocolate and sell it to gold miners. The name “Rocky Road” was a nod to the difficult path travelers had to take to reach the goldfields.
However, an American company also lays claim to its invention. In 1929, William Dreyer of Dreyer’s Grand Ice Cream is said to have cut up walnuts and marshmallows with his wife’s sewing shears and added them to his chocolate ice cream. He named the creation “Rocky Road” during the Great Depression to give people something to smile about amidst the economic turmoil. Regardless of its true origin, the combination of chocolate, marshmallows, and nuts has become a beloved classic worldwide. And while it’s certainly an indulgent treat, high-quality dark chocolate does contain antioxidants. As noted by sources like Healthline, dark chocolate consumed in moderation can be part of a balanced lifestyle.
Conclusion
In summary, making Bunny Marshmallow Rocky Road Bars is an incredibly fun, easy, and rewarding experience. This no-bake recipe delivers a delightful treat that perfectly balances rich chocolate with chewy and crunchy textures. Because it is so simple to prepare, it is an ideal activity to do with kids and a fantastic solution for a last-minute dessert need. Furthermore, its festive appearance makes it a standout addition to any Easter or springtime celebration. Therefore, gather your ingredients and get ready to create a delicious dessert that is sure to become a new family favorite.
Frequently Asked Questions
Can I make these Bunny Marshmallow Rocky Road Bars ahead of time?
Absolutely! In fact, these bars need at least two hours in the refrigerator to set properly, so they are a perfect make-ahead dessert. You can easily prepare them a day or two before you plan to serve them. Just keep them stored in an airtight container in the refrigerator until you’re ready.
What can I use if I can’t find bunny-shaped marshmallows?
If seasonal bunny marshmallows are unavailable, you can simply substitute them with regular mini marshmallows. For a colorful alternative, you could also use pastel-colored mini marshmallows, which are often available in the spring. The taste and texture will be just as delicious.
Why didn’t my rocky road set properly?
The most common reason for rocky road not setting is not using enough chocolate to bind the ingredients or not letting it chill for long enough. Ensure you are using the correct ratios listed in the recipe. Also, be patient and allow the bars to chill in the refrigerator for at least 2-3 hours, or until completely firm to the touch, before attempting to slice them.
Can I freeze rocky road bars?
Yes, you can! These bars freeze very well. For best results, slice them into individual portions first. Then, wrap each bar tightly in plastic wrap and place them in a freezer-safe bag or container. They can be stored in the freezer for up to two months. Simply let them thaw in the refrigerator for an hour or so before enjoying.