Welcome to the ultimate guide for creating the most adorable and delicious spring dessert: Bunny Face Cheesecake Bars. As the weather warms up and holidays like Easter approach, finding a treat that is both festive and incredibly tasty can be a delightful challenge. Fortunately, this recipe checks all the boxes. These cheesecake bars feature a buttery graham cracker crust, a rich and creamy cheesecake filling, and are topped with a charming bunny face decoration that will bring a smile to everyone’s face. Consequently, they are the perfect centerpiece for any dessert table. Whether you are an experienced baker or just starting, this guide will walk you through every step, ensuring your baking adventure is a complete success. Furthermore, we will cover everything from essential ingredients to expert tips for achieving that perfect cheesecake texture.
Why You’ll Absolutely Adore This Recipe
There are countless reasons to fall in love with these delightful Bunny Face Cheesecake Bars. First and foremost, they offer the decadent flavor of a classic cheesecake but in a much more approachable, shareable format. Instead of dealing with the potential pitfalls of a large, round cheesecake, such as water baths and cracking, you get perfectly portioned bars that are simple to make and serve. As a result, this recipe is fantastic for bakers who might be intimidated by traditional cheesecakes.
In addition, the visual appeal is simply undeniable. The cute bunny face design makes these treats an instant hit at any gathering, especially with children. It’s a wonderful opportunity to get creative in the kitchen and even let the kids help with the decorating part. Moreover, the combination of a crunchy, sweet crust with the smooth, tangy cheesecake filling creates a textural and flavorful experience that is truly satisfying. They are not just a dessert; they are a memorable activity and a centerpiece all in one. For this reason, they are ideal for Easter brunch, spring parties, or simply as a special weekend treat for the family.
Print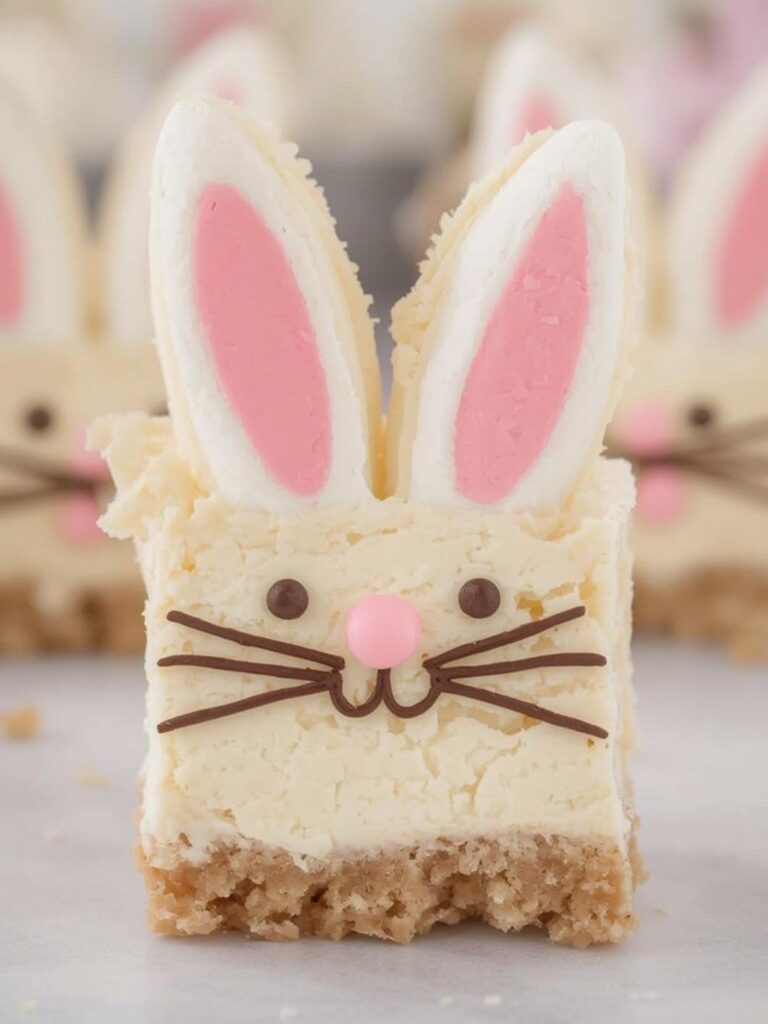
Bunny Face Cheesecake Bars
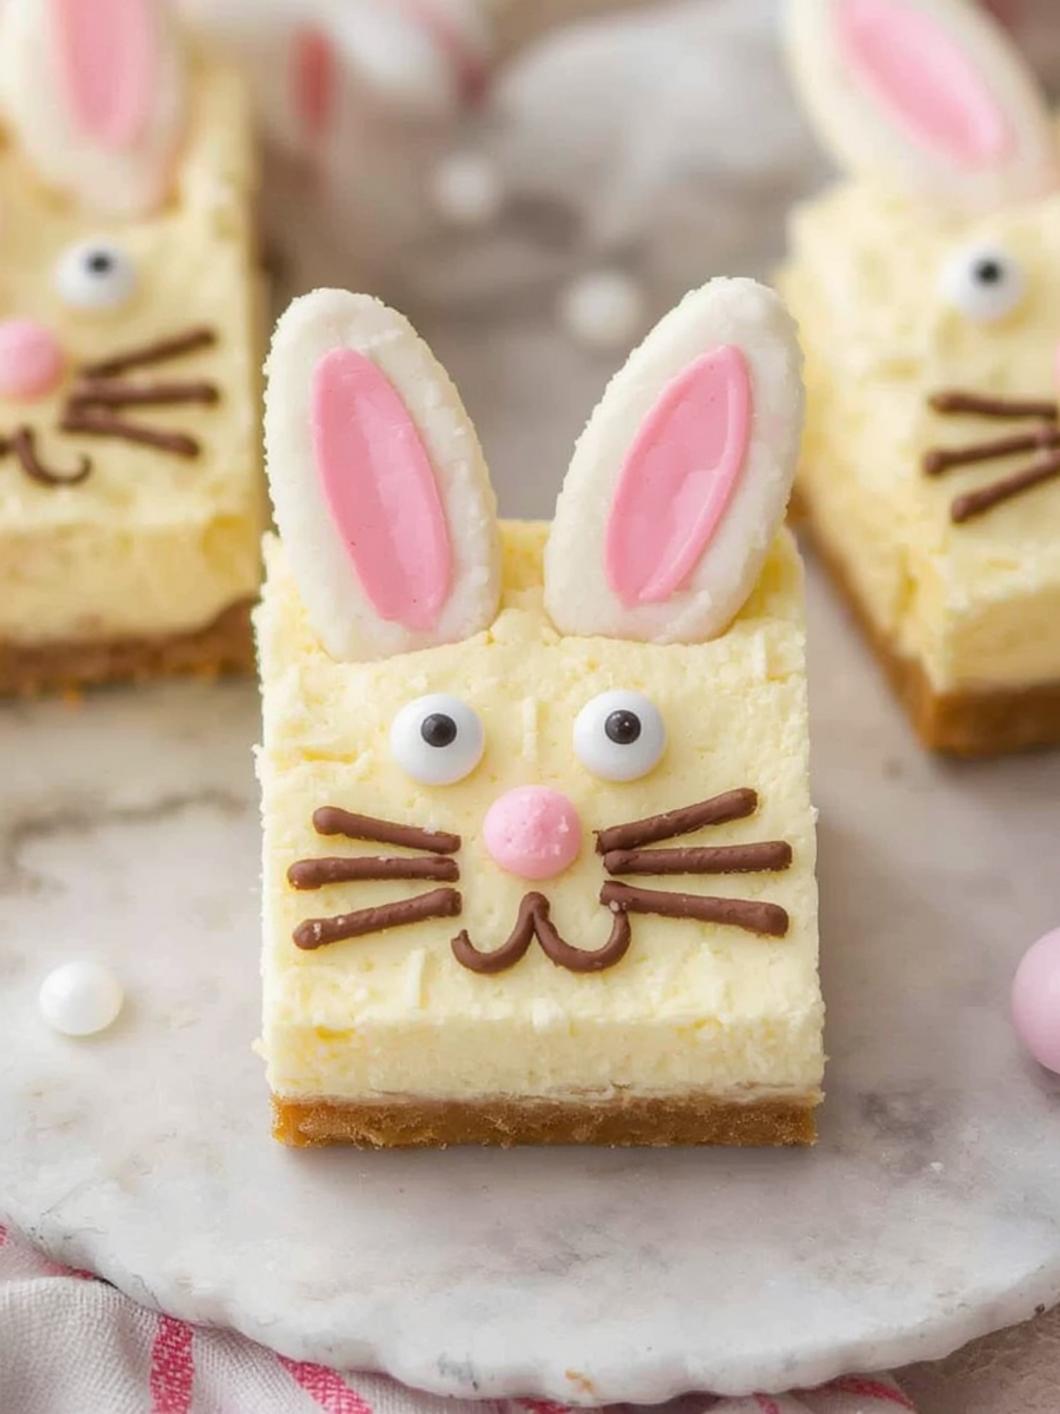
These festive cheesecake bars feature a buttery graham cracker crust, a rich and creamy cheesecake filling, and are topped with a charming bunny face decoration, perfect for spring or Easter.
- Total Time: 6 hours 15 minutes
- Yield: 9 to 12 bars
Ingredients
Graham Cracker Crumbs
1/2 cup Unsalted Butter, melted
1/4 cup Granulated Sugar
2 (8 ounce) packages Full-Fat Cream Cheese, room temperature
1 cup Granulated Sugar
2 Large Eggs, room temperature
1/2 cup Sour Cream or Plain Greek Yogurt
1 tsp Pure Vanilla Extract
1 tbsp Fresh Lemon Juice
1 cup White Chocolate Chips or Wafers
1/4 cup Pink Candy Melts
Black Decorating Gel or Mini Chocolate Chips
Instructions
1. Preheat oven to 325°F and line a 9×9 inch pan with parchment paper, leaving an overhang on the sides.
2. In a bowl, combine graham cracker crumbs, melted butter, and sugar, then press the mixture firmly into the prepared pan.
3. Bake the crust for 10 minutes, then set aside to cool slightly.
4. In a large bowl, beat the room temperature cream cheese until smooth, then gradually beat in the sugar.
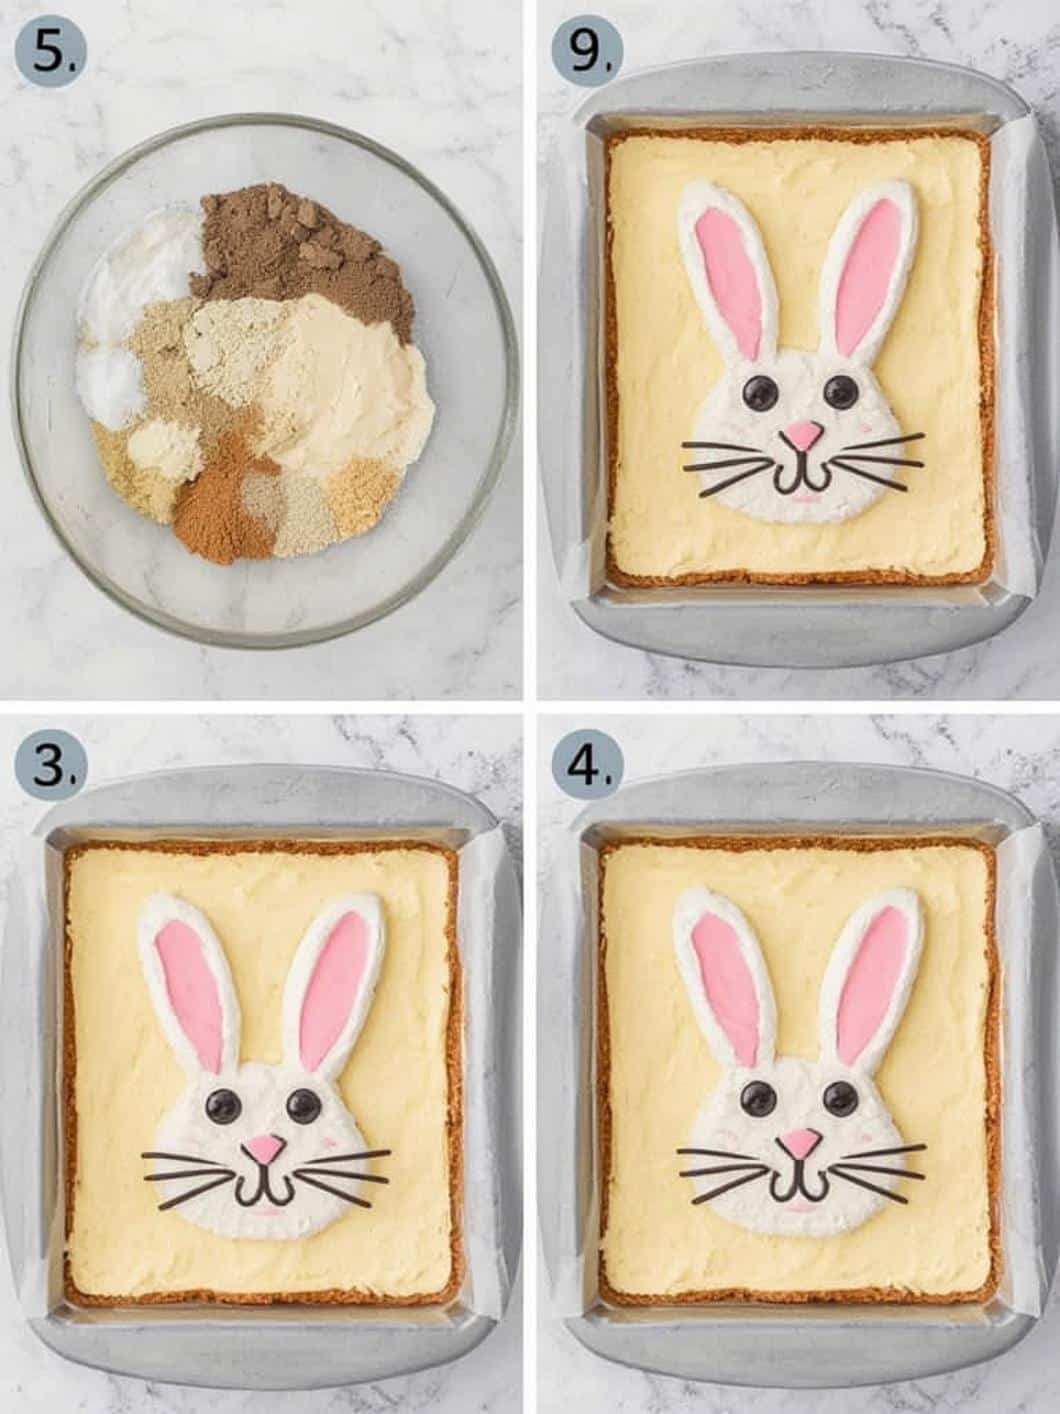
5. Add eggs one at a time on low speed, then gently mix in the sour cream, vanilla extract, and lemon juice until just combined.
6. Pour the filling evenly over the pre-baked crust and smooth the top with a spatula.
7. Bake for 35-45 minutes, until the edges are set and the center has a slight jiggle.
8. Turn off the oven and let the cheesecake cool inside with the door cracked open for one hour, then cool completely at room temperature.
9. Cover the pan and chill in the refrigerator for at least 4 hours, or preferably overnight.
10. Use parchment handles to lift the cheesecake from the pan and cut into 9 or 12 bars, wiping the knife clean between cuts.
11. Melt the white chocolate and pink candy melts in separate bowls.
12. On parchment paper, create oval shapes with white chocolate for ears, add smaller pink ovals inside, and let them harden.
13. Place a round dollop of melted white chocolate on each bar for the face, attach two hardened ears, and use gel or mini chips for the eyes and nose.
Notes
For a perfectly smooth cheesecake, ensure all dairy and eggs are at room temperature. For clean, professional cuts, dip a sharp knife in hot water and wipe it clean between each slice. Undecorated bars can be made 2 days in advance and stored in the fridge.
- Prep Time: 25 minutes
- Cook Time: 50 minutes
- Category: Dessert
- Method: Baking
- Cuisine: American
Nutrition
- Serving Size: 1 bar
- Calories: 360
- Sugar: 28g
- Sodium: 210mg
- Fat: 24g
- Saturated Fat: 14g
- Unsaturated Fat: 8g
- Trans Fat: 0g
- Carbohydrates: 31g
- Fiber: 1g
- Protein: 6g
- Cholesterol: 95mg
Essential Ingredients You Will Need
To begin your baking journey, it’s important to gather all the necessary ingredients. Using high-quality components will significantly impact the final taste and texture of your dessert. Therefore, we’ve broken down the ingredient list into three main parts: the crust, the filling, and the decorations.
For the Buttery Graham Cracker Crust
The foundation of any great cheesecake bar is a solid crust. A classic graham cracker crust provides the perfect balance of sweetness and crunch to complement the creamy filling. You will need:
- Graham Cracker Crumbs: You can buy pre-crushed crumbs or make your own by pulsing whole graham crackers in a food processor.
- Unsalted Butter: Melted butter is the binder that holds the crust together, giving it a rich, buttery flavor.
- Granulated Sugar: A little bit of sugar adds sweetness and helps the crust caramelize slightly during its pre-bake.
For the Rich and Creamy Cheesecake Filling
The star of the show is, of course, the cheesecake filling. The key to a velvety smooth texture is using room temperature ingredients, which allows them to combine seamlessly without lumps. For the filling, you will need:
- Full-Fat Cream Cheese: It is crucial to use blocks of full-fat cream cheese, not the whipped or spreadable kind in a tub. Room temperature cream cheese is essential for a smooth, lump-free batter. Cream cheese also offers some health benefits, as it contains vitamin A and certain antioxidants. You can learn more about its nutritional profile at Healthline.
- Granulated Sugar: This sweetens the filling and contributes to its tender structure.
- Large Eggs: Eggs are a vital binder and provide structure. Again, make sure they are at room temperature to ensure they mix evenly into the batter.
- Sour Cream or Plain Greek Yogurt: This ingredient adds a wonderful tanginess that cuts through the richness of the cream cheese. It also contributes to an extra creamy texture.
- Pure Vanilla Extract: A splash of high-quality vanilla enhances all the other flavors in the cheesecake.
- Lemon Juice: A small amount of fresh lemon juice brightens the flavor of the cream cheese, giving it a fresh, clean taste.
For the Adorable Bunny Face Decorations
This is where the magic happens! Decorating the bars is a fun and creative process. Here’s what you’ll need to bring your bunnies to life:
- White Chocolate Chips or Wafers: These will be melted to create the bunny’s ears and head shape.
- Pink Candy Melts or Food Coloring: To create the pink inner part of the bunny’s ears. If using food coloring, be sure to use an oil-based one so it doesn’t cause the white chocolate to seize.
- Black Decorating Gel or Mini Chocolate Chips: For creating the bunny’s eyes and nose.
Step-by-Step Instructions
Now that you have all your ingredients ready, it’s time to start baking. Following these steps carefully will guarantee flawless Bunny Face Cheesecake Bars.
- Prepare Your Pan and Oven: First, preheat your oven to 325°F (163°C). Then, line a 9×9 inch baking pan with parchment paper, leaving an overhang on the sides. This overhang will act as handles, making it much easier to lift the bars out of the pan later.
- Make the Crust: In a medium bowl, combine the graham cracker crumbs, melted butter, and granulated sugar. Stir until the mixture resembles wet sand. Afterward, press this mixture firmly and evenly into the bottom of your prepared pan.
- Pre-Bake the Crust: Bake the crust for 10 minutes. This step helps create a sturdier base that won’t get soggy from the filling. Once baked, remove it from the oven and set it aside to cool slightly.
- Create the Cheesecake Filling: In a large bowl, use a hand mixer or stand mixer to beat the room temperature cream cheese until it is completely smooth and creamy. Next, gradually add the granulated sugar and continue to beat until well combined. Scrape down the sides of the bowl to ensure everything is incorporated.
- Add Remaining Filling Ingredients: Add the eggs one at a time, mixing on low speed just until each one is incorporated. Be careful not to overmix, as this can introduce too much air and cause cracking. Finally, gently mix in the sour cream, vanilla extract, and lemon juice.
- Assemble and Bake: Pour the cheesecake filling evenly over the pre-baked crust. Then, smooth the top with a spatula. Bake for 35-45 minutes, or until the edges are set and the center has a slight jiggle.
- Cool Completely: This is a very important step. Turn off the oven and let the cheesecake bars cool inside the oven with the door cracked open for one hour. Subsequently, remove them from the oven and let them cool completely at room temperature on a wire rack.
- Chill for Several Hours: Once at room temperature, cover the pan with plastic wrap and transfer it to the refrigerator. Chill for at least 4 hours, but preferably overnight. Chilling is essential for the cheesecake to set properly. Proper setting is important, and you can read more about food safety practices at Mayo Clinic.
- Cut into Bars: After chilling, use the parchment paper handles to lift the cheesecake out of the pan. Place it on a cutting board and use a large, sharp knife to cut it into 9 or 12 equal bars. For clean cuts, wipe the knife with a hot, damp cloth between each slice.
- Decorate Your Bunnies: Melt the white chocolate in a microwave-safe bowl in 30-second intervals, stirring in between. On a separate piece of parchment paper, use a spoon to create oval shapes for the bunny ears. Melt the pink candy melts and add a smaller pink oval inside each white ear. Let them harden. Place a round dollop of melted white chocolate on top of each cheesecake bar for the face. While it’s still wet, place two ears at the top. Use black decorating gel or mini chocolate chips to create the eyes and nose. Let the decorations set completely before serving.
Tips and Tricks for Perfect Bunny Face Cheesecake Bars
Achieving bakery-quality results at home is easy with a few professional tips. Following these suggestions will elevate your Bunny Face Cheesecake Bars from good to absolutely unforgettable.
Achieving the Perfect Cheesecake Texture
The secret to a flawlessly smooth cheesecake is using room temperature ingredients. Consequently, cold cream cheese will result in a lumpy batter, no matter how much you mix it. Similarly, room temperature eggs and sour cream incorporate more easily, preventing overmixing. Overmixing is a primary cause of cracks in cheesecake because it incorporates too much air. Therefore, mix on low speed and only until the ingredients are just combined.
Cutting Clean and Professional-Looking Bars
For those perfect, clean edges, the temperature of your knife is key. Fill a tall glass with hot water and dip your knife into it before making each cut. Then, wipe the knife clean with a paper towel. This simple trick melts the cheesecake just enough to slice through it without dragging, resulting in beautiful, sharp edges for every single bar.
Fun Decoration Variations
While the white chocolate bunny faces are classic, feel free to get creative! For instance, you could sprinkle shredded coconut on the white chocolate face to give your bunny some “fur.” Alternatively, you could use different colored candy melts for the ears or even use sprinkles for the nose and whiskers. Another fun idea is to use a different type of crust, such as one made from Oreo cookies or shortbread, to change up the flavor profile. If you enjoy creative holiday desserts, you might also love our Easter Egg Oreo Balls.
Make-Ahead and Storage Instructions
These Bunny Face Cheesecake Bars are an excellent make-ahead dessert. You can bake the bars up to two days in advance and store them, undecorated, in an airtight container in the refrigerator. In fact, their flavor often improves after a day in the fridge. For longer storage, you can freeze the uncut block of cheesecake (without decorations) for up to one month. Simply wrap it tightly in plastic wrap and then a layer of aluminum foil. Thaw it overnight in the refrigerator before cutting and decorating.
Fun Easter Dessert Pairings and Ideas
These Bunny Face Cheesecake Bars are a star on their own, but they also play well with others on a festive dessert table. To create a truly impressive spread for your Easter or spring celebration, consider pairing them with other themed treats. For example, colorful macarons, lemon tarts, or a fresh fruit platter can provide a lovely contrast in flavor and color. For another show-stopping Easter dessert, consider trying these Strawberry Shortcake Easter Egg Bombs, which are equally festive and delicious.
Building a dessert buffet allows guests to sample a little bit of everything. You could include bowls of pastel-colored candies, chocolate eggs, and perhaps a simple vanilla cake decorated with spring flowers. The key is to have a variety of textures and flavors. These creamy Bunny Face Cheesecake Bars will be the centerpiece that ties everything together, offering a rich and satisfying option amidst lighter fare. It is also important to consider any dietary restrictions your guests may have, and you can find information on common food allergens on sites like WebMD.
Conclusion
In conclusion, this recipe for Bunny Face Cheesecake Bars is the perfect way to add a touch of whimsy and deliciousness to your spring celebrations. With a buttery crust, a luxuriously creamy filling, and an irresistibly cute design, they are guaranteed to be a crowd-pleaser. By following the detailed instructions and expert tips provided, you can confidently create a dessert that looks as amazing as it tastes. Ultimately, baking these bars is a joyful activity that brings people together. So, gather your ingredients, preheat your oven, and get ready to create a memorable treat that will have everyone hopping back for more.
Frequently Asked Questions
Can I use a different type of cookie for the crust?
Absolutely! While graham crackers are classic, you can easily substitute them with other cookies. For a chocolatey twist, try using Oreo cookie crumbs (no need to remove the filling). Shortbread cookies or vanilla wafers also make a delicious, buttery crust that pairs wonderfully with the cheesecake filling.
How long will these Bunny Face Cheesecake Bars last in the refrigerator?
Stored in an airtight container, the cheesecake bars will stay fresh and delicious for up to 5 days in the refrigerator. In fact, many people find that the flavor and texture of the cheesecake deepens and improves after the first day, making them an ideal make-ahead dessert.
What can I use for the bunny eyes if I don’t have decorating gel?
If you don’t have black decorating gel, you have several great alternatives. Mini chocolate chips are a popular choice and are very easy to apply. You could also use a small dab of melted dark chocolate, applied with a toothpick, to create the eyes. Black nonpareils or other small, dark sprinkles would also work perfectly well.
Is it possible to make this recipe gluten-free?
Yes, you can easily adapt this recipe to be gluten-free. Simply substitute the graham crackers in the crust with your favorite gluten-free cookies or graham-style crackers. The cheesecake filling is naturally gluten-free, so no other substitutions are needed. Just be sure to check that all your other ingredients, like vanilla extract, are certified gluten-free.