Easter is a time of celebration, family gatherings, and of course, delicious food. While the main course often gets the spotlight, the dessert is truly the grand finale. Consequently, if you’re looking for a dessert that is not only delicious but also a stunning centerpiece for your holiday table, look no further than this incredible Bunny Ears Pavlova Wreath. This dessert is a beautiful symphony of textures and flavors, featuring a crisp meringue shell that gives way to a soft, marshmallowy interior. Furthermore, it’s filled with luscious whipped cream and topped with fresh, vibrant berries. The adorable bunny ears add a whimsical touch that makes this pavlova wreath an unforgettable Easter treat for all ages.
What Exactly Is a Pavlova?
Before we dive into creating our festive wreath, let’s talk about the star of the show: the pavlova. A pavlova is a meringue-based dessert named after the Russian ballerina Anna Pavlova. It has a famously crisp crust and a soft, light inside, which distinguishes it from a hard meringue. Interestingly, its origin is a point of contention between Australia and New Zealand, with both countries claiming to have invented the delightful dessert in the 1920s to honor the dancer during her tour.
Regardless of its origin, the pavlova is celebrated for its simple yet elegant nature. The base is typically made from whipped egg whites and sugar, which are baked at a low temperature to achieve that signature texture. The magic happens during the cooling process, which allows the exterior to become brittle while the inside remains pillowy soft. Because it’s made primarily with egg whites and sugar, a pavlova is naturally gluten-free, making it an excellent option for guests with dietary restrictions. In fact, many people follow specific eating plans that can still accommodate such a treat. For more information on dietary choices, you can find valuable resources at Healthline.
Print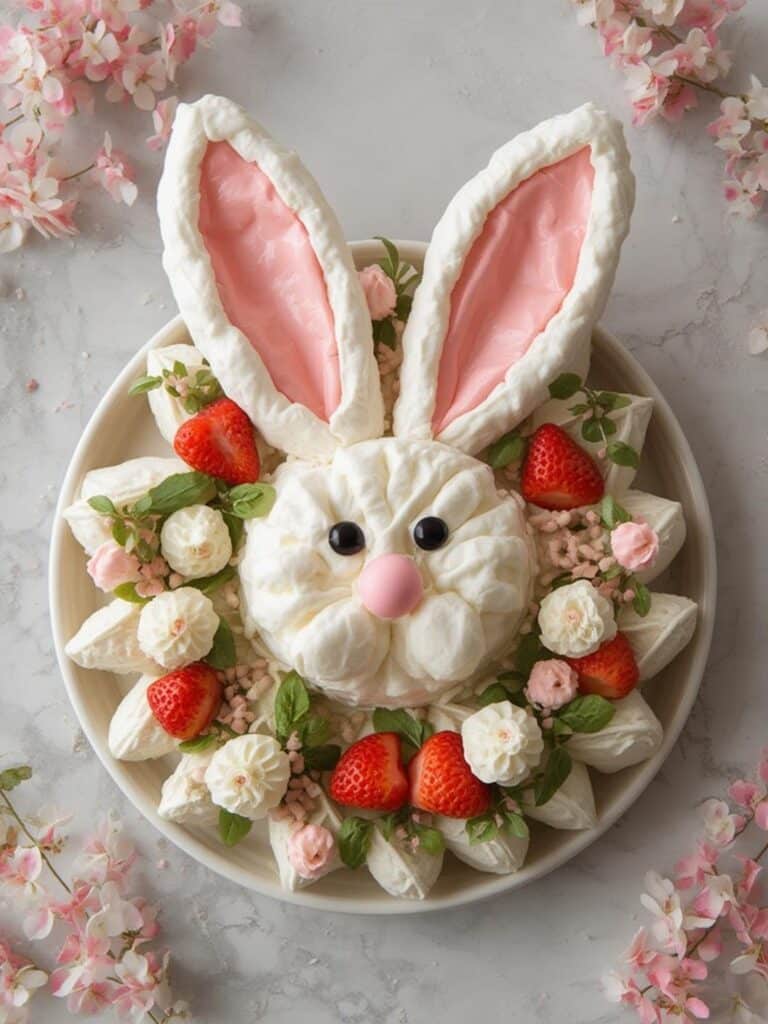
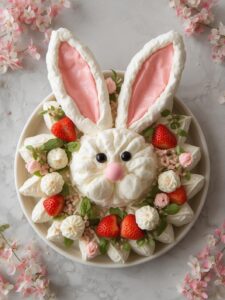
Bunny Ears Pavlova Wreath
A stunning Easter dessert featuring a crisp meringue wreath with a soft, marshmallowy center, filled with whipped cream and topped with fresh berries and adorable bunny ears.
- Total Time: 2 hours
- Yield: 8–10 servings 1x
Ingredients
6 large egg whites, at room temperature
1 1/2 cups superfine (caster) sugar
2 tsp cornstarch
1 tsp white vinegar
1 tsp vanilla extract
2 cups heavy whipping cream, cold
1/4 cup powdered sugar
3 cups mixed fresh berries (strawberries, blueberries, raspberries)
White chocolate or cookies for bunny ears
Fresh mint leaves for garnish (optional)
Instructions
1. Preheat oven to 250°F (120°C) and draw a 9-inch wreath template on a sheet of parchment paper.
2. In a very clean bowl, beat the room-temperature egg whites on medium-high speed until soft peaks form.
3. Gradually add the superfine sugar one tablespoon at a time, beating continuously until the meringue is stiff, thick, and glossy.
4. Gently fold in the cornstarch, white vinegar, and vanilla extract until just combined.
5. Spoon the meringue onto the parchment paper following your template, creating a wreath shape with swirls and peaks.
6. Place in the oven, immediately reduce the temperature to 225°F (110°C), and bake for 75-90 minutes until the exterior is dry and crisp.
7. Turn the oven off, prop the door open slightly, and let the pavlova cool completely inside for several hours or overnight.
8. Just before serving, whip the cold heavy cream with powdered sugar until soft peaks form.
9. Carefully transfer the cooled meringue wreath to a serving platter and top with whipped cream, fresh berries, and bunny ears.
Notes
Use room temperature egg whites and an impeccably clean, grease-free bowl. Add sugar very slowly to ensure it fully dissolves for a stable meringue. Assemble just before serving for the best texture; the meringue base can be made 1-2 days ahead and stored in an airtight container at room temperature.
- Prep Time: 30 minutes
- Cook Time: 1 hour 30 minutes
- Category: Dessert
- Method: Baking
- Cuisine: Australian
Nutrition
- Serving Size: 1 slice
- Calories: 320
- Sugar: 35g
- Sodium: 80mg
- Fat: 18g
- Saturated Fat: 11g
- Unsaturated Fat: 7g
- Trans Fat: 0g
- Carbohydrates: 39g
- Fiber: 1g
- Protein: 2g
- Cholesterol: 65mg
Why You’ll Love This Bunny Ears Pavlova Wreath Recipe
There are countless reasons to fall in love with this particular dessert. It’s more than just a sweet treat; it’s an experience that brings joy and a touch of elegance to any occasion, especially Easter.
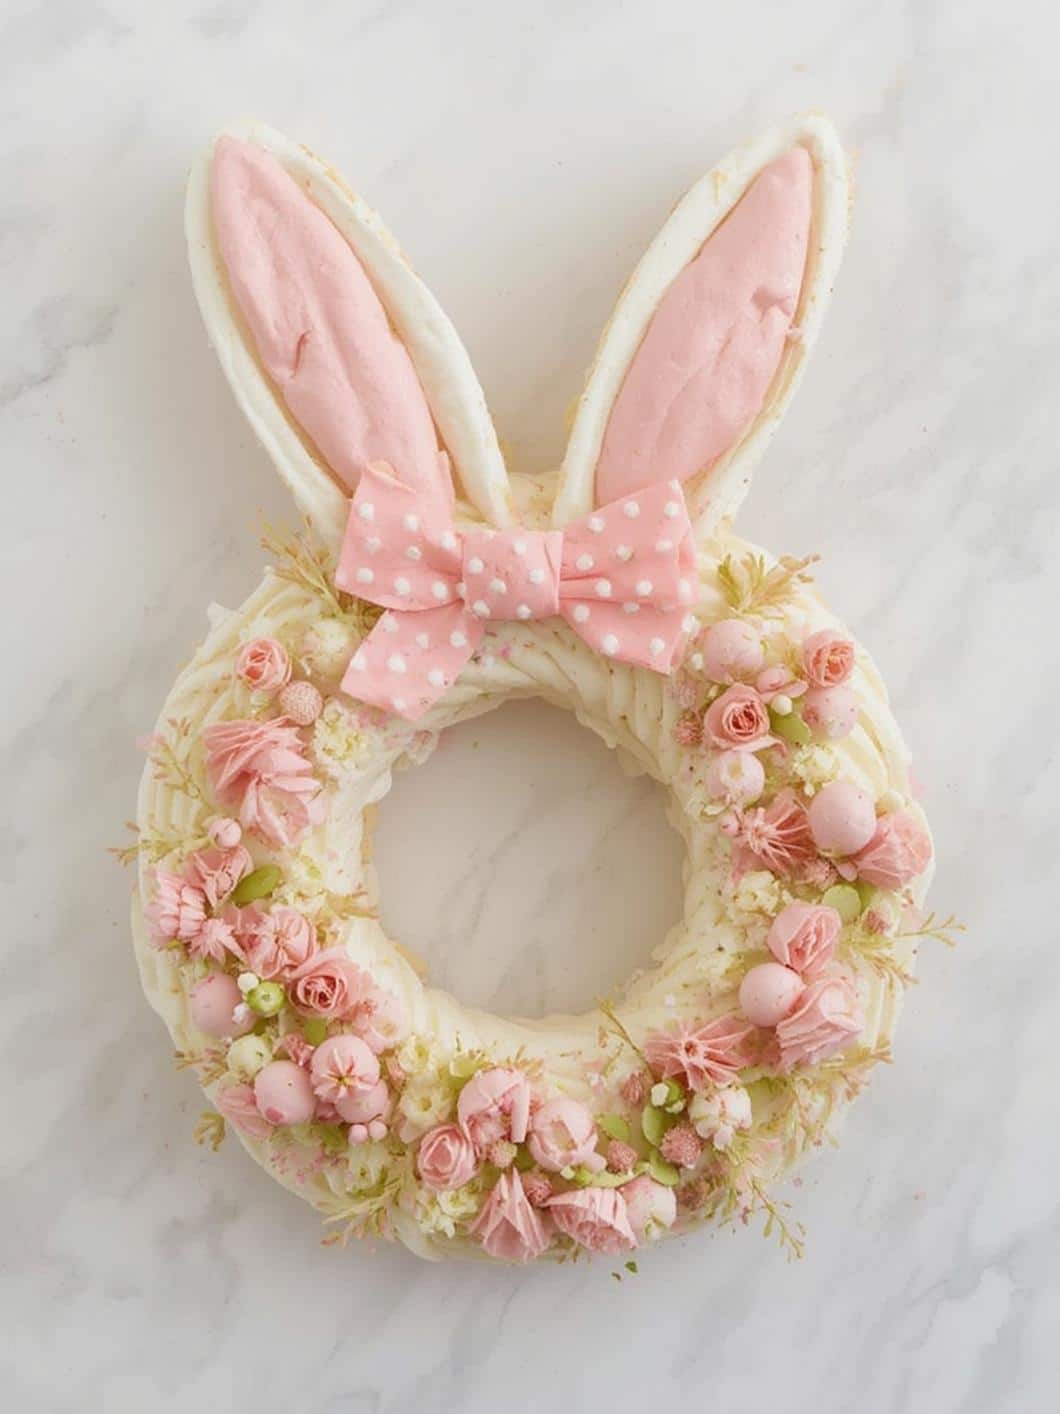
A Showstopping Centerpiece
First and foremost, the visual appeal of the Bunny Ears Pavlova Wreath is undeniable. The wreath shape, piled high with billowy cream and colorful berries, is stunning on its own. However, the addition of cute bunny ears transforms it into a festive masterpiece that will have your guests reaching for their cameras before they reach for their forks. It instantly elevates your dessert table from simple to spectacular.
Surprisingly Simple to Make
Many home bakers are intimidated by the idea of making meringue, but it’s much easier than you might think. With just a few key ingredients and some important tips, which we’ll cover in detail, you can achieve a perfect pavlova base. The process is straightforward, and the result is incredibly rewarding. Therefore, don’t let the fear of a cracked or weeping meringue hold you back from trying this amazing recipe.
Light and Airy Dessert
After a hearty Easter dinner, a heavy, dense dessert can sometimes feel like too much. A pavlova, on the other hand, is wonderfully light and airy. The combination of the delicate meringue, fluffy cream, and fresh fruit is refreshing and satisfying without being overly rich. As a result, it’s the perfect, sweet conclusion to a big holiday meal.
Customizable and Fun
Another great aspect of this Bunny Ears Pavlova Wreath is its versatility. While this recipe suggests a classic combination of mixed berries, you can customize the toppings to your heart’s content. For example, you could use tropical fruits, drizzle it with chocolate or caramel sauce, or even sprinkle it with toasted nuts. The decorating possibilities are endless, making it a fun project for the whole family to get involved in.
Essential Ingredients and Equipment
To ensure your pavlova-making process is smooth and successful, it’s important to gather all your ingredients and tools before you begin. A little preparation goes a long way, especially with meringue.
For the Pavlova Wreath:
- Egg Whites: You will need large egg whites, preferably at room temperature. This helps them whip up to their maximum volume.
- Superfine Sugar: Also known as caster sugar, it dissolves more easily than granulated sugar, which is crucial for a smooth, stable meringue.
- Cornstarch: This is the secret ingredient for that soft, marshmallowy center.
- White Vinegar: Just a teaspoon helps to stabilize the egg whites, ensuring a strong meringue structure. Lemon juice can also be used as a substitute.
- Vanilla Extract: For a touch of warm flavor that complements the cream and fruit.
For the Toppings and Decoration:
- Heavy Whipping Cream: To create the luscious, creamy filling.
- Powdered Sugar: To lightly sweeten the whipped cream.
- Fresh Berries: A mix of strawberries, blueberries, raspberries, and blackberries adds color, freshness, and a bit of tartness to balance the sweet meringue.
- Bunny Ears: You can make these from melted white chocolate piped onto parchment paper, or use specially shaped cookies. For an extra festive touch, you could even adapt these speckled Easter egg sugar cookies by using a bunny ear cookie cutter.
- Optional Garnishes: Fresh mint leaves, mini chocolate eggs, or a dusting of powdered sugar.
Necessary Kitchen Tools:
- Stand mixer with a whisk attachment or a powerful electric hand mixer.
- A large baking sheet lined with parchment paper.
- A pencil and a round object (like a dinner plate) for tracing your wreath shape.
- A clean, dry bowl for whipping the egg whites.
- A flexible spatula for folding.
Step-by-Step Instructions for the Perfect Bunny Ears Pavlova Wreath
Now it’s time to create your edible work of art. Follow these steps carefully, and you’ll have a perfect pavlova wreath ready for its delicious decorations.
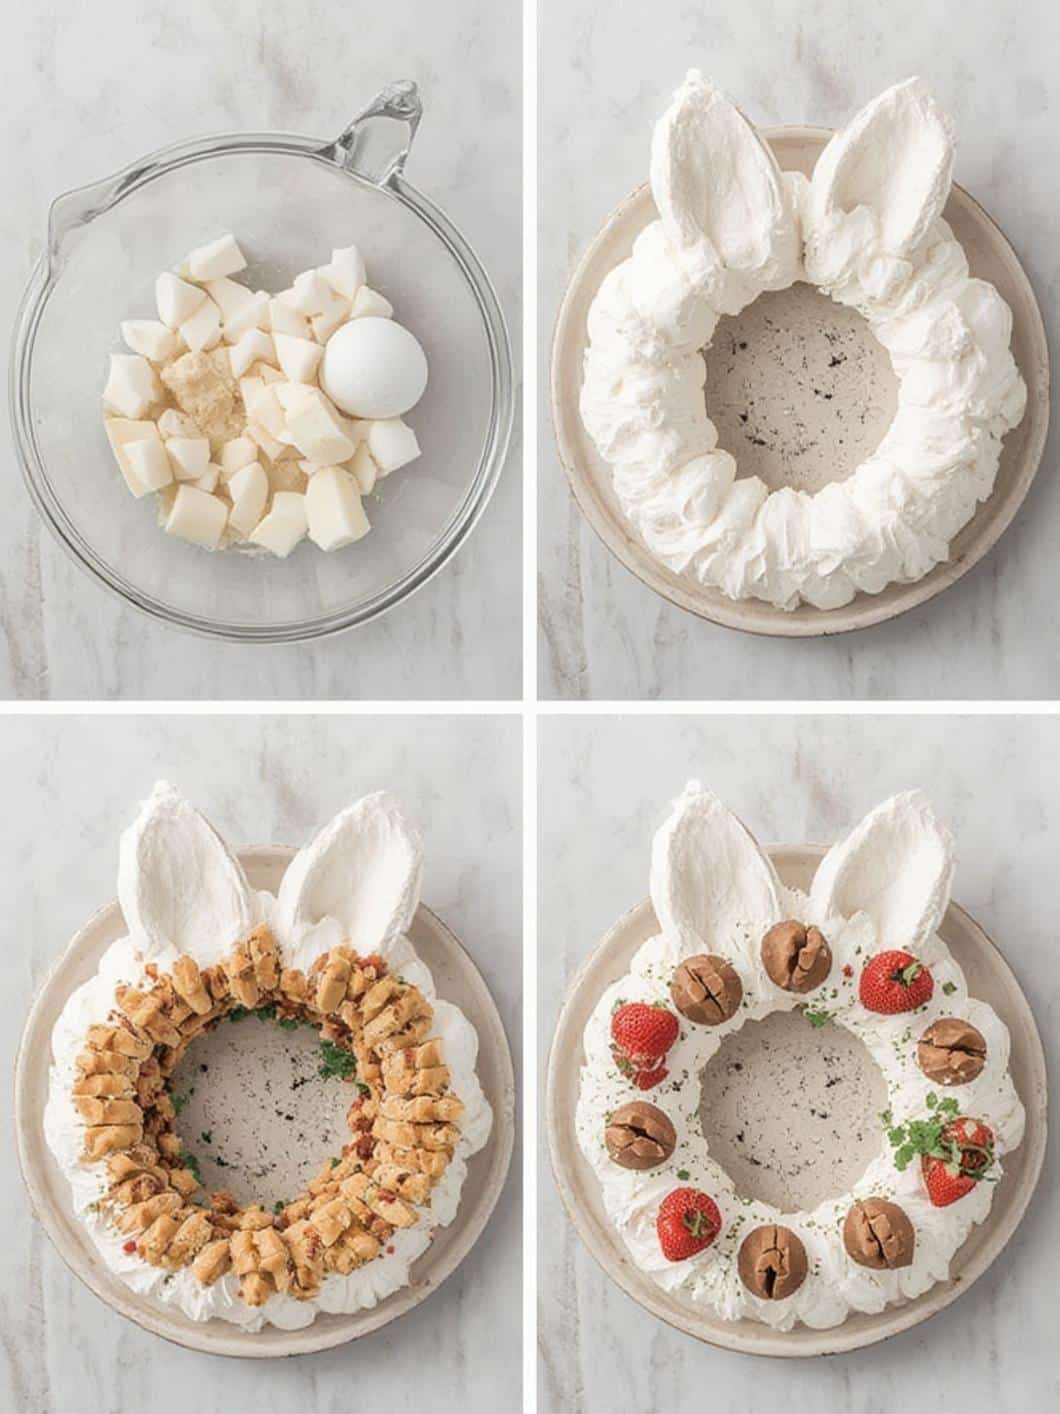
- Prepare Your Oven and Pan: Firstly, preheat your oven to 250°F (120°C). Then, take your large baking sheet and a piece of parchment paper. Using a pencil, trace a large circle (about 9 inches) and a smaller circle inside it (about 5 inches) to create a wreath template. Flip the parchment paper over so the pencil marks are on the bottom.
- Whip the Egg Whites: In the very clean bowl of your stand mixer, add the room temperature egg whites. Beat on medium-high speed until they form soft peaks. This means that when you lift the whisk, a peak will form and then gently curl over.
- Gradually Add the Sugar: With the mixer still running, begin adding the superfine sugar one tablespoon at a time. This is a crucial step; adding the sugar too quickly can deflate the egg whites. Wait about 30 seconds between each addition. Continue beating until the meringue is thick, stiff, and glossy. To check if the sugar has dissolved, rub a small amount of meringue between your fingers. It should feel smooth, not gritty.
- Fold in Stabilizers: Next, sprinkle the cornstarch, white vinegar, and vanilla extract over the surface of the meringue. Gently fold them in with a large spatula until just combined. Be careful not to overmix and knock the air out.
- Shape the Wreath: Spoon large dollops of the meringue onto your prepared parchment paper, following the wreath template you drew. Use the back of a spoon or a small spatula to create swirls and peaks, giving the wreath a rustic, beautiful texture.
- Bake and Cool: Place the baking sheet in the preheated oven and immediately reduce the temperature to 225°F (110°C). Bake for about 1 hour and 15-30 minutes. The outside should be dry and crisp to the touch. Once the baking time is up, turn the oven off completely, prop the door open with a wooden spoon, and let the pavlova cool completely inside the oven for several hours, or even overnight. This slow cooling process is key to preventing major cracks.
- Prepare the Toppings: Just before you are ready to serve, prepare the filling. In a chilled bowl, whip the heavy cream, powdered sugar, and a splash of vanilla until soft peaks form. Wash and dry your fresh berries.
- Assemble Your Masterpiece: Carefully transfer the cooled meringue wreath to a large platter or cake stand. Fill the center and top of the wreath with the sweetened whipped cream. Finally, arrange the fresh berries, mint leaves, and your bunny ears on top. Your stunning Bunny Ears Pavlova Wreath is now ready to serve!
Tips and Tricks for Meringue Success
To help ensure your pavlova turns out perfectly every time, here are a few expert tips that address common meringue-making pitfalls.
Use Room Temperature Egg Whites
Cold egg whites don’t whip as well as those at room temperature. Consequently, they won’t reach their full volume potential. To quickly bring eggs to room temperature, you can place them in a bowl of warm water for a few minutes. Healthy fats and proteins found in eggs are essential for many bodily functions, as noted by experts at the Mayo Clinic.
A Squeaky Clean Bowl is a Must
Any trace of fat or grease—whether from a previous recipe, your fingertips, or a stray drop of egg yolk—can prevent your egg whites from whipping up properly. For this reason, always use a glass, metal, or ceramic bowl, as plastic bowls can retain greasy residue. As an extra precaution, you can wipe the bowl and whisk with a little white vinegar before you start.
Don’t Rush the Sugar
As mentioned in the instructions, adding the sugar slowly and gradually is non-negotiable for a stable meringue. It allows the sugar to fully dissolve, which creates a strong structure. A weepy meringue with beads of syrup on top is often a sign that the sugar was not fully incorporated.
Assemble Just Before Serving
Pavlova is at its best when assembled right before it’s eaten. The moisture from the whipped cream and fruit will begin to soften the crisp meringue shell over time. If you need to prepare in advance, you can make the meringue base a day or two ahead and store it in an airtight container at room temperature. Then, simply add the toppings when you’re ready to serve your Bunny Ears Pavlova Wreath.
Fun Variations and Topping Ideas
While the classic berry-topped pavlova is a true delight, don’t be afraid to get creative! This dessert is a blank canvas for all sorts of delicious flavors.
Tropical Twist
For a different flavor profile, consider topping your pavlova with passion fruit pulp, sliced mango, kiwi, and toasted coconut flakes. This combination offers a sweet and tangy experience that is perfect for a spring celebration.
Chocolate and Caramel Indulgence
If you have chocolate lovers in the family, drizzle the finished wreath with melted dark or white chocolate. In addition, a swirl of salted caramel sauce would be absolutely decadent. You could also fold some cocoa powder into the whipped cream for a light chocolate filling. For another fun, festive treat, consider placing a few of these Easter Egg Oreo Balls around the wreath.
Lemon and Cream
For a bright and zesty version, swirl some lemon curd into the whipped cream before spreading it on the meringue base. Top with blueberries and lemon zest for a beautiful and refreshing dessert. The tartness of the lemon provides a wonderful contrast to the sweet pavlova.
Conclusion
The Bunny Ears Pavlova Wreath is more than just a dessert; it’s a celebration on a plate. With its crisp meringue shell, soft marshmallow center, and endless possibilities for toppings, it’s guaranteed to be a hit. This recipe proves that an elegant, showstopping dessert can be achievable for any home baker. Therefore, embrace the festive spirit and create a stunning and delicious Bunny Ears Pavlova Wreath for your next gathering. It’s a sweet, light, and beautiful way to make your Easter celebration even more memorable.
Frequently Asked Questions
Can I make the pavlova base ahead of time?
Absolutely! In fact, it’s a great way to save time on the day of your event. You can bake the meringue shell up to two days in advance. Just be sure to let it cool completely and then store it in an airtight container at room temperature. Do not refrigerate it, as the moisture will make it soft and sticky.
Why did my pavlova crack?
A few cracks are completely normal and are part of a pavlova’s rustic charm! However, large cracks or a total collapse are usually caused by a sudden change in temperature. This is why it is so important to cool the pavlova slowly in the turned-off oven. Also, avoid opening the oven door while it is baking.
What can I do with the leftover egg yolks?
Don’t throw them away! Leftover egg yolks can be used to make a variety of delicious things, such as homemade lemon curd, pastry cream, creme brûlée, or a rich hollandaise sauce. You can store them in an airtight container in the refrigerator for a couple of days.
My meringue is weeping clear syrup. What went wrong?
Weeping meringue, where beads of sugary syrup appear on the surface, is typically caused by undissolved sugar. This is why it’s so important to use superfine (caster) sugar and to add it very slowly, allowing it to dissolve completely before adding more. Always check the texture by rubbing a bit between your fingers; if it feels gritty, you need to beat it longer.