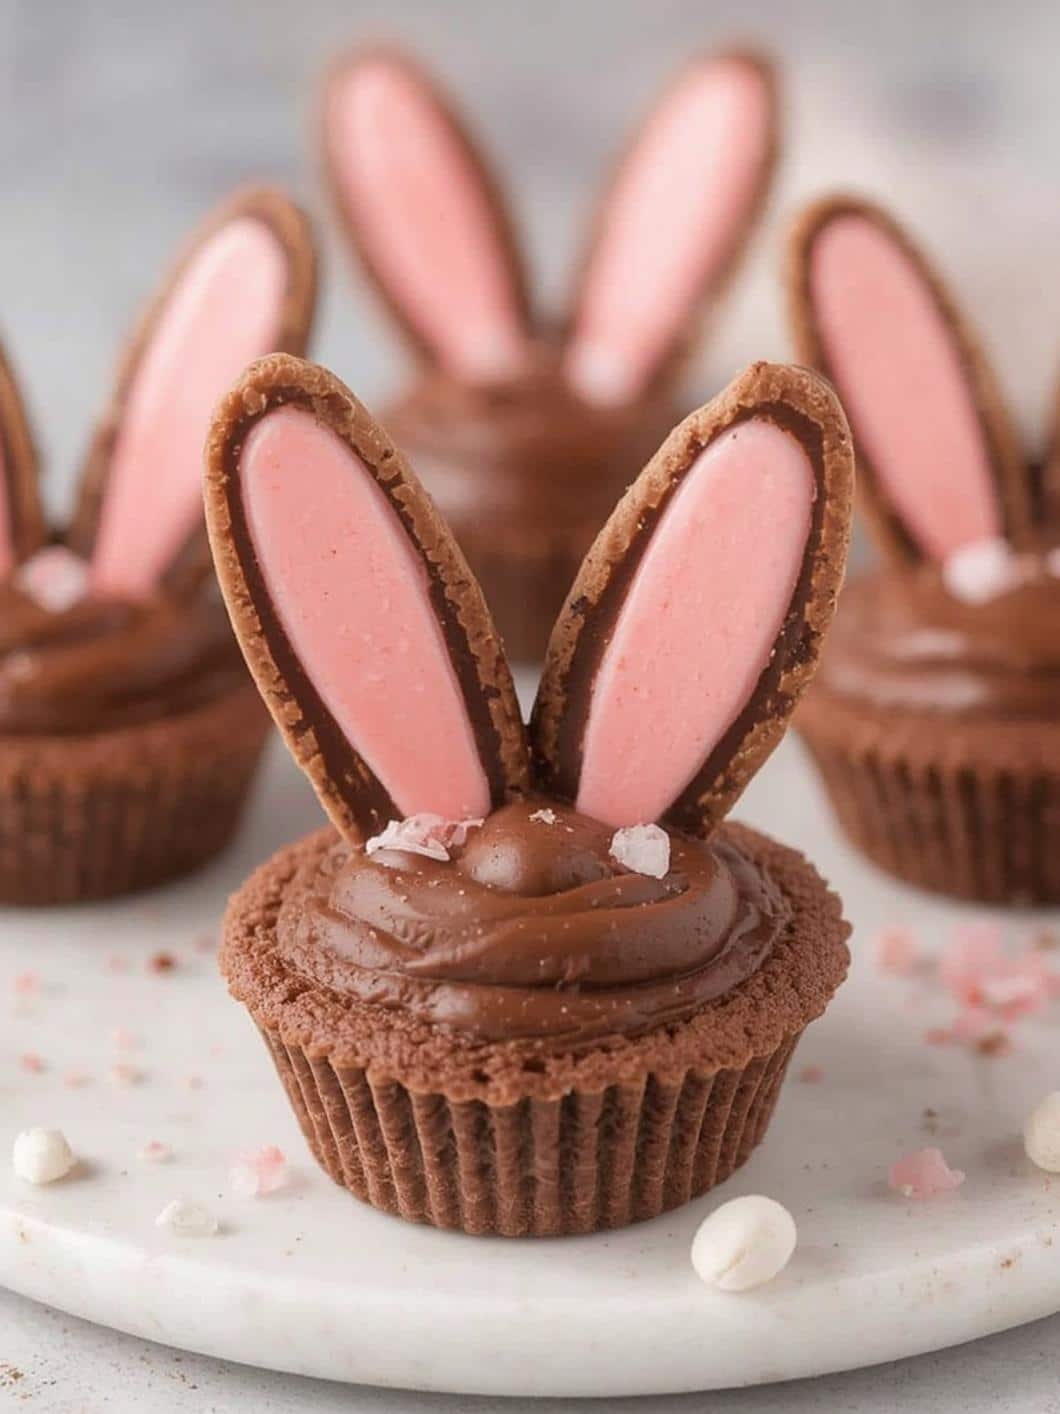
Easter is a time for celebration, family gatherings, and of course, delightful sweet treats. While classic candies are always a hit, there’s something truly special about a homemade dessert that captures the spirit of the season. Consequently, if you’re looking to create a memorable and adorable treat, these Bunny Ear Chocolate Tartlets are the perfect choice. These individual-sized desserts feature a crisp, buttery tart shell filled with a rich, silky chocolate ganache and are topped with the cutest little marshmallow bunny ears. Furthermore, this recipe is not only a feast for the eyes but also a delight for the palate, making it an ideal centerpiece for your Easter dessert table. This guide will walk you through every step, ensuring your baking adventure is both fun and successful.
Why You’ll Love This Bunny Ear Chocolate Tartlets Recipe
There are countless reasons to fall in love with these charming little tarts. First and foremost, they are incredibly festive and bring a sense of joy to any occasion. However, their appeal goes far beyond their cute appearance. These tartlets offer a sophisticated yet approachable dessert experience that bakers of all levels can appreciate.
Perfectly Adorable for Easter
Without a doubt, the main draw of these tartlets is their whimsical design. The simple marshmallow bunny ears transform a classic chocolate tart into a festive masterpiece. As a result, they are perfect for Easter brunches, family dinners, or as a special treat in a child’s Easter basket. They are guaranteed to bring smiles to everyone’s faces and become a talking point of your celebration. In addition to being cute, they are portion-controlled, making them easy to serve to a crowd.
Incredibly Delicious
Beyond their looks, these Bunny Ear Chocolate Tartlets are genuinely delicious. The recipe balances textures and flavors perfectly. You begin with a tender, shortbread-like crust that has a satisfying snap. Then, you experience the smooth, decadent chocolate ganache filling, which is rich without being overly sweet. The combination is a classic pairing that never fails to impress. The small marshmallow ears add a final touch of sweetness and a soft, chewy texture that complements the other components beautifully.
Surprisingly Simple to Make
Although they look like they came from a high-end bakery, these tartlets are surprisingly straightforward to create. The tartlet shell dough comes together quickly, and the chocolate ganache filling is a simple, two-ingredient wonder. For this reason, even beginner bakers can feel confident tackling this recipe. The process is broken down into easy-to-follow steps, ensuring a stress-free baking experience from start to finish. You can even use store-bought tartlet shells if you’re short on time.
Print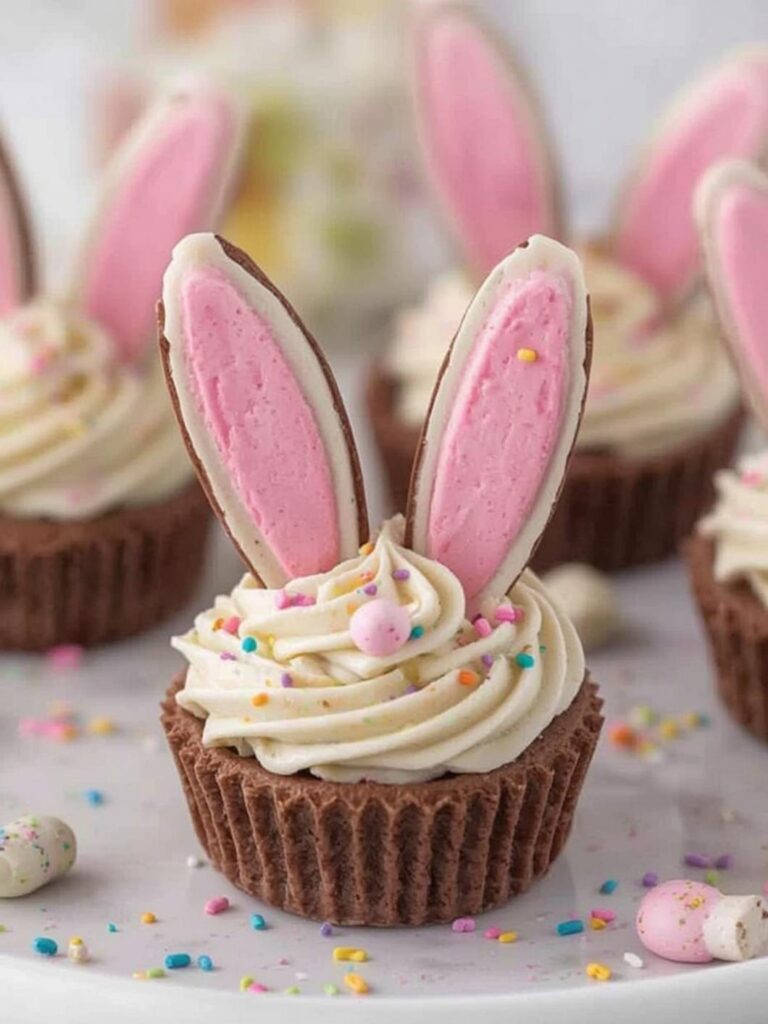
Bunny Ear Chocolate Tartlets
Individual-sized desserts featuring a crisp, buttery tart shell filled with a rich, silky chocolate ganache and topped with adorable marshmallow bunny ears. A perfect, festive treat for any Easter celebration.
- Total Time: 57 minutes
- Yield: 12 tartlets
Ingredients
For the Buttery Tartlet Shells:
All-Purpose Flour
Cold, cubed unsalted butter
Powdered sugar
1 Large egg yolk
Vanilla extract
Salt
For the Silky Chocolate Ganache Filling:
Semi-sweet chocolate chips
Heavy whipping cream
For the Adorable Bunny Ears:
Large marshmallows
Pink sanding sugar
Instructions
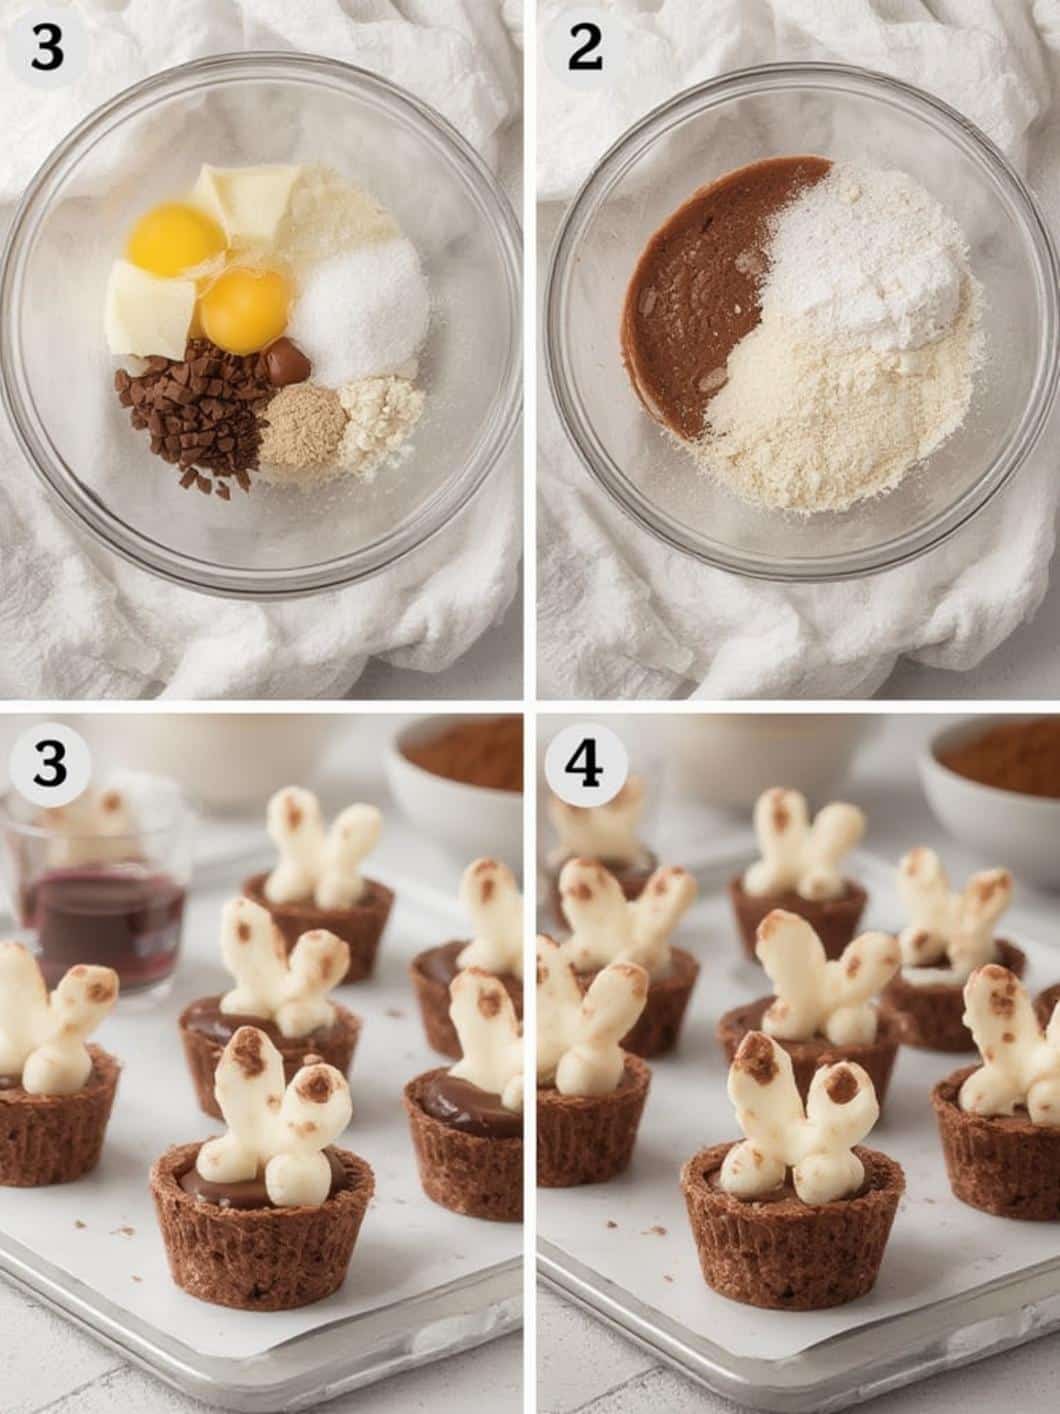
1. Combine flour, powdered sugar, and salt, then cut in cold butter until the mixture resembles coarse crumbs. Mix in a whisked egg yolk and vanilla extract until the dough just comes together, then form into a disk, wrap, and chill for at least 30 minutes.
2. Preheat oven to 375°F (190°C). Roll out the chilled dough to 1/8-inch thickness, cut circles, and press them into a mini tartlet pan. Prick the bottoms with a fork.
3. Bake the shells for 10-12 minutes until lightly golden, then let them cool completely on a wire rack.
4. To make the ganache, place chocolate chips in a heatproof bowl. Heat heavy cream until just simmering, then pour it over the chocolate. Let sit for 5 minutes before whisking until smooth and glossy.
5. Cut large marshmallows in half diagonally to create ear shapes. Press the sticky, cut side into pink sanding sugar to create the inner ear.
6. Pour the slightly cooled ganache into the cooled tartlet shells. Gently place two marshmallow bunny ears on top of each tartlet.
7. Allow the tartlets to set at room temperature for about an hour or in the refrigerator for 20-30 minutes until the ganache is firm.
Notes
The tartlet shells can be baked up to two days in advance and stored in an airtight container. The ganache can also be made a day ahead and refrigerated; gently warm it to a pourable consistency before assembling.
- Prep Time: 45 minutes
- Cook Time: 12 minutes
- Category: Dessert
- Method: Baking
- Cuisine: American
Nutrition
- Serving Size: 1 tartlet
- Calories: 320
- Sugar: 20g
- Sodium: 80mg
- Fat: 22g
- Saturated Fat: 12g
- Unsaturated Fat: 10g
- Trans Fat: 0g
- Carbohydrates: 28g
- Fiber: 2g
- Protein: 4g
- Cholesterol: 50mg
Essential Ingredients for Your Tartlets
To create the most delicious Bunny Ear Chocolate Tartlets, it’s important to start with quality ingredients. The list is relatively simple, and you may already have many of these items in your pantry. For best results, we’ve separated the ingredients by component.
For the Buttery Tartlet Shells:
- All-Purpose Flour: This provides the structure for our tender tart shells.
- Unsalted Butter: Make sure it’s cold and cubed. Cold butter is essential for creating a flaky, tender crust.
- Powdered Sugar: This dissolves easily into the dough, giving the crust a fine, delicate texture and a hint of sweetness.
- Large Egg Yolk: The yolk adds richness and helps bind the dough together.
- Vanilla Extract: A splash of vanilla enhances the buttery flavor of the crust.
- Salt: Just a pinch is needed to balance the sweetness and elevate the other flavors.
For the Silky Chocolate Ganache Filling:
- Semi-Sweet Chocolate Chips: Using good-quality chocolate is key, as it’s the star of the filling. Semi-sweet provides a nice balance, but you could also use dark chocolate for a more intense flavor. Interestingly, dark chocolate is often noted for its potential health benefits, which you can read more about at Healthline.com.
- Heavy Whipping Cream: This creates the smooth, creamy, and rich texture of the ganache. Do not substitute with milk or half-and-half, as the fat content is crucial.
For the Adorable Bunny Ears:
- Large Marshmallows: Standard-sized marshmallows are perfect for cutting into ear shapes.
- Pink Sanding Sugar: This adds a pop of color and a little sparkle to create the inner part of the bunny ears.
Step-by-Step Instructions
Now that you have your ingredients ready, it’s time to start baking. Following these steps carefully will ensure your Bunny Ear Chocolate Tartlets turn out perfectly. Therefore, take your time and enjoy the process.
Step 1: Prepare the Tartlet Shells
First, in a large bowl or a food processor, combine the flour, powdered sugar, and salt. Pulse or whisk to mix. Next, add the cold, cubed butter and cut it into the flour mixture using a pastry blender or by pulsing in the food processor. Continue until the mixture resembles coarse crumbs with pea-sized pieces of butter remaining. In a small, separate bowl, whisk together the egg yolk and vanilla extract. Then, drizzle this mixture into the flour and butter mixture. Mix gently until the dough just starts to come together. Do not overmix. Subsequently, turn the dough out onto a clean surface and gently kne फॉर्म it into a flat disk. Wrap the disk in plastic wrap and chill it in the refrigerator for at least 30 minutes.
Step 2: Bake the Shells
While the dough is chilling, preheat your oven to 375°F (190°C). Once chilled, roll the dough out on a lightly floured surface to about 1/8-inch thickness. Using a round cookie cutter slightly larger than your mini tartlet pan indentations, cut out circles of dough. Gently press each circle into the tartlet pan, ensuring it fits snugly along the bottom and up the sides. Prick the bottom of each shell a few times with a fork. This helps prevent them from puffing up during baking. Bake for 10-12 minutes, or until the edges are lightly golden. Finally, let the shells cool in the pan for a few minutes before carefully transferring them to a wire rack to cool completely.
Step 3: Create the Silky Chocolate Ganache
To make the filling, place your semi-sweet chocolate chips in a heatproof bowl. Then, in a small saucepan, heat the heavy cream over medium heat until it just begins to simmer around the edges. Be careful not to let it boil. Immediately pour the hot cream over the chocolate chips. Let the mixture sit undisturbed for about 5 minutes. This allows the hot cream to melt the chocolate gently. After 5 minutes, begin whisking from the center outwards until the ganache is completely smooth and glossy. If you’re looking for another rich, chocolatey treat, our Cosmic Brownies Recipe is another fan favorite.
Step 4: Make the Bunny Ears and Assemble
For the bunny ears, take a large marshmallow and, using clean kitchen scissors, cut it in half diagonally. This will create two triangular, ear-shaped pieces. The cut side will be sticky. Pour your pink sanding sugar onto a small plate. Gently press the sticky, cut side of each marshmallow piece into the pink sugar to create the inner ear. Now, it’s time for assembly. Pour the slightly cooled chocolate ganache evenly into each of the cooled tartlet shells. Then, gently place two marshmallow bunny ears onto the top of each tartlet, positioning them to look like a bunny peeking over the edge. Allow the tartlets to set at room temperature for about an hour, or in the refrigerator for 20-30 minutes, until the ganache is firm.
Tips and Tricks for Perfect Tartlets Every Time
A few expert tips can elevate your Bunny Ear Chocolate Tartlets from good to great. Keep these pointers in mind for flawless results.
- Keep Dough Cold: The key to a tender, flaky crust is cold butter. If your dough becomes too warm while you’re working with it, don’t hesitate to pop it back in the fridge for 10-15 minutes.
- Don’t Overfill the Shells: Fill the tartlet shells just to the brim. Overfilling can cause the ganache to spill over as it sets, creating a messy appearance.
- Use High-Quality Chocolate: Since the ganache has only two ingredients, the quality of your chocolate will significantly impact the final taste. Choose a chocolate brand you enjoy eating on its own.
- Ganache Troubleshooting: If your ganache separates or looks oily, it may have gotten too hot. You can often save it by adding a tablespoon of cool heavy cream and whisking vigorously until it comes back together.
- Make-Ahead Plan: You can bake the tartlet shells up to two days in advance. Simply store them in an airtight container at room temperature. The ganache can also be made a day ahead and stored in the fridge. When ready to assemble, you may need to gently warm it to a pourable consistency.
Variations and Customizations
While this classic recipe for Bunny Ear Chocolate Tartlets is wonderful as is, there are many ways to customize it to your liking. Feel free to get creative!
- Salted Caramel Filling: For a delightful twist, add a thin layer of salted caramel at the bottom of each tart shell before pouring in the chocolate ganache.
- White Chocolate Version: Swap the semi-sweet chocolate for white chocolate to create a creamy, vanilla-flavored filling. You can use pastel-colored sanding sugar for a different look.
- Add a Little Crunch: For extra texture, sprinkle some chopped nuts, toffee bits, or mini chocolate chips on top of the ganache before it sets.
- More Easter Fun: If you’re looking for other easy and festive Easter desserts, you might also enjoy making these adorable Easter Egg Oreo Balls. They are a no-bake treat that kids and adults love.
- Flavor Infusions: You can infuse the heavy cream for the ganache with other flavors. For instance, steep a mint tea bag or some orange zest in the cream as it heats, then strain it before pouring over the chocolate. Just remember to be mindful of added sugars if you are watching your intake, as recommended by health experts at the Mayo Clinic.
Conclusion
In conclusion, creating these delightful Bunny Ear Chocolate Tartlets is a fantastic way to add a personal and creative touch to your Easter celebrations. This recipe successfully combines a buttery, crisp shell with a luxuriously smooth chocolate filling, resulting in a dessert that is as delicious as it is charming. Not only are they a beautiful addition to any dessert spread, but they are also a fun project for the whole family to enjoy making together. Consequently, with our detailed instructions and helpful tips, you are now fully equipped to bake these show-stopping treats with confidence. So, gather your ingredients and get ready to hop into the Easter spirit with these irresistible tartlets.
Frequently Asked Questions (FAQ)
Can I use a pre-made tart crust?
Absolutely! To save time, you can use pre-made mini tartlet shells from the grocery store. Simply prepare the chocolate ganache filling and assemble the Bunny Ear Chocolate Tartlets according to the recipe instructions. This is a great shortcut for busy holiday schedules.
How should I store these tartlets?
These tartlets are best stored in an airtight container in the refrigerator. They will stay fresh for up to 3 days. However, the tartlet shells may soften slightly over time. For the best texture, they are ideally served on the day they are made or the day after.
My ganache seems too runny. How can I fix it?
If your ganache is too runny after setting, it likely means the ratio of cream to chocolate was a bit too high. You can thicken it by gently reheating the ganache and whisking in more chocolate chips, a little at a time, until it reaches the desired consistency. Conversely, if it’s too stiff, you can whisk in a small amount of warm cream to loosen it up.
What kind of chocolate is best for this recipe?
For the best flavor and texture, we recommend using a high-quality semi-sweet or dark chocolate with a cacao percentage between 55% and 70%. Chocolate chips work well for convenience, but you can also use finely chopped chocolate bars, which often melt more smoothly.